איסוף ורישום נתוני תמונה היא אחת המשימות עתירות המשאבים ביותר בכל פרויקט ראייה ממוחשבת. זה יכול לקחת חודשים בכל פעם כדי לאסוף, לנתח ולהתנסות במלואו עם זרמי תמונות ברמה שאתה צריך כדי להתחרות בשוק הנוכחי. גם לאחר שאספת נתונים בהצלחה, עדיין יש לך זרם קבוע של שגיאות הערות, תמונות ממוסגרות בצורה גרועה, כמויות קטנות של נתונים משמעותיים בים של לכידות לא רצויות ועוד. צווארי הבקבוק העיקריים הללו הם הסיבה לכך שיצירת נתונים סינתטיים צריכה להיות בערכת הכלים של כל מהנדס מודרני. על ידי יצירת ייצוגים תלת מימדיים של האובייקטים שאנו רוצים ליצור מודל, נוכל במהירות אבטיפוס לאלגוריתמים תוך איסוף נתונים חיים במקביל.
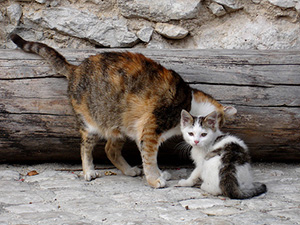
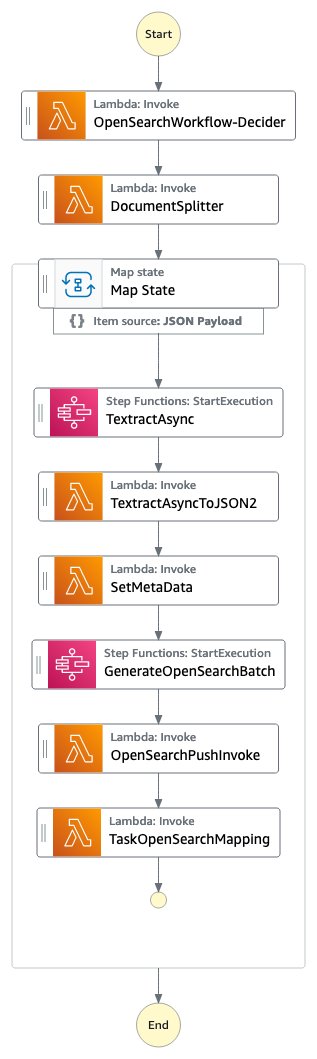
בפוסט זה, אני מנחה אותך דרך דוגמה לשימוש בספריית האנימציה בקוד פתוח בלנדר לבניית צינור נתונים סינתטיים מקצה לקצה, תוך שימוש ב-Chicken Nuggets כדוגמה. התמונה הבאה היא המחשה של הנתונים שנוצרו בפוסט זה בבלוג.
מה זה בלנדר?
מַמחֶה היא תוכנת גרפיקה תלת מימדית בקוד פתוח המשמשת בעיקר באנימציה, הדפסת תלת מימד ומציאות מדומה. יש לו חבילת חבלול, אנימציה וסימולציה מקיפה ביותר המאפשרת יצירת עולמות תלת מימדיים עבור כמעט כל מקרה שימוש בראייה ממוחשבת. יש לו גם קהילת תמיכה פעילה ביותר שבה רוב, אם לא כל, שגיאות המשתמש נפתרות.
הגדר את הסביבה המקומית שלך
אנו מתקינים שתי גרסאות של בלנדר: אחת על מחשב מקומי עם גישה ל-GUI, והשנייה על ענן מחשוב אלסטי של אמזון (Amazon EC2) מופע P2.
התקן בלנדר ו-ZPY
התקן את הבלנדר מה- אתר בלנדר.
לאחר מכן השלם את השלבים הבאים:
- הפעל את הפקודות הבאות:
wget https://mirrors.ocf.berkeley.edu/blender/release/Blender3.2/blender-3.2.0-linux-x64.tar.xz
sudo tar -Jxf blender-3.2.0-linux-x64.tar.xz --strip-components=1 -C /bin
rm -rf blender*

/bin/3.2/python/bin/python3.10 -m ensurepip
/bin/3.2/python/bin/python3.10 -m pip install --upgrade pip
- העתק את כותרות Python הדרושות לגרסת הבלנדר של Python כדי שתוכל להשתמש בספריות אחרות שאינן בלנדר:
wget https://www.python.org/ftp/python/3.10.2/Python-3.10.2.tgz
tar -xzf Python-3.10.2.tgz
sudo cp Python-3.10.2/Include/* /bin/3.2/python/include/python3.10
- תעקוף את גרסת הבלנדר שלך וכפה התקנות כך שה-Python המסופק בבלנדר יעבוד:
/bin/3.2/python/bin/python3.10 -m pip install pybind11 pythran Cython numpy==1.22.1
sudo /bin/3.2/python/bin/python3.10 -m pip install -U Pillow --force
sudo /bin/3.2/python/bin/python3.10 -m pip install -U scipy --force
sudo /bin/3.2/python/bin/python3.10 -m pip install -U shapely --force
sudo /bin/3.2/python/bin/python3.10 -m pip install -U scikit-image --force
sudo /bin/3.2/python/bin/python3.10 -m pip install -U gin-config --force
sudo /bin/3.2/python/bin/python3.10 -m pip install -U versioneer --force
sudo /bin/3.2/python/bin/python3.10 -m pip install -U shapely --force
sudo /bin/3.2/python/bin/python3.10 -m pip install -U ptvsd --force
sudo /bin/3.2/python/bin/python3.10 -m pip install -U ptvseabornsd --force
sudo /bin/3.2/python/bin/python3.10 -m pip install -U zmq --force
sudo /bin/3.2/python/bin/python3.10 -m pip install -U pyyaml --force
sudo /bin/3.2/python/bin/python3.10 -m pip install -U requests --force
sudo /bin/3.2/python/bin/python3.10 -m pip install -U click --force
sudo /bin/3.2/python/bin/python3.10 -m pip install -U table-logger --force
sudo /bin/3.2/python/bin/python3.10 -m pip install -U tqdm --force
sudo /bin/3.2/python/bin/python3.10 -m pip install -U pydash --force
sudo /bin/3.2/python/bin/python3.10 -m pip install -U matplotlib --force
- הורדה
zpy והתקן מהמקור:
git clone https://github.com/ZumoLabs/zpy
cd zpy
vi requirements.txt
- שנה את גרסת NumPy ל
>=1.19.4 ו scikit-image>=0.18.1 כדי לבצע את ההתקנה 3.10.2 אפשרי וכדי שלא תקבל שום כתיבה:
numpy>=1.19.4
gin-config>=0.3.0
versioneer
scikit-image>=0.18.1
shapely>=1.7.1
ptvsd>=4.3.2
seaborn>=0.11.0
zmq
pyyaml
requests
click
table-logger>=0.3.6
tqdm
pydash
- כדי להבטיח תאימות עם Blender 3.2, היכנס
zpy/render.py והעיר את שתי השורות הבאות (למידע נוסף, עיין כשל בבלנדר 3.0 מס' 54):
#scene.render.tile_x = tile_size
#scene.render.tile_y = tile_size
- לאחר מכן, התקן את
zpy הספריה:
/bin/3.2/python/bin/python3.10 setup.py install --user
/bin/3.2/python/bin/python3.10 -c "import zpy; print(zpy.__version__)"
- הורד את גרסת התוספות של
zpy מ GitHub ריפו כך שתוכל להפעיל את המופע שלך באופן פעיל:
cd ~
curl -O -L -C - "https://github.com/ZumoLabs/zpy/releases/download/v1.4.1rc9/zpy_addon-v1.4.1rc9.zip"
sudo unzip zpy_addon-v1.4.1rc9.zip -d /bin/3.2/scripts/addons/
mkdir .config/blender/
mkdir .config/blender/3.2
mkdir .config/blender/3.2/scripts
mkdir .config/blender/3.2/scripts/addons/
mkdir .config/blender/3.2/scripts/addons/zpy_addon/
sudo cp -r zpy/zpy_addon/* .config/blender/3.2/scripts/addons/zpy_addon/
- שמור קובץ בשם
enable_zpy_addon.py בך /home ספרייה והפעל את פקודת ההפעלה, מכיוון שאין לך ממשק משתמש כדי להפעיל אותה:
import bpy, os
p = os.path.abspath('zpy_addon-v1.4.1rc9.zip')
bpy.ops.preferences.addon_install(overwrite=True, filepath=p)
bpy.ops.preferences.addon_enable(module='zpy_addon')
bpy.ops.wm.save_userpref()

sudo blender -b -y --python enable_zpy_addon.py
If zpy-addon לא מתקין (מכל סיבה שהיא), אתה יכול להתקין אותו דרך ה-GUI.
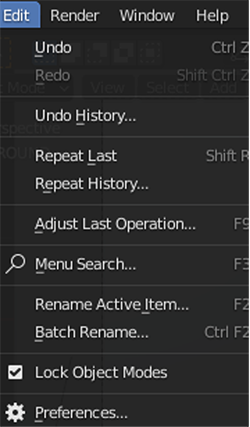
- בבלנדר, על ערוך בתפריט, בחר העדפות.
- בחרו רחבות בחלונית הניווט והפעל
zpy.

אתה אמור לראות דף פתוח ב-GUI, ותוכל לבחור ZPY. זה יאשר שהבלנדר נטען.

AliceVision ו-Meshroom
התקן את AliceVision ו- Meshrooom ממאגר GitHub בהתאמה:
FFmpeg
המערכת שלך צריכה להיות ffmpeg, אבל אם לא, תצטרך להורדה זה.
רשתות מיידיות
אתה יכול להרכיב את הספרייה בעצמך או להוריד את הקבצים הבינאריים הזמינים מראש (וזה מה שעשיתי) עבור רשתות מיידיות.
הגדר את סביבת ה-AWS שלך
כעת הגדרנו את סביבת AWS על מופע EC2. אנו חוזרים על השלבים מהסעיף הקודם, אבל רק עבור בלנדר ו zpy.
- בקונסולת אמזון EC2, בחר הפעל מקרים.
- בחר את AMI שלך. יש כמה אפשרויות מכאן. אנחנו יכולים לבחור תמונה רגילה של אובונטו, לבחור מופע GPU ואז להתקין ידנית את הדרייברים ולהגדיר הכל, או שנוכל לקחת את המסלול הקל ולהתחיל עם Deep Learning AMI מוגדר מראש ולדאוג רק להתקנת Blender. פוסט, אני משתמש באפשרות השנייה, ובוחר בגרסה העדכנית ביותר של Deep Learning AMI עבור אובונטו (גרסת Deep Learning AMI (אובונטו 18.04). 61.0).
- בעד סוג מופעבחר p2.xlarge.
- אם אין לך זוג מפתחות, צור אחד חדש או בחר קיים.
- עבור פוסט זה, השתמש בהגדרות ברירת המחדל עבור רשת ואחסון.
- בחרו הפעל מקרים.
- בחרו לְחַבֵּר ומצא את ההוראות לכניסה למופע שלנו מ-SSH ב- לקוח SSH TAB.
- התחבר עם SSH:
ssh -i "your-pem" ubuntu@IPADDRESS.YOUR-REGION.compute.amazonaws.com
לאחר שהתחברת למופע שלך, בצע את אותם שלבי ההתקנה מהסעיף הקודם כדי להתקין את Blender ו zpy.
איסוף נתונים: סריקת תלת ממדית שלנו
לשלב זה, אני משתמש באייפון כדי להקליט סרטון וידאו של 360 מעלות בקצב איטי למדי סביב הגוש שלי. הדבקתי גוש עוף על קיסם והדבקתי את הקיסם על השיש שלי, ופשוט סובבתי את המצלמה שלי סביב הגוש כדי לקבל כמה שיותר זוויות. ככל שאתה מצלם מהר יותר, כך קטן הסיכוי שתקבל תמונות טובות לעבוד איתן בהתאם למהירות הצמצם.
לאחר שסיימתי לצלם, שלחתי את הסרטון למייל שלי וחילצתי את הסרטון לכונן מקומי. משם, השתמשתי ffmepg כדי לחתוך את הסרטון לפריימים כדי להקל בהרבה על הטמעת Meshroom:
mkdir nugget_images
ffmpeg -i VIDEO.mov ffmpeg nugget_images/nugget_%06d.jpg
פתח את Meshroom והשתמש ב-GUI כדי לגרור את nugget_images תיקייה לחלונית משמאל. משם, בחר הַתחָלָה והמתן כמה שעות (או פחות) בהתאם לאורך הסרטון ואם יש לך מכונה התומכת ב-CUDA.

אתה אמור לראות משהו כמו צילום המסך הבא כשהוא כמעט שלם.

איסוף נתונים: מניפולציה של בלנדר
לאחר השלמת השחזור של Meshroom, השלם את השלבים הבאים:
- פתח את ה-Blender GUI ועל ה- שלח בתפריט, בחר תבואו, ואז לבחור Wavefront (.jj) לקובץ המרקם שנוצר מ-Meshroom.
יש לשמור את הקובץ ב path/to/MeshroomCache/Texturing/uuid-string/texturedMesh.obj.
- טען את הקובץ וצפה במפלצתיות שהיא האובייקט התלת-ממדי שלך.

כאן זה נהיה קצת מסובך.
- גלול אל הצד הימני העליון ובחר את מסגרת חוט סמל ב - הצללת נקודת מבט.
- בחר את האובייקט שלך בשדה התצוגה הימני וודא שהוא מודגש, גלול אל יציאת התצוגה הראשית של הפריסה ולחץ על Tab או לבחור ידנית מצב עריכה.

- לאחר מכן, תמרן את נקודת התצוגה בצורה כזו שתאפשר לעצמך להיות מסוגל לראות את האובייקט שלך עם כמה שפחות מאחוריו. תצטרך לעשות זאת כמה פעמים כדי באמת לקבל את זה נכון.
- לחץ וגרור תיבה תוחמת מעל האובייקט כך שרק הגוש יודגש.
- לאחר שהוא מודגש כמו בצילום המסך הבא, אנו מפרידים את הגוש שלנו מהמסה התלת-ממדית על ידי לחיצה שמאלית, בחירה נפרד, ולאחר מכן בחירה.

כעת אנו עוברים ימינה, שם אנו אמורים לראות שני אובייקטים בעלי מרקם: texturedMesh ו texturedMesh.001.
- החפץ החדש שלנו צריך להיות
texturedMesh.001, אז אנחנו בוחרים texturedMesh ולבחור מחק כדי להסיר את המסה הלא רצויה.

- בחר את האובייקט (
texturedMesh.001) בצד ימין, עבור אל הצופה שלנו, ובחר את האובייקט, הגדר מקור, ו מקור למרכז המיסה.

כעת, אם נרצה, נוכל להזיז את האובייקט שלנו למרכז התצוגה (או פשוט להשאיר אותו היכן שהוא נמצא) ולראות אותו במלוא הדרו. שימו לב לחור השחור הגדול שממנו לא ממש קיבלנו סיקור טוב של הסרט! נצטרך לתקן את זה.

כדי לנקות את האובייקט שלנו מכל זיהומי פיקסלים, אנו מייצאים את האובייקט שלנו לקובץ .obj. הקפד לבחור מבחר בלבד בעת ייצוא.

איסוף נתונים: נקה עם רשתות מיידיות
עכשיו יש לנו שתי בעיות: לתמונה שלנו יש פער פיקסלים שנוצר כתוצאה מהצילום הגרוע שלנו שאנחנו צריכים לנקות, והתמונה שלנו צפופה להפליא (מה שיגרום ליצירת תמונות זמן רב ביותר). כדי להתמודד עם שתי הבעיות, עלינו להשתמש בתוכנה הנקראת Instant Meshes כדי להרחיב את משטח הפיקסלים שלנו כדי לכסות את החור השחור וגם כדי לכווץ את האובייקט הכולל לגודל קטן יותר, פחות צפוף.
- פתח את ה-Instant Meshes וטען שלנו שנשמר לאחרונה
nugget.obj קובץ.

- תַחַת שדה התמצאות, בחר לפתור.

- תַחַת שדה מיקום, בחר לפתור.
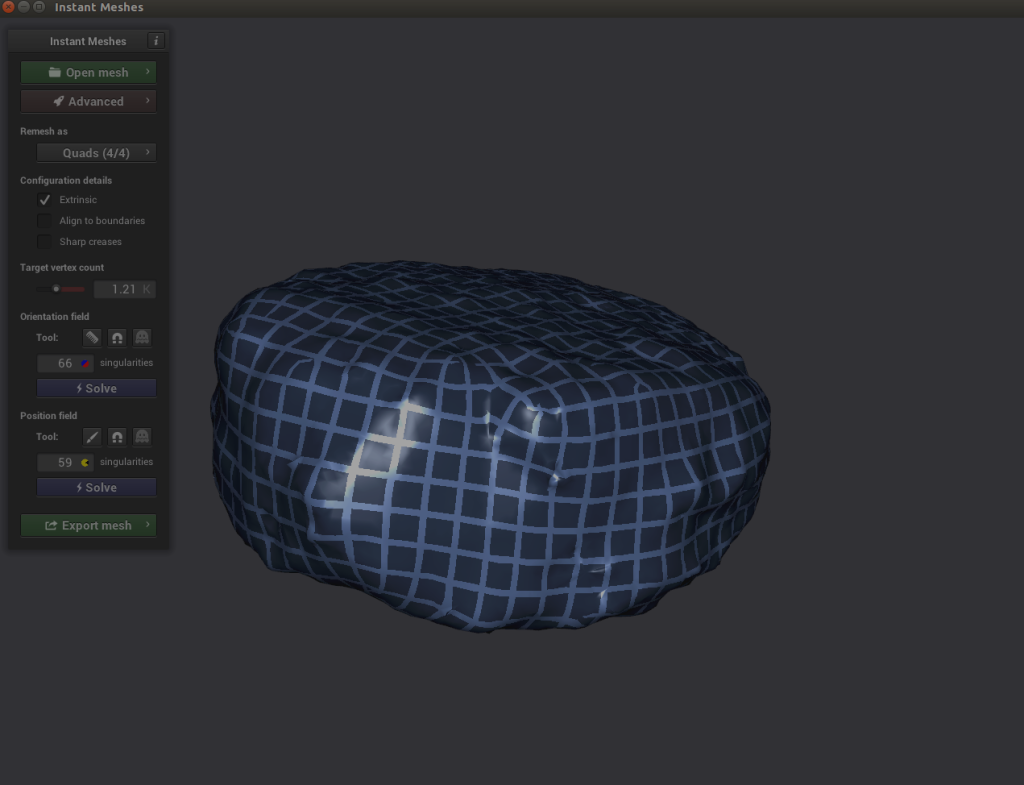 כאן זה נהיה מעניין. אם אתה חוקר את האובייקט שלך ומבחין שהקווים הצולבים של פותר המיקום נראים מפורקים, תוכל לבחור בסמל המסרק תחת שדה התמצאות ולשרטט מחדש את הקווים כמו שצריך.
- בחרו לפתור לשניהם שדה התמצאות ו שדה מיקום.

- אם הכל נראה טוב, ייצא את הרשת, שם לה משהו כמו
nugget_refined.obj, ושמור אותו בדיסק.
איסוף נתונים: מנערים ואופים!
מכיוון שלרשת הפולי הנמוכה שלנו אין שום טקסטורת תמונה הקשורה אליה ולרשת הפולי הגבוהה שלנו יש, אנחנו צריכים לאפות את מרקם הפולי הגבוה על רשת הפולי הנמוכה, או ליצור מרקם חדש ולהקצות אותו האובייקט שלנו. למען הפשטות, אנחנו הולכים ליצור מרקם תמונה מאפס וליישם אותו על הגוש שלנו.
השתמשתי בחיפוש תמונות בגוגל עבור נאגטס ודברים מטוגנים אחרים כדי לקבל תמונה ברזולוציה גבוהה של פני השטח של חפץ מטוגן. מצאתי תמונה ברזולוציה סופר גבוהה של גבינה מטוגנת והכנתי תמונה חדשה מלאה במרקם המטוגן.

עם תמונה זו, אני מוכן להשלים את השלבים הבאים:
- פתח את הבלנדר וטען את החדש
nugget_refined.obj באותו אופן שטענת את האובייקט הראשוני שלך: על שלח בתפריט, בחר תבואו, Wavefront (.jj), ובחר את nugget_refined.obj קובץ.
- לאחר מכן עבור אל ה- הצללה TAB.
בתחתית אתה אמור לשים לב לשתי תיבות עם הכותרות BDSF עקרוני ו פלט חומר.
- על להוסיף בתפריט, בחר מִרקָם ו מרקם תמונה.
An מרקם תמונה תיבה אמורה להופיע.
- בחרו פתח תמונה וטען את תמונת המרקם המטוגן שלך.
- גרור בין העכבר צֶבַע ב מרקם תמונה קופסא צבע בסיסי ב BDSF עקרוני קוּפסָה.

עכשיו הגוש שלך אמור להיות מוכן!
איסוף נתונים: צור משתני סביבת בלנדר
כעת, כשיש לנו את אובייקט ה-Nugget הבסיסי שלנו, עלינו ליצור כמה אוספים ומשתני סביבה שיעזרו לנו בתהליך שלנו.
- לחץ לחיצה ימנית על אזור סצינת היד ובחר אוסף חדש.
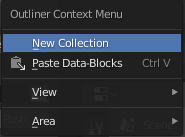
- צור את האוספים הבאים: רקע, גוּשׁ זָהָב גָלמִי, ו הוליד.

- גרור את הגוש אל גוּשׁ זָהָב גָלמִי אוסף ושנה את שמו nugget_base.
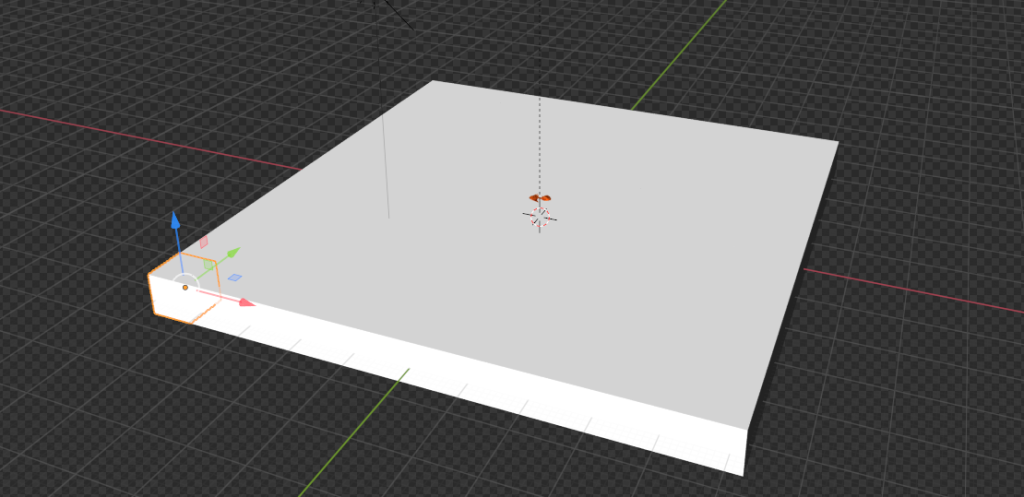
איסוף נתונים: צור מטוס
אנחנו הולכים ליצור אובייקט רקע שממנו יופקו הנאגטס שלנו כשאנחנו מעבדים תמונות. במקרה של שימוש בעולם האמיתי, המטוס הזה הוא המקום שבו מניחים את הנאגטס שלנו, כמו מגש או פח.
- על להוסיף בתפריט, בחר רֶשֶׁת ולאחר מכן מטוס.
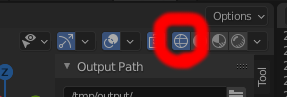
מכאן, אנו עוברים לצד ימין של הדף ומוצאים את התיבה הכתומה (מאפייני אובייקט).
- ב לשנות חלונית, עבור XYZ אוילר, הגדר X אל 46.968, Y עד 46.968, ו Z אל 1.0.
- לשניהם מקום ו רוטציה, הגדר X, Y, ו Z אל 0.

איסוף נתונים: הגדר את המצלמה והציר
לאחר מכן, אנו הולכים להגדיר את המצלמות שלנו בצורה נכונה כדי שנוכל ליצור תמונות.
- על להוסיף בתפריט, בחר ריק ו ציר רגיל.
- תן שם לאובייקט ציר ראשי.

- ודא שהציר שלנו הוא 0 עבור כל המשתנים (כך שהוא נמצא ישירות במרכז).

- אם כבר יצרת מצלמה, גרור את המצלמה אל מתחת לציר הראשי.
- בחרו פריט ו לשנות.
- בעד מקום, הגדר X אל 0, Y עד 0, ו Z אל 100.

איסוף נתונים: הנה באה השמש
לאחר מכן, נוסיף אובייקט Sun.
- על להוסיף בתפריט, בחר אור ו שמש.
המיקום של האובייקט הזה לא בהכרח משנה כל עוד הוא מרוכז איפשהו מעל האובייקט המישורי שקבענו.
- בחר את סמל הנורה הירוקה בחלונית השמאלית התחתונה (מאפייני נתוני אובייקט) והגדר את העוצמה ל-5.0.
- חזור על אותו הליך כדי להוסיף א אור חפץ והניח אותו במקום אקראי מעל המטוס.

איסוף נתונים: הורד רקעים אקראיים
כדי להחדיר אקראיות לתמונות שלנו, אנו מורידים מהן כמה שיותר מרקמים אקראיים texture.ninja כפי שאנו יכולים (לדוגמה, לבנים). הורד לתיקיה בתוך סביבת העבודה שלך בשם random_textures. הורדתי בערך 50.

צור תמונות
עכשיו אנחנו מגיעים לדברים המהנים: יצירת תמונות.
צינור יצירת תמונות: Object3D ו-DensityController
נתחיל עם כמה הגדרות קוד:
class Object3D:
	'''
	object container to store mesh information about the
	given object

	Returns
	the Object3D object
	'''
	def __init__(self, object: Union[bpy.types.Object, str]):
		"""Creates a Object3D object.

		Args:
		obj (Union[bpy.types.Object, str]): Scene object (or it's name)
		"""
		self.object = object
		self.obj_poly = None
		self.mat = None
		self.vert = None
		self.poly = None
		self.bvht = None
		self.calc_mat()
		self.calc_world_vert()
		self.calc_poly()
		self.calc_bvht()

	def calc_mat(self) -> None:
		"""store an instance of the object's matrix_world"""
		self.mat = self.object.matrix_world

	def calc_world_vert(self) -> None:
		"""calculate the verticies from object's matrix_world perspective"""
		self.vert = [self.mat @ v.co for v in self.object.data.vertices]
		self.obj_poly = np.array(self.vert)

	def calc_poly(self) -> None:
		"""store an instance of the object's polygons"""
		self.poly = [p.vertices for p in self.object.data.polygons]

	def calc_bvht(self) -> None:
		"""create a BVHTree from the object's polygon"""
		self.bvht = BVHTree.FromPolygons( self.vert, self.poly )

	def regenerate(self) -> None:
		"""reinstantiate the object's variables;
		used when the object is manipulated after it's creation"""
		self.calc_mat()
		self.calc_world_vert()
		self.calc_poly()
		self.calc_bvht()

	def __repr__(self):
		return "Object3D: " + self.object.__repr__()
ראשית, אנו מגדירים מחלקה בסיסית של מיכל עם כמה מאפיינים חשובים. מחלקה זו קיימת בעיקר כדי לאפשר לנו ליצור עץ BVH (דרך לייצג את אובייקט הגוש שלנו בחלל תלת מימד), שבו נצטרך להשתמש ב- BVHTree.overlap שיטה כדי לראות אם שני אובייקטים נאגטים שנוצרו באופן עצמאי חופפים במרחב התלת-ממדי שלנו. עוד על כך בהמשך.
פיסת הקוד השנייה היא בקר הצפיפות שלנו. זה משמש כדרך לכבול את עצמנו לכללי המציאות ולא לעולם התלת מימד. לדוגמה, בעולם הבלנדר התלת מימדי, אובייקטים בבלנדר יכולים להתקיים זה בתוך זה; עם זאת, אלא אם כן מישהו מבצע מדע מוזר על הנאגטס העוף שלנו, אנחנו רוצים לוודא שאין שני נאגטס חופפים במידה שהופכת אותו לא מציאותי מבחינה ויזואלית.
אנו משתמשים שלנו Plane אובייקט להוליד קבוצה של קוביות בלתי נראות מוגבלות שניתן לבצע שאילתות בכל זמן נתון כדי לראות אם המקום תפוס או לא.

ראה את הקוד הבא:
class DensityController:
    """Container that controlls the spacial relationship between 3D objects

    Returns:
        DensityController: The DensityController object.
    """
    def __init__(self):
        self.bvhtrees = None
        self.overlaps = None
        self.occupied = None
        self.unoccupied = None
        self.objects3d = []

    def auto_generate_kdtree_cubes(
        self,
        num_objects: int = 100, # max size of nuggets
    ) -> None:
        """
        function to generate physical kdtree cubes given a plane of -resize- size
        this allows us to access each cube's overlap/occupancy status at any given
        time

        creates a KDTree collection, a cube, a set of individual cubes, and the
        BVHTree object for each individual cube

        Args:
            resize (Tuple[float]): the size of a cube to create XYZ.
            cuts (int): how many cuts are made to the cube face
                12 cuts == 13 Rows x 13 Columns
        """
בקטע הבא, אנו בוחרים את הגוש ויוצרים קובייה תוחמת סביב הגוש הזה. קובייה זו מייצגת את הגודל של פסאודו-ווקס בודד של אובייקט ה-pseudo-kdtree שלנו. אנחנו צריכים להשתמש ב bpy.context.view_layer.update() פונקציה מכיוון שכאשר קוד זה מופעל מתוך פונקציה או סקריפט לעומת blender-gui, נראה שה- view_layer לא מתעדכן אוטומטית.
        # read the nugget,
        # see how large the cube needs to be to encompass a single nugget
        # then touch a parameter to allow it to be smaller or larger (eg more touching)
        bpy.context.view_layer.objects.active = bpy.context.scene.objects.get('nugget_base')
        bpy.ops.object.origin_set(type='ORIGIN_GEOMETRY', center='BOUNDS')
        #create a cube for the bounding box
        bpy.ops.mesh.primitive_cube_add(location=Vector((0,0,0)))
        #our new cube is now the active object, so we can keep track of it in a variable:
        bound_box = bpy.context.active_object
        bound_box.name = 'CUBE1'
        bpy.context.view_layer.update()
        #copy transforms
        nug_dims = bpy.data.objects["nugget_base"].dimensions
        bpy.data.objects["CUBE1"].dimensions = nug_dims
        bpy.context.view_layer.update()
        bpy.data.objects["CUBE1"].location = bpy.data.objects["nugget_base"].location
        bpy.context.view_layer.update()
        bpy.data.objects["CUBE1"].rotation_euler = bpy.data.objects["nugget_base"].rotation_euler
        bpy.context.view_layer.update()
        print("bound_box.dimensions: ", bound_box.dimensions)
        print("bound_box.location:", bound_box.location)
לאחר מכן, אנו מעדכנים מעט את אובייקט הקובייה שלנו כך שאורכו ורוחבו יהיו מרובעים, בניגוד לגודל הטבעי של הגוש שממנו הוא נוצר:
        # this cube created isn't always square, but we're going to make it square
        # to fit into our
        x, y, z = bound_box.dimensions
        v = max(x, y)
        if np.round(v) < v:
            v = np.round(v)+1
        bb_x, bb_y = v, v
        bound_box.dimensions = Vector((v, v, z))
        bpy.context.view_layer.update()
        print("bound_box.dimensions updated: ", bound_box.dimensions)
        # now we generate a plane
        # calc the size of the plane given a max number of boxes.
כעת אנו משתמשים באובייקט הקובייה המעודכן שלנו כדי ליצור מישור שיכול להחזיק באופן נפחי num_objects כמות נאגטס:
        x, y, z = bound_box.dimensions
        bb_loc = bound_box.location
        bb_rot_eu = bound_box.rotation_euler
        min_area = (x*y)*num_objects
        min_length = min_area / num_objects
        print(min_length)
        # now we generate a plane
        # calc the size of the plane given a max number of boxes.
        bpy.ops.mesh.primitive_plane_add(location=Vector((0,0,0)), size = min_length)
        plane = bpy.context.selected_objects[0]
        plane.name = 'PLANE'
        # move our plane to our background collection
        # current_collection = plane.users_collection
        link_object('PLANE', 'BACKGROUND')
        bpy.context.view_layer.update()
אנחנו לוקחים את חפץ המטוס שלנו ויוצרים קוביית ענק באותו אורך ורוחב כמו המטוס שלנו, עם גובה קוביית הנאגט שלנו, CUBE 1:
        # New Collection
        my_coll = bpy.data.collections.new("KDTREE")
        # Add collection to scene collection
        bpy.context.scene.collection.children.link(my_coll)
        # now we generate cubes based on the size of the plane.
        bpy.ops.mesh.primitive_cube_add(location=Vector((0,0,0)), size = min_length)
        bpy.context.view_layer.update()
        cube = bpy.context.selected_objects[0]
        cube_dimensions = cube.dimensions
        bpy.context.view_layer.update()
        cube.dimensions = Vector((cube_dimensions[0], cube_dimensions[1], z))
        bpy.context.view_layer.update()
        cube.location = bb_loc
        bpy.context.view_layer.update()
        cube.rotation_euler = bb_rot_eu
        bpy.context.view_layer.update()
        cube.name = 'cube'
        bpy.context.view_layer.update()
        current_collection = cube.users_collection
        link_object('cube', 'KDTREE')
        bpy.context.view_layer.update()
מכאן, אנחנו רוצים ליצור ווקסלים מהקובייה שלנו. אנחנו לוקחים את מספר הקוביות שהיינו מתאימים num_objects ואז לחתוך אותם מחפץ הקובייה שלנו. אנחנו מחפשים את פני הרשת הפונה כלפי מעלה של הקובייה שלנו, ואז בוחרים את הפנים כדי לבצע את החתכים שלנו. ראה את הקוד הבא:
        # get the bb volume and make the proper cuts to the object
        bb_vol = x*y*z
        cube_vol = cube_dimensions[0]*cube_dimensions[1]*cube_dimensions[2]
        n_cubes = cube_vol / bb_vol
        cuts = n_cubes / ((x+y) / 2)
        cuts = int(np.round(cuts)) - 1 #
        # select the cube
        for object in bpy.data.objects:
            object.select_set(False)
        bpy.context.view_layer.update()
        for object in bpy.data.objects:
            object.select_set(False)
        bpy.data.objects['cube'].select_set(True) # Blender 2.8x
        bpy.context.view_layer.objects.active = bpy.context.scene.objects.get('cube')
        # set to edit mode
        bpy.ops.object.mode_set(mode='EDIT', toggle=False)
        print('edit mode success')
        # get face_data
        context = bpy.context
        obj = context.edit_object
        me = obj.data
        mat = obj.matrix_world
        bm = bmesh.from_edit_mesh(me)
        up_face = None
        # select upwards facing cube-face
        # https://blender.stackexchange.com/questions/43067/get-a-face-selected-pointing-upwards
        for face in bm.faces:
            if (face.normal-UP_VECTOR).length < EPSILON:
                up_face = face
                break
        assert(up_face)
        # subdivide the edges to get the perfect kdtree cubes
        bmesh.ops.subdivide_edges(bm,
                edges=up_face.edges,
                use_grid_fill=True,
                cuts=cuts)
        bpy.context.view_layer.update()
        # get the center point of each face
לבסוף, אנו מחשבים את מרכז החלק העליון של כל חיתוך שיצרנו מהקובייה הגדולה שלנו ויוצרים קוביות ממשיות מהחתכים הללו. כל אחת מהקוביות החדשות שנוצרו מייצגת פיסת שטח יחידה להוליד או להזיז נאגטס סביב המטוס שלנו. ראה את הקוד הבא:
        face_data = {}
        sizes = []
        for f, face in enumerate(bm.faces):
            face_data[f] = {}
            face_data[f]['calc_center_bounds'] = face.calc_center_bounds()
            loc = mat @ face_data[f]['calc_center_bounds']
            face_data[f]['loc'] = loc
            sizes.append(loc[-1])
        # get the most common cube-z; we use this to determine the correct loc
        counter = Counter()
        counter.update(sizes)
        most_common = counter.most_common()[0][0]
        cube_loc = mat @ cube.location
        # get out of edit mode
        bpy.ops.object.mode_set(mode='OBJECT', toggle=False)
        # go to new colection
        bvhtrees = {}
        for f in face_data:
            loc = face_data[f]['loc']
            loc = mat @ face_data[f]['calc_center_bounds']
            print(loc)
            if loc[-1] == most_common:
                # set it back down to the floor because the face is elevated to the
                # top surface of the cube
                loc[-1] = cube_loc[-1]
                bpy.ops.mesh.primitive_cube_add(location=loc, size = x)
                cube = bpy.context.selected_objects[0]
                cube.dimensions = Vector((x, y, z))
                # bpy.context.view_layer.update()
                cube.name = "cube_{}".format(f)
                #my_coll.objects.link(cube)
                link_object("cube_{}".format(f), 'KDTREE')
                #bpy.context.view_layer.update()
                bvhtrees[f] = {
                    'occupied' : 0,
                    'object' : Object3D(cube)
                }
        for object in bpy.data.objects:
            object.select_set(False)
        bpy.data.objects['CUBE1'].select_set(True) # Blender 2.8x
        bpy.ops.object.delete()
        return bvhtrees
לאחר מכן, אנו מפתחים אלגוריתם שמבין אילו קוביות תפוסות בכל זמן נתון, מוצא אילו אובייקטים חופפים זה לזה, ומעביר אובייקטים חופפים בנפרד לחלל לא תפוס. לא נוכל להיפטר לחלוטין מכל החפיפות, אבל נוכל לגרום לזה להיראות אמיתי מספיק.


ראה את הקוד הבא:
    def find_occupied_space(
        self,
        objects3d: List[Object3D],
    ) -> None:
        """
        discover which cube's bvhtree is occupied in our kdtree space

        Args:
            list of Object3D objects

        """
        count = 0
        occupied = []
        for i in self.bvhtrees:
            bvhtree = self.bvhtrees[i]['object']
            for object3d in objects3d:
                if object3d.bvht.overlap(bvhtree.bvht):
                    self.bvhtrees[i]['occupied'] = 1

    def find_overlapping_objects(
        self,
        objects3d: List[Object3D],
    ) -> List[Tuple[int]]:
        """
        returns which Object3D objects are overlapping

        Args:
            list of Object3D objects

        Returns:
            List of indicies from objects3d that are overlap
        """
        count = 0
        overlaps = []
        for i, x_object3d in enumerate(objects3d):
            for ii, y_object3d in enumerate(objects3d[i+1:]):
                if x_object3d.bvht.overlap(y_object3d.bvht):
                    overlaps.append((i, ii))
        return overlaps

    def calc_most_overlapped(
        self,
        overlaps: List[Tuple[int]]
    ) -> List[Tuple[int]]:
        """
        Algorithm to count the number of edges each index has
        and return a sorted list from most->least with the number
        of edges each index has.

        Args:
            list of indicies that are overlapping

        Returns:
            list of indicies with the total number of overlapps they have
            [index, count]
        """
        keys = {}
        for x,y in overlaps:
            if x not in keys:
                keys[x] = 0
            if y not in keys:
                keys[y] = 0
            keys[x]+=1
            keys[y]+=1
        # sort by most edges first
        index_counts = sorted(keys.items(), key=lambda x: x[1])[::-1]
        return index_counts

    def get_random_unoccupied(
        self
    ) -> Union[int,None]:
        """
        returns a randomly chosen unoccuped kdtree cube

        Return
            either the kdtree cube's key or None (meaning all spaces are
            currently occupied)
            Union[int,None]
        """
        unoccupied = []
        for i in self.bvhtrees:
            if not self.bvhtrees[i]['occupied']:
                unoccupied.append(i)
        if unoccupied:
            random.shuffle(unoccupied)
            return unoccupied[0]
        else:
            return None

    def regenerate(
        self,
        iterable: Union[None, List[Object3D]] = None
    ) -> None:
        """
        this function recalculates each objects world-view information
        we default to None, which means we're recalculating the self.bvhtree cubes

        Args:
            iterable (None or List of Object3D objects). if None, we default to
            recalculating the kdtree
        """
        if isinstance(iterable, list):
            for object in iterable:
                object.regenerate()
        else:
            for idx in self.bvhtrees:
                self.bvhtrees[idx]['object'].regenerate()
                self.update_tree(idx, occupied=0)

    def process_trees_and_objects(
        self,
        objects3d: List[Object3D],
    ) -> List[Tuple[int]]:
        """
        This function finds all overlapping objects within objects3d,
        calculates the objects with the most overlaps, searches within
        the kdtree cube space to see which cubes are occupied. It then returns
        the edge-counts from the most overlapping objects

        Args:
            list of Object3D objects
        Returns
            this returns the output of most_overlapped
        """
        overlaps = self.find_overlapping_objects(objects3d)
        most_overlapped = self.calc_most_overlapped(overlaps)
        self.find_occupied_space(objects3d)
        return most_overlapped

    def move_objects(
        self,
        objects3d: List[Object3D],
        most_overlapped: List[Tuple[int]],
        z_increase_offset: float = 2.,
    ) -> None:
        """
        This function iterates through most-overlapped, and uses
        the index to extract the matching object from object3d - it then
        finds a random unoccupied kdtree cube and moves the given overlapping
        object to that space. It does this for each index from the most-overlapped
        function

        Args:
            objects3d: list of Object3D objects
            most_overlapped: a list of tuples (index, count) - where index relates to
                where it's found in objects3d and count - how many times it overlaps
                with other objects
            z_increase_offset: this value increases the Z value of the object in order to
                make it appear as though it's off the floor. If you don't augment this value
                the object looks like it's 'inside' the ground plane
        """
        for idx, cnt in most_overlapped:
            object3d = objects3d[idx]
            unoccupied_idx = self.get_random_unoccupied()
            if unoccupied_idx:
                object3d.object.location =  self.bvhtrees[unoccupied_idx]['object'].object.location
                # ensure the nuggest is above the groundplane
                object3d.object.location[-1] = z_increase_offset
                self.update_tree(unoccupied_idx, occupied=1)

    def dynamic_movement(
        self,
        objects3d: List[Object3D],
        tries: int = 100,
        z_offset: float = 2.,
    ) -> None:
        """
        This function resets all objects to get their current positioning
        and randomly moves objects around in an attempt to avoid any object
        overlaps (we don't want two objects to be spawned in the same position)

        Args:
            objects3d: list of Object3D objects
            tries: int the number of times we want to move objects to random spaces
                to ensure no overlaps are present.
            z_offset: this value increases the Z value of the object in order to
                make it appear as though it's off the floor. If you don't augment this value
                the object looks like it's 'inside' the ground plane (see `move_objects`)
        """

        # reset all objects
        self.regenerate(objects3d)
        # regenerate bvhtrees
        self.regenerate(None)

        most_overlapped = self.process_trees_and_objects(objects3d)
        attempts = 0
        while most_overlapped:
            if attempts>=tries:
                break
            self.move_objects(objects3d, most_overlapped, z_offset)
            attempts+=1
            # recalc objects
            self.regenerate(objects3d)
            # regenerate bvhtrees
            self.regenerate(None)
            # recalculate overlaps
            most_overlapped = self.process_trees_and_objects(objects3d)

    def generate_spawn_point(
        self,
    ) -> Vector:
        """
        this function generates a random spawn point by finding which
        of the kdtree-cubes are unoccupied, and returns one of those

        Returns
            the Vector location of the kdtree-cube that's unoccupied
        """
        idx = self.get_random_unoccupied()
        print(idx)
        self.update_tree(idx, occupied=1)
        return self.bvhtrees[idx]['object'].object.location

    def update_tree(
        self,
        idx: int,
        occupied: int,
    ) -> None:
        """
        this function updates the given state (occupied vs. unoccupied) of the
        kdtree given the idx

        Args:
            idx: int
            occupied: int
        """
        self.bvhtrees[idx]['occupied'] = occupied
צינור יצירת תמונות: ריצות מגניבות
בחלק זה, אנו מפרקים את מה שלנו run הפונקציה עושה.
אנחנו מאתחלים את שלנו DensityController וליצור משהו שנקרא חוסך באמצעות ה ImageSaver החל מ- zpy. זה מאפשר לנו לשמור ללא מראה את התמונות המעובדות שלנו בכל מיקום שנבחר. לאחר מכן נוסיף את שלנו nugget קטגוריה (ואם היו לנו עוד קטגוריות, היינו מוסיפים אותן כאן). ראה את הקוד הבא:
@gin.configurable("run")
@zpy.blender.save_and_revert
def run(
    max_num_nuggets: int = 100,
    jitter_mesh: bool = True,
    jitter_nugget_scale: bool = True,
    jitter_material: bool = True,
    jitter_nugget_material: bool = False,
    number_of_random_materials: int = 50,
    nugget_texture_path: str = os.getcwd()+"/nugget_textures",
    annotations_path = os.getcwd()+'/nugget_data',
):
    """
    Main run function.
    """
    density_controller = DensityController()
    # Random seed results in unique behavior
    zpy.blender.set_seed(random.randint(0,1000000000))

    # Create the saver object
    saver = zpy.saver_image.ImageSaver(
        description="Image of the randomized Amazon nuggets",
        output_dir=annotations_path,
    )
    saver.add_category(name="nugget")
לאחר מכן, עלינו ליצור אובייקט מקור שממנו אנו משצים נאגטס להעתיק; במקרה הזה, זה ה nugget_base שיצרנו:
    # Make a list of source nugget objects
    source_nugget_objects = []
    for obj in zpy.objects.for_obj_in_collections(
        [
            bpy.data.collections["NUGGET"],
        ]
    ):
        assert(obj!=None)

        # pass on everything not named nugget
        if 'nugget_base' not in obj.name:
            print('passing on {}'.format(obj.name))
            continue
        zpy.objects.segment(obj, name="nugget", as_category=True) #color=nugget_seg_color
        print("zpy.objects.segment: check {}".format(obj.name))
        source_nugget_objects.append(obj.name)
עכשיו, כשיש לנו את גוש הבסיס שלנו, אנחנו הולכים לשמור את תנוחות העולם (מיקומים) של כל האובייקטים האחרים כך שאחרי כל רינדור, נוכל להשתמש בתנוחות השמורות הללו כדי לאתחל מחדש רינדור. אנחנו גם מזיזים את גוש הבסיס שלנו לגמרי מהדרך כך שה-kdtree לא ירגיש מקום תפוס. לבסוף, אנו מאתחלים את אובייקטי ה-kdtree-cube שלנו. ראה את הקוד הבא:
    # move nugget point up 10 z's so it won't collide with base-cube
    bpy.data.objects["nugget_base"].location[-1] = 10

    # Save the position of the camera and light
    # create light and camera
    zpy.objects.save_pose("Camera")
    zpy.objects.save_pose("Sun")
    zpy.objects.save_pose("Plane")
    zpy.objects.save_pose("Main Axis")
    axis = bpy.data.objects['Main Axis']
    print('saving poses')
    # add some parameters to this

    # get the plane-3d object
    plane3d = Object3D(bpy.data.objects['Plane'])

    # generate kdtree cubes
    density_controller.generate_kdtree_cubes()
הקוד הבא אוסף את הרקעים שהורדנו מ-texture.ninja, שם הם ישמשו כדי להיות מוקרנים באופן אקראי על המטוס שלנו:
    # Pre-create a bunch of random textures
    #random_materials = [
    #    zpy.material.random_texture_mat() for _ in range(number_of_random_materials)
    #]
    p = os.path.abspath(os.getcwd()+'/random_textures')
    print(p)
    random_materials = []
    for x in os.listdir(p):
        texture_path = Path(os.path.join(p,x))
        y = zpy.material.make_mat_from_texture(texture_path, name=texture_path.stem)
        random_materials.append(y)
    #print(random_materials[0])

    # Pre-create a bunch of random textures
    random_nugget_materials = [
        random_nugget_texture_mat(Path(nugget_texture_path)) for _ in range(number_of_random_materials)
    ]
כאן מתחיל הקסם. ראשית, אנו מחדשים את kdtree-cubes לריצה זו כדי שנוכל להתחיל מחדש:
    # Run the sim.
    for step_idx in zpy.blender.step():
        density_controller.generate_kdtree_cubes()

        objects3d = []
        num_nuggets = random.randint(40, max_num_nuggets)
        log.info(f"Spawning {num_nuggets} nuggets.")
        spawned_nugget_objects = []
        for _ in range(num_nuggets):
אנו משתמשים בבקר הצפיפות שלנו כדי ליצור נקודת השרצה אקראית עבור הגוש שלנו, ליצור עותק של nugget_base, והעבר את העותק לנקודת השרצים שנוצרה באופן אקראי:
            # Choose location to spawn nuggets
            spawn_point = density_controller.generate_spawn_point()
            # manually spawn above the floor
            # spawn_point[-1] = 1.8 #2.0

            # Pick a random object to spawn
            _name = random.choice(source_nugget_objects)
            log.info(f"Spawning a copy of source nugget {_name} at {spawn_point}")
            obj = zpy.objects.copy(
                bpy.data.objects[_name],
                collection=bpy.data.collections["SPAWNED"],
                is_copy=True,
            )

            obj.location = spawn_point
            obj.matrix_world = mathutils.Matrix.Translation(spawn_point)
            spawned_nugget_objects.append(obj)
לאחר מכן, אנו מרעידים באופן אקראי את גודל הנאגט, את הרשת של הנאגט ואת קנה המידה של הנאגט, כך שאף שני נאגטס לא ייראו אותו הדבר:
            # Segment the newly spawned nugget as an instance
            zpy.objects.segment(obj)

            # Jitter final pose of the nugget a little
            zpy.objects.jitter(
                obj,
                rotate_range=(
                    (0.0, 0.0),
                    (0.0, 0.0),
                    (-math.pi * 2, math.pi * 2),
                ),
            )

            if jitter_nugget_scale:
                # Jitter the scale of each nugget
                zpy.objects.jitter(
                    obj,
                    scale_range=(
                        (0.8, 2.0), #1.2
                        (0.8, 2.0), #1.2
                        (0.8, 2.0), #1.2
                    ),
                )

            if jitter_mesh:
                # Jitter (deform) the mesh of each nugget
                zpy.objects.jitter_mesh(
                    obj=obj,
                    scale=(
                        random.uniform(0.01, 0.03),
                        random.uniform(0.01, 0.03),
                        random.uniform(0.01, 0.03),
                    ),
                )

            if jitter_nugget_material:
                # Jitter the material (apperance) of each nugget
                for i in range(len(obj.material_slots)):
                    obj.material_slots[i].material = random.choice(random_nugget_materials)
                    zpy.material.jitter(obj.material_slots[i].material)
אנחנו הופכים את עותק הגוש שלנו ל- Object3D אובייקט שבו אנו משתמשים בפונקציונליות עץ BVH כדי לראות אם המטוס שלנו חותך או חופף כל פנים או קודקודים בעותק הגוש שלנו. אם אנו מוצאים חפיפה עם המטוס, אנו פשוט מזיזים את הגוש כלפי מעלה על ציר ה-Z שלו. ראה את הקוד הבא:
            # create 3d obj for movement
            nugget3d = Object3D(obj)

            # make sure the bottom most part of the nugget is NOT
            # inside the plane-object
            plane_overlap(plane3d, nugget3d)

            objects3d.append(nugget3d)
כעת, כשכל הנאגטס נוצרו, אנו משתמשים בעצמנו DensityController להזיז נאגטס סביב כך שיהיה לנו מספר מינימלי של חפיפות, ואלה שחופפים אינם נראים מחרידים:
        # ensure objects aren't on top of each other
        density_controller.dynamic_movement(objects3d)
בקוד הבא: אנו משחזרים את Camera ו Main Axis תנוחות ובחר באקראי כמה רחוקה המצלמה ל Plane אובייקט:
        # Return camera to original position
        zpy.objects.restore_pose("Camera")
        zpy.objects.restore_pose("Main Axis")
        zpy.objects.restore_pose("Camera")
        zpy.objects.restore_pose("Main Axis")

        # assert these are the correct versions...
        assert(bpy.data.objects["Camera"].location == Vector((0,0,100)))
        assert(bpy.data.objects["Main Axis"].location == Vector((0,0,0)))
        assert(bpy.data.objects["Main Axis"].rotation_euler == Euler((0,0,0)))

        # alter the Z ditance with the camera
        bpy.data.objects["Camera"].location = (0, 0, random.uniform(0.75, 3.5)*100)
אנחנו מחליטים באיזו אקראית אנחנו רוצים שהמצלמה תיסע לאורך Main Axis. תלוי אם אנחנו רוצים שזה יהיה בעיקר מעל הראש או אם אכפת לנו מאוד מהזווית שממנה הוא רואה את הלוח, אנחנו יכולים להתאים את top_down_mostly פרמטר תלוי עד כמה מודל האימון שלנו קולט את האות של "מה זה בכלל גוש?"
        # alter the main-axis beta/gamma params
        top_down_mostly = False
        if top_down_mostly:
            zpy.objects.rotate(
                bpy.data.objects["Main Axis"],
                rotation=(
                    random.uniform(0.05, 0.05),
                    random.uniform(0.05, 0.05),
                    random.uniform(0.05, 0.05),
                ),
            )
        else:
            zpy.objects.rotate(
                bpy.data.objects["Main Axis"],
                rotation=(
                    random.uniform(-1., 1.),
                    random.uniform(-1., 1.),
                    random.uniform(-1., 1.),
                ),
            )

        print(bpy.data.objects["Main Axis"].rotation_euler)
        print(bpy.data.objects["Camera"].location)
בקוד הבא, אנו עושים את אותו הדבר עם Sun אובייקט, ובחר באקראי מרקם עבור Plane אובייקט:
        # change the background material
        # Randomize texture of shelf, floors and walls
        for obj in bpy.data.collections["BACKGROUND"].all_objects:
            for i in range(len(obj.material_slots)):
                # TODO
                # Pick one of the random materials
                obj.material_slots[i].material = random.choice(random_materials)
                if jitter_material:
                    zpy.material.jitter(obj.material_slots[i].material)
                # Sets the material relative to the object
                obj.material_slots[i].link = "OBJECT"
        # Pick a random hdri (from the local textures folder for background background)
        zpy.hdris.random_hdri()
        # Return light to original position
        zpy.objects.restore_pose("Sun")

        # Jitter the light position
        zpy.objects.jitter(
            "Sun",
            translate_range=(
                (-5, 5),
                (-5, 5),
                (-5, 5),
            ),
        )
        bpy.data.objects["Sun"].data.energy = random.uniform(0.5, 7)
לבסוף, אנחנו מסתירים את כל החפצים שלנו שאנחנו לא רוצים שיוצגו: ה nugget_base וכל מבנה הקובייה שלנו:
# we hide the cube objects
for obj in         # we hide the cube objects
        for obj in bpy.data.objects:
            if 'cube' in obj.name:
                obj.hide_render = True
                try:
                    zpy.objects.toggle_hidden(obj, hidden=True)
                except:
                    # deal with this exception here...
                    pass
        # we hide our base nugget object
        bpy.data.objects["nugget_base"].hide_render = True
        zpy.objects.toggle_hidden(bpy.data.objects["nugget_base"], hidden=True)
לבסוף, אנו משתמשים zpy כדי לעבד את הסצנה שלנו, לשמור את התמונות שלנו ולאחר מכן לשמור את ההערות שלנו. עבור הפוסט הזה, עשיתי כמה שינויים קטנים ב- zpy ספריית הערות למקרה השימוש הספציפי שלי (ביאור לכל תמונה במקום קובץ אחד לכל פרוייקט), אבל לא צריך לעשות זאת לצורך הפוסט הזה).
        # create the image name
        image_uuid = str(uuid.uuid4())

        # Name for each of the output images
        rgb_image_name = format_image_string(image_uuid, 'rgb')
        iseg_image_name = format_image_string(image_uuid, 'iseg')
        depth_image_name = format_image_string(image_uuid, 'depth')

        zpy.render.render(
            rgb_path=saver.output_dir / rgb_image_name,
            iseg_path=saver.output_dir / iseg_image_name,
            depth_path=saver.output_dir / depth_image_name,
        )

        # Add images to saver
        saver.add_image(
            name=rgb_image_name,
            style="default",
            output_path=saver.output_dir / rgb_image_name,
            frame=step_idx,
        )

        saver.add_image(
            name=iseg_image_name,
            style="segmentation",
            output_path=saver.output_dir / iseg_image_name,
            frame=step_idx,
        )
        saver.add_image(
            name=depth_image_name,
            style="depth",
            output_path=saver.output_dir / depth_image_name,
            frame=step_idx,
        )

        # ideally in this thread, we'll open the anno file
        # and write to it directly, saving it after each generation
        for obj in spawned_nugget_objects:
            # Add annotation to segmentation image
            saver.add_annotation(
                image=rgb_image_name,
                category="nugget",
                seg_image=iseg_image_name,
                seg_color=tuple(obj.seg.instance_color),
            )

        # Delete the spawned nuggets
        zpy.objects.empty_collection(bpy.data.collections["SPAWNED"])

        # Write out annotations
        saver.output_annotated_images()
        saver.output_meta_analysis()

        # # ZUMO Annotations
        _output_zumo = _OutputZUMO(saver=saver, annotation_filename = Path(image_uuid + ".zumo.json"))
        _output_zumo.output_annotations()
        # change the name here..
        saver.output_annotated_images()
        saver.output_meta_analysis()

        # remove the memory of the annotation to free RAM
        saver.annotations = []
        saver.images = {}
        saver.image_name_to_id = {}
        saver.seg_annotations_color_to_id = {}

    log.info("Simulation complete.")

if __name__ == "__main__":

    # Set the logger levels
    zpy.logging.set_log_levels("info")

    # Parse the gin-config text block
    # hack to read a specific gin config
    parse_config_from_file('nugget_config.gin')

    # Run the sim
    run()
וואלה!
הפעל את סקריפט היצירה ללא ראש
עכשיו, כשיש לנו את קובץ הבלנדר השמור שלנו, הגוש שנוצר שלנו, וכל המידע התומך, בואו נסגור את ספריית העבודה שלנו או scp אותו למחשב ה-GPU שלנו או העלה אותו באמצעות שירות אחסון פשוט של אמזון (Amazon S3) או שירות אחר:
tar cvf working_blender_dir.tar.gz working_blender_dir
scp -i "your.pem" working_blender_dir.tar.gz ubuntu@EC2-INSTANCE.compute.amazonaws.com:/home/ubuntu/working_blender_dir.tar.gz
היכנס למופע EC2 שלך ושחרר את התיקיה working_blender שלך:
tar xvf working_blender_dir.tar.gz
כעת אנו יוצרים את הנתונים שלנו במלוא הדרו:
blender working_blender_dir/nugget.blend --background --python working_blender_dir/create_synthetic_nuggets.py
הסקריפט אמור לפעול עבור 500 תמונות, והנתונים נשמרים ב /path/to/working_blender_dir/nugget_data.
הקוד הבא מציג הערה יחידה שנוצרה עם מערך הנתונים שלנו:
{
    "metadata": {
        "description": "3D data of a nugget!",
        "contributor": "Matt Krzus",
        "url": "krzum@amazon.com",
        "year": "2021",
        "date_created": "20210924_000000",
        "save_path": "/home/ubuntu/working_blender_dir/nugget_data"
    },
    "categories": {
        "0": {
            "name": "nugget",
            "supercategories": [],
            "subcategories": [],
            "color": [
                0.0,
                0.0,
                0.0
            ],
            "count": 6700,
            "subcategory_count": [],
            "id": 0
        }
    },
    "images": {
        "0": {
            "name": "a0bb1fd3-c2ec-403c-aacf-07e0c07f4fdd.rgb.png",
            "style": "default",
            "output_path": "/home/ubuntu/working_blender_dir/nugget_data/a0bb1fd3-c2ec-403c-aacf-07e0c07f4fdd.rgb.png",
            "relative_path": "a0bb1fd3-c2ec-403c-aacf-07e0c07f4fdd.rgb.png",
            "frame": 97,
            "width": 640,
            "height": 480,
            "id": 0
        },
        "1": {
            "name": "a0bb1fd3-c2ec-403c-aacf-07e0c07f4fdd.iseg.png",
            "style": "segmentation",
            "output_path": "/home/ubuntu/working_blender_dir/nugget_data/a0bb1fd3-c2ec-403c-aacf-07e0c07f4fdd.iseg.png",
            "relative_path": "a0bb1fd3-c2ec-403c-aacf-07e0c07f4fdd.iseg.png",
            "frame": 97,
            "width": 640,
            "height": 480,
            "id": 1
        },
        "2": {
            "name": "a0bb1fd3-c2ec-403c-aacf-07e0c07f4fdd.depth.png",
            "style": "depth",
            "output_path": "/home/ubuntu/working_blender_dir/nugget_data/a0bb1fd3-c2ec-403c-aacf-07e0c07f4fdd.depth.png",
            "relative_path": "a0bb1fd3-c2ec-403c-aacf-07e0c07f4fdd.depth.png",
            "frame": 97,
            "width": 640,
            "height": 480,
            "id": 2
        }
    },
    "annotations": [
        {
            "image_id": 0,
            "category_id": 0,
            "id": 0,
            "seg_color": [
                1.0,
                0.6000000238418579,
                0.9333333373069763
            ],
            "color": [
                1.0,
                0.6,
                0.9333333333333333
            ],
            "segmentation": [
                [
                    299.0,
                    308.99,
                    292.0,
                    308.99,
                    283.01,
                    301.0,
                    286.01,
                    297.0,
                    285.01,
                    294.0,
                    288.01,
                    285.0,
                    283.01,
                    275.0,
                    287.0,
                    271.01,
                    294.0,
                    271.01,
                    302.99,
                    280.0,
                    305.99,
                    286.0,
                    305.99,
                    303.0,
                    302.0,
                    307.99,
                    299.0,
                    308.99
                ]
            ],
            "bbox": [
                283.01,
                271.01,
                22.980000000000018,
                37.98000000000002
            ],
            "area": 667.0802000000008,
            "bboxes": [
                [
                    283.01,
                    271.01,
                    22.980000000000018,
                    37.98000000000002
                ]
            ],
            "areas": [
                667.0802000000008
            ]
        },
        {
            "image_id": 0,
            "category_id": 0,
            "id": 1,
            "seg_color": [
                1.0,
                0.4000000059604645,
                1.0
            ],
            "color": [
                1.0,
                0.4,
                1.0
            ],
            "segmentation": [
                [
                    241.0,
                    273.99,
                    236.0,
                    271.99,
                    234.0,
                    273.99,
                    230.01,
                    270.0,
                    232.01,
                    268.0,
                    231.01,
                    263.0,
                    233.01,
                    261.0,
                    229.0,
                    257.99,
                    225.0,
                    257.99,
                    223.01,
                    255.0,
                    225.01,
                    253.0,
                    227.01,
                    246.0,
                    235.0,
                    239.01,
                    238.0,
                    239.01,
                    240.0,
                    237.01,
                    247.0,
                    237.01,
                    252.99,
                    245.0,
                    253.99,
                    252.0,
                    246.99,
                    269.0,
                    241.0,
                    273.99
                ]
            ],
            "bbox": [
                223.01,
                237.01,
                30.980000000000018,
                36.98000000000002
            ],
            "area": 743.5502000000008,
            "bboxes": [
                [
                    223.01,
                    237.01,
                    30.980000000000018,
                    36.98000000000002
                ]
            ],
            "areas": [
                743.5502000000008
            ]
        },
...
...
...


סיכום
בפוסט זה, הדגמתי כיצד להשתמש בספריית האנימציה בקוד פתוח בלנדר כדי לבנות צינור נתונים סינתטיים מקצה לקצה.
יש המון דברים מגניבים שאתה יכול לעשות בבלנדר וב-AWS; אני מקווה שההדגמה הזו יכולה לעזור לך בפרויקט הבא שלך מורעב בנתונים!
הפניות
על המחבר
 מאט קרזוס הוא Sr. Data Scientist בחברת Amazon Web Service בקבוצת השירותים המקצועיים של AWS