Hardware wallets can protect your generational wealth. Leverage them to gain the highest level of security and privacy.
This is an opinion editorial by Josef Tětek, the Trezor brand ambassador for SatoshiLabs.
Whether you’re just contemplating buying your first hardware Bitcoin wallet or have already had one for years, it’s always a good idea to refresh on the basics of these marvelous devices. Contrary to popular belief, a hardware wallet isn’t a “set it and forget it” tool that will take care of your bitcoin for you. Instead, a hardware wallet can help you with your ongoing bitcoin security.
When And Why Should I Buy A Hardware Wallet?
Since hardware wallets start around $70, it’s obviously not an attractive idea to buy one if you’re just dipping your toes into Bitcoin. There is no clear cutting-off point after which it is imperative that you buy yourself a hardware wallet, but a good rule of thumb is to get one once you have around $1,000 worth of bitcoin to protect. When you stack regularly and bitcoin appreciates in the meantime, chances are you’ll cross the $1,000 threshold quickly, so don’t put it off for too long.
Some people hold the view that hardware wallets are superfluous and an old phone/laptop will work perfectly well in their place. The problem with such general-purpose devices is that virtually anything can run on such hardware and unless you’re an advanced security expert, you won’t know if the device is really safe, even if disconnected from the internet (and honestly, security experts would rather assume it is not safe in the first place). Hardware wallets are special-purpose devices with firmware that performs a limited set of processes, namely generating keys and cryptographically signing with those keys — all in a strictly offline environment.
Writing Down And Protecting Your Recovery Seed
When you’re setting up your hardware wallet, one of the first things the wallet does for you is that it generates your private keys. To ensure you will hold on to your bitcoin even if the particular device is lost or breaks down, you will be prompted to write down your recovery seed: a human-readable secret that can be used to recover your private keys in other compatible wallets.
Writing down the 12 or 24 words that make up the recovery seed is one of the most important things you need to do in order to protect your bitcoin. Hardware wallets typically do not show the recovery seed again — you need to write it down and keep it safe during the setup process.
Here are some basic tips for protecting your seed:
- Write the words down with your own hand on a piece of paper
- Alternatively, you can use a more robust solution such as Cryptosteel Capsules or other metal solutions
- Never take a photo or keep a digital copy of the seed — hackers are actively looking for such data
- Store your recovery seed in a location with controlled access away from water, fire hazard, etc.
- Consider setting up a Shamir Backup — multiple recovery seed shares that increase the safety of your seed
Checking Your Recovery Seed
Once you have your recovery seed written down, it’s advisable to verify that it really works to restore your wallet. You want to check the integrity of your seed before there’s any bitcoin attached to it, not after.
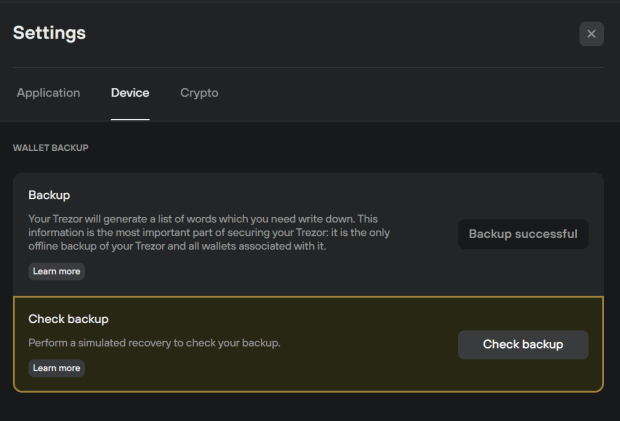
The best practice is to factory-reset your hardware wallet and then recover your wallet from the seed. Alternatively, some hardware wallets offer dry-run recovery — this option will make you more comfortable if you already have some bitcoin stored on the device. To perform the dry-run recovery in the Trezor Suite, for instance, navigate to settings, select “Check Backup” and follow the prompts (note that the connected Trezor device should respond in the third step — never input the seed words into a computer if the device doesn’t respond!)
It’s a good idea to check your seed backup regularly. If your security setup involves multiple Shamir Backup shares, inspect them every 12 months at least to make sure the shares are still intact and ready to be used when needed.
Setting Up The PIN And Passphrase
Most hardware wallets can be secured with a PIN. A good PIN can keep an attacker from stealing your funds if they discover your device, but note that a PIN only protects the device, not the recovery seed. So if the attacker were to discover both your device (protected by the PIN) and your recovery seed, they might steal all your bitcoin, as with a recovery seed in their hand, they don’t actually need the device itself.
Fortunately, there is a way to mitigate the threat of an attacker finding your recovery seed as well. Some hardware wallets, such as Trezor devices, offer the option to protect your seed with a passphrase. Passphrase helps you create a brand new set of wallets that are derived by combining the recovery seed and a particular passphrase. This means that the seed itself becomes useless to an attacker, as they wouldn’t be able to derive the correct set of wallets with a recovery seed alone.
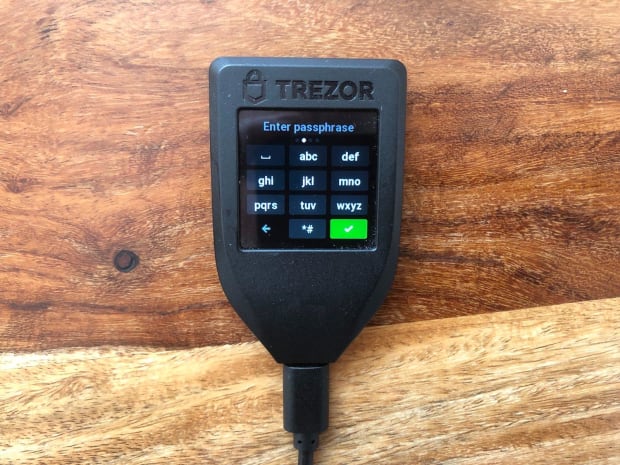
If you’re having a hard time telling the difference between the PIN and the passphrase, just remember: the PIN protects the device, the passphrase protects the seed.
If you opt to use the passphrase, do not rely on your memory. If you forgot the passphrase, there will be no way to access your funds. It’s imperative that you create a backup of your passphrase, similar to what you’ve done for your seed. Keep the seed and the passphrase separate and you will make it impossible for attackers to steal your funds if they accidentally find either of those.
The Device Screen Is There For A Reason: Always Verify Your Addresses!
Hardware wallets are useful beyond simple HODLing. One of the main benefits of these devices is the ability to receive and send bitcoin in a very secure manner.
A common clipboard malware can change the address you are copy/pasting on your computer. If your computer is infected with such a virus, the only line of defense is to compare the address shown on the device with the sending/receiving counterparty (the exchange website, your friend’s phone wallet, a Signal message, etc.). This is one of the reasons why all the hardware wallets worth their names must have their own screens, and why some cold storage solutions such as near-field communication (NFC) cards without screens aren’t good design choices.
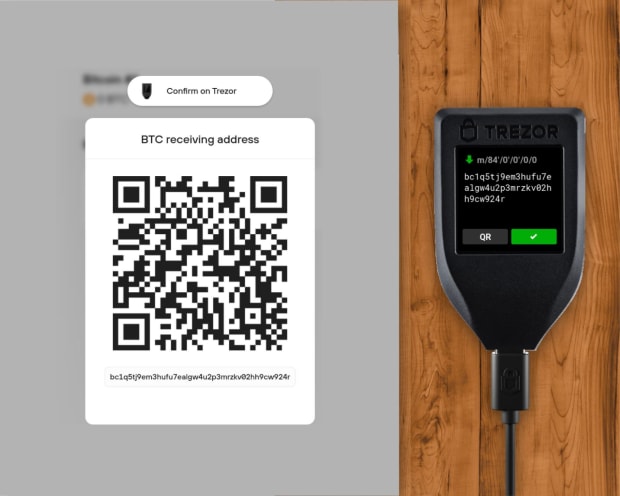
When receiving bitcoin, the device will show the full address on its display, so that you can independently verify that the address shown in the companion app is the correct one (i.e., generated by the device). After you verify the address and give it to your counterparty (either as a scanned QR code or copy/pasted string), verify it again to make sure it wasn’t modified by the clipboard malware.
When sending bitcoin, the process involves multiple checks: verifying the address you’re sending to, the associated fee, and the total amount to be sent. Be sure to double check everything!
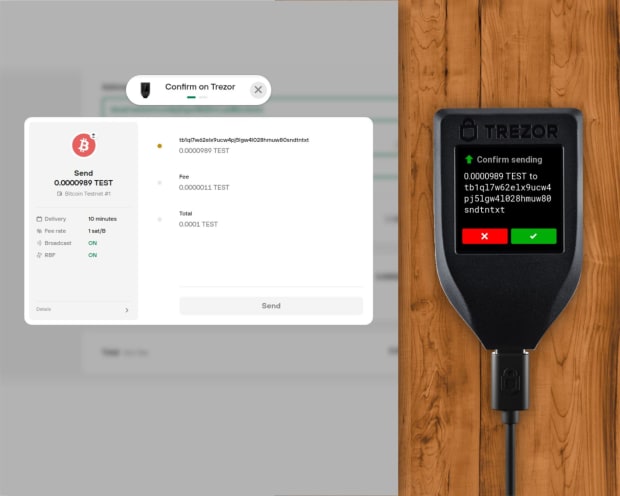
Do not rush through the process of verifying everything. Only the device screen can tell you what is really going on inside the hardware wallet, so make sure you are really sending or receiving funds where you’re supposed to.
Beware Of Phishermen!
There are many bad people out there who would like to steal your bitcoin. Some choose to spread their tentacles through malware like the one described above, others try to take your coins through social engineering techniques — fake websites, e-mails or apps that try to make you type your seed along with the passphrase are widespread.
The best protection is to remember one simple rule: never type your seed into a website or an app without the hardware wallet guidance. When recovering your bitcoin with a hardware wallet such as a Trezor, you either type the seed words on the device itself (possible with the Trezor Model T), or the device tells you the order in which you have to type the words (like the Trezor Model One), so as not to leak the correct order to possible keyloggers or other spying techniques.
Routing Through Tor, Connecting Your Full Node
To improve user privacy and prevent IP address leakage, it’s advisable to route all the bitcoin-related traffic through the Tor network. Tor is better than a virtual private network (VPN), as VPNs often keep logs of customer traffic that can leak or be handed over to authorities if requested. With Tor, your IP address is truly hidden, so your bitcoin transactions remain private (although keep in mind that Tor by itself won’t protect you if your bitcoin addresses are linked to you because you bought bitcoin on a centralized exchange that knows your identity). You can route your Bitcoin transactions originating from your hardware wallet with Bitcoin Core (see this guide) or other compatible wallets.
To further strengthen your privacy and sovereignty, you can connect your hardware wallet to a full node. When running your own full node, you don’t have to rely on any third party to broadcast your transactions and to give you the latest state of the Bitcoin ledger. You can run a Bitcoin full node on your home computer, laptop or a Raspberry Pi device, and connect your hardware wallet through a Bitcoin Core HWI or Electrum.
Prepare For The Real Risks
The most common risk when handling bitcoin is accidental loss. Throwing out the recovery seed, sending or receiving funds to a wrong address, falling for a phishing scam, forgetting a passphrase, or failing to take self custody and keeping coins on an exchange that’s later hacked — these are much more probable risk vectors than any government seizure. The inconvenient truth is that Gitcoiners are their own worst enemies.
A good rule to remember is to test out everything. After you set up your new hardware wallet, test that your recovery seed really works, either by wiping the device or performing the dry run recovery. When you’re sending your first transaction using a hardware wallet, send a few dollars first to get a feel of how everything works. If it has been some time since you’ve checked up on your seed, make sure it’s still there. If you’re considering using a passphrase, try sending just a few sats into the new wallet and then try logging in and out with and without the passphrase a few times. Being familiar with how the hardware wallet should respond will be to your advantage if you ever find yourself in a stressful situation.
Also keep in mind that all the major hardware wallet manufacturers use a mutually-compatible recovery seed standard (BIP39 for regular seed or SLIP39 for Shamir Backup), so even if a particular manufacturer went bankrupt, your coins will always be safe and you’ll be able to recover your bitcoin in a multitude of open-source wallets, hardware of software.
This is a guest post by Josef Tětek. Opinions expressed are entirely their own and do not necessarily reflect those of BTC Inc or Bitcoin Magazine.
- 000
- 12 months
- a
- ability
- access
- address
- addresses
- advanced
- ADvantage
- All
- already
- Although
- always
- Ambassador
- amount
- app
- apps
- around
- associated
- Backup
- bankrupt
- Basics
- because
- before
- being
- benefits
- BEST
- Better
- between
- Beyond
- Bitcoin
- bitcoin core
- bitcoin transactions
- Bitcoin Wallet
- bitcoiners
- brand
- breaks
- broadcast
- BTC
- BTC Inc
- buy
- Buying
- Cards
- care
- centralized
- chances
- change
- Checks
- choices
- Choose
- code
- Coins
- Cold Storage
- Common
- Communication
- compatible
- computer
- Connect
- connected
- Connecting
- Core
- Counterparty
- create
- Custody
- customer
- Defense
- described
- Design
- device
- Devices
- difference
- digital
- discover
- Display
- Doesn’t
- dollars
- double
- down
- during
- Editorial
- enemies
- Engineering
- Environment
- etc
- everything
- exchange
- expert
- experts
- expressed
- fake
- familiar
- finding
- Fire
- First
- follow
- from
- full
- Full node
- funds
- further
- general-purpose
- generated
- generating
- generational wealth
- going
- good
- Government
- Guest
- Guest Post
- hacked
- hackers
- Handling
- Hardware
- Hardware Wallet
- Hardware Wallets
- having
- help
- helps
- hold
- Home
- How
- HTTPS
- human-readable
- idea
- Identity
- images
- important
- impossible
- improve
- In other
- Increase
- independently
- input
- instance
- integrity
- Internet
- IP
- IP Address
- IT
- itself
- Keep
- keeping
- keys
- Know
- laptop
- latest
- leak
- Ledger
- Level
- Leverage
- Limited
- Line
- location
- Long
- looking
- magazine
- major
- make
- malware
- manner
- Manufacturer
- Manufacturers
- means
- meantime
- Memory
- metal
- might
- mind
- model
- months
- more
- most
- multiple
- multitude
- namely
- names
- Navigate
- necessarily
- network
- NFC
- offer
- offline
- ongoing
- Opinion
- Opinions
- Option
- order
- Other
- own
- particular
- party
- People
- performing
- phishing
- piece
- Point
- Popular
- possible
- practice
- privacy
- private
- Private Keys
- Problem
- process
- processes
- protect
- protected
- protection
- QR code
- quickly
- reasons
- receive
- Recover
- recovery
- reflect
- regular
- regularly
- remain
- Risk
- Route
- Run
- running
- rush
- safe
- Safety
- Scam
- Screen
- secure
- Secured
- security
- seed
- set
- setting
- setup
- Shares
- show
- shown
- similar
- Simple
- since
- situation
- So
- Social
- Social Engineering
- Software
- solution
- Solutions
- some
- spread
- stack
- standard
- start
- State
- Still
- storage
- Strengthen
- techniques
- tells
- test
- The
- The Basics
- things
- threshold
- Through
- Throwing
- time
- times
- tips
- tool
- Tor
- traffic
- transaction
- Transactions
- Trezor
- typically
- use
- user privacy
- verify
- verifying
- View
- Virtual
- virtually
- virus
- VPN
- VPNs
- Wallet
- Wallets
- Water
- Wealth
- Website
- websites
- What
- What is
- WHO
- widespread
- without
- words
- Work
- works
- worth
- would
- years
- Your