In this article we learn how to create a reactive form in a cross platform application which uses RxWeb model based approach for creating and validating the form
An efficient way to increase the capability of an enterprise application using a well designed form with proper input validations
The below case describes a use case in which the user registration in which there are three fields FirstName, LastName and email address and all these things are mandatory for the registartion process
To use an elegant approach to construct this form in a simple way without writing much complicated business logic involved in the component
This can be achieved using @rxweb/reactive-form-validators which has an approach to design a model based validation form and has many useful in-built validations like unique, choice, compare etc…
Model Based forms contains a model class having the initialized properties using validators which are used to build the form in the contains model, component and HTML based architecture.
For more about model driven forms please refer Simplified Angular Reactive Forms
Start by installing the rxweb package from the npm using the below command :
npm i @rxweb/reactive-form-validators
Register the RxReactiveFormsModule module as below in the root(App) module:
@NgModule({ declarations: [AppComponent,UserComponent], entryComponents: [], imports: [BrowserModule,RxReactiveFormsModule, CommonModule,FormsModule, ReactiveFormsModule, IonicModule.forRoot(), AppRoutingModule], providers: [ StatusBar, SplashScreen, { provide: RouteReuseStrategy, useClass: IonicRouteStrategy } ], bootstrap: [AppComponent]
})
export class AppModule {}
Lets begin the implementation by creating a model class
This model contains a class Named User with the required properties in which the annotation is used from the rxweb validators, in this the model can contain one or more annotation
import { required } from '@rxweb/reactive-form-validators'; export class User { @required() firstName: string; @required() lastName: string; @required() Email: string;
}
Using the above model the FormGroup is bind using the formGroup method of the RxFormBuilder which is responsible for the forming of the userFormGroup as mentioned below in the code. The FormGroup which consist of the properties of the user model as a FormControl along with the applied validations.
import { Component, OnInit } from '@angular/core';
import { FormGroup } from '@angular/forms';
import { RxFormBuilder } from '@rxweb/reactive-form-validators';
import { User } from './user.model'; @Component({ selector: 'app-user', templateUrl: './user.component.html', styleUrls: ['./user.component.scss'],
})
export class UserComponent implements OnInit { userFormGroup : FormGroup constructor(private formBuilder: RxFormBuilder) { } ngOnInit() { this.userFormGroup = this.formBuilder.formGroup(User); } userRegistrationFormGroupSubmit() { console.log(this.userFormGroup.getRawValue()); }
}
As we are using the ionic framework which is used for hybrid cross platform application development in which we will use the ion tags for making it compatible for mobile and web both.
Here the validation messages are displayed from the globally configured in the app component during the initialization of the application as below
initializeApp() { ReactiveFormConfig.set({"validationMessage":{"required":"This field is required."}}); this.platform.ready().then(() => { this.statusBar.styleDefault(); this.splashScreen.hide(); }); }
The Html code:
<ion-header> <ion-toolbar color="primary"> <ion-title> Ionic Rxweb Reactive Form Validators </ion-title> </ion-toolbar>
</ion-header>
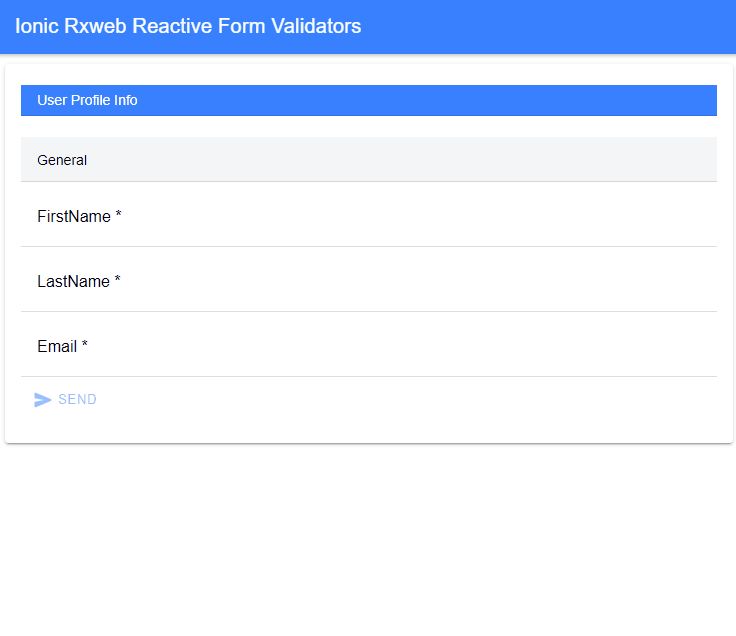
<ion-content> <ion-card> <ion-card-content> <form [formGroup]="userFormGroup" novalidate (ngSubmit)="userFormGroupSubmit()"> <ion-list> <ion-item-divider color="primary">User Profile Info</ion-item-divider> <br> <ion-item-divider color="light"> <ion-label> General </ion-label> </ion-item-divider> <ion-item [class.has-error]="(userFormGroup.get('firstName').hasError('required') || userFormGroup.get('firstName').hasError('required')) && userFormGroup.get('firstName').touched"> <ion-label position="floating">FirstName *</ion-label> <ion-input type="text" formControlName="firstName"></ion-input> </ion-item> <ion-item lines="none" *ngIf="(userFormGroup.get('firstName').hasError('required') || userFormGroup.get('firstName').hasError('required')) && userFormGroup.get('firstName').touched"> <div class="error-message"> <small *ngIf="userFormGroup.get('firstName').hasError('required')"> {{ userFormGroup.controls.firstName.errors.required.message}}.<br /></small> </div> </ion-item> <ion-item [class.has-error]="(userFormGroup.get('lastName').hasError('required') || userFormGroup.get('lastName').hasError('required')) && userFormGroup.get('lastName').touched"> <ion-label position="floating">LastName *</ion-label> <ion-input type="text" formControlName="lastName"></ion-input> </ion-item> <ion-item lines="none" *ngIf="(userFormGroup.get('lastName').hasError('required') || userFormGroup.get('lastName').hasError('required')) && userFormGroup.get('lastName').touched"> <div class="error-message"> <small *ngIf="userFormGroup.get('lastName').hasError('required')"> {{ userFormGroup.controls.lastName.errors.required.message}}.<br /></small> </div> </ion-item> <ion-item [class.has-error]="(userFormGroup.get('Email').hasError('required') || userFormGroup.get('Email').hasError('required')) && userFormGroup.get('Email').touched"> <ion-label position="floating">Email *</ion-label> <ion-input type="email" formControlName="Email"></ion-input> </ion-item> <ion-item lines="none" *ngIf="(userFormGroup.get('Email').hasError('required') || userFormGroup.get('Email').hasError('required')) && userFormGroup.get('Email').touched"> <div class="error-message"> <small *ngIf="userFormGroup.get('Email').hasError('required')">{{ userFormGroup.controls['Email'].errors.required.message}}.<br /></small> </div> </ion-item> <ion-row no-padding justify-content-center> <ion-col col-auto text-right> <ion-button [disabled]='!userFormGroup.valid' type="submit" fill="clear" size="small" color="primary"> <ion-icon name='send' slot="start"></ion-icon> Send </ion-button> </ion-col> </ion-row> </ion-list> </form> </ion-card-content> </ion-card>
</ion-content> The above image displays the output after completion of the following process
In this article we learned creating a model based reactive form and using the model driven approach along with the integration of** RxWeb** validations in an ionic application.
- SEO Powered Content & PR Distribution. Get Amplified Today.
- Platoblockchain. Web3 Metaverse Intelligence. Knowledge Amplified. Access Here.
- Source: https://www.codementor.io/ushmidave905/how-to-make-ionic-reactive-forms-using-rxweb-1d28ybqmfl