
Amazon QuickSight is a scalable, serverless, embeddable, machine learning-powered business intelligence (BI) service built for the cloud. QuickSight lets you easily create and publish interactive BI dashboards that include Machine Learning-powered insights. QuickSight dashboards can be accessed from any device, and seamlessly embedded into your applications, portals, and websites.
QuickSight offers several sources for data, including but not limited to Amazon Atena, Amazon RedShift, Serviciul Amazon de stocare simplă (Amazon S3), and Snowflake. This post presents solutions to enable you to set up Snowflake as a data source for QuickSight regardless of your network configuration requirements.
We cover the following configurations of Snowflake as a data source for QuickSight:
- QuickSight connection to Snowflake via AWS PrivateLink
- QuickSight connection to Snowflake via AWS PrivateLink and virtual private cloud (VPC) peering (same Region)
- QuickSight connection to Snowflake via AWS PrivateLink and VPC peering (cross-Region)
- QuickSight connection to Snowflake (public network)
Cerințe preliminare
To complete this solution, you need the following:
- Un cont AWS
- Interfața liniei de comandă AWS (AWS CLI) installed on your workstation (for instructions, see (Installing, updating, and uninstalling the AWS CLI version 2)
- An Enterprise edition QuickSight account
- A Snowflake account
- A Snowflake database and table
- A Snowflake warehouse
- Suficient Gestionarea identității și accesului AWS (IAM) privileges to create VPC endpoints, security groups, route tables, and Ruta Amazonului 53 hosted zones and resource record sets
QuickSight connection to Snowflake via AWS PrivateLink
First, we show you how to connect to Snowflake with QuickSight over AWS PrivateLink. The following diagram illustrates the solution architecture.

Set up the Snowflake AWS PrivateLink integration
To start, we walk through enabling AWS PrivateLink for your Snowflake account. This includes locating resources in your AWS account, access to the Snowflake UI, and creating a support case with Snowflake.
- Identify the VPC you want to use to set up the AWS PrivateLink integration. To do so, retrieve a list of VPCs from the command line, then retrieve the
VpcIdelement from the resulting JSON object for the desired VPC. See the following code:
- Retrieve your AWS account ID. This post assumes that the account you’re targeting is your default account on your AWS CLI configuration.
- If you’re setting up multiple accounts, repeat these steps for all accounts and VPCs (this post assumes you’re setting up a single account and VPC and will use this as the context moving forward).
- Contact Snowflake Support with your AWS account ID, VPC ID, and the corresponding account URL you use to access Snowflake (for example,
<account id>.snowflakecomputing.com).
Enabling AWS PrivateLink for your Snowflake account can take up to two business days.
- After AWS PrivateLink is enabled, retrieve the AWS PrivateLink configuration for your Region by running the following command in a Snowflake worksheet, then retrieve the values for
privatelink-account-urlșiprivatelink_ocsp-urlfrom the resulting JSON object. Examples of each value are as follows:
- Store these values in a text editor for later use.
Next, we configure the VPC endpoint on the Cloud virtual virtual Amazon (Amazon VPC) console create all the required security groups.
- În consola Amazon VPC, alegeți Puncte finale în meniul de navigare.
- Alege Creați punct final.
- Selectați Find AWS Service by Name.
- Pentru numele serviciului, introduceți valoarea pentru
privatelink-vpce-idthat we retrieved earlier. - Alege Verifica.

A green alert with “Service Name Found” appears and the VPC and subnet options automatically expand.
Depending on your targeted Region, your resulting screen may show another Region name.
- Choose the same VPC ID that you sent to Snowflake.
- Select the subnets where you want to create endpoints.

AWS recommends using more than one subnet for high availability.
- Pentru Grup de securitate, alege Creați un nou grup de securitate.
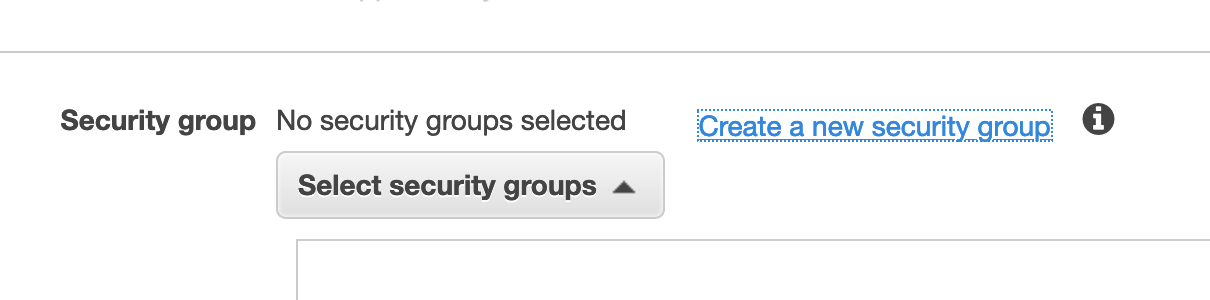
Aceasta deschide Grupuri de securitate page on the Amazon VPC console in a new tab.
- Alege Create security group.

- Give your new security group a name (for example,
quicksight-doc-snowflake-privatelink-connection) și descriere. - Choose the VPC ID you used in previous steps.
Next, you add two rules that allow traffic from within your VPC to this VPC endpoint.
- Retrieve the CIDR block for your targeted VPC:
- Alege Adăugați o regulă în Reguli de intrare
- Alege HTTPS for the type, leave the source as pachet personalizat, and enter the value retrieved from the preceding
describe-vpcscall (for example, 10.0.0.0/16). - Alege Adăugați o regulă în Reguli de intrare
- Alege HTTP for the type, leave the source as pachet personalizat, and enter the value retrieved from the preceding
describe-vpcs - Alege Create security group.

- Retrieve the security group ID from the newly created security group.
- On the VPC endpoint configuration page, remove the default security group.
- Search for and select the new security group ID.

- Alege Creați punct final.
You’re redirected to a page that has a link to your VPC endpoint configuration, specified by the VPC ID. The next page has a link to view the configuration in full.

- Retrieve the topmost record in the DNS names list.
This can be differentiated from other DNS names because it only includes the Region name (such as us-west-2), and no Availability Zone letter notation (such as us-west-2a).
- Store this record in a text editor for later use.
Configure DNS for Snowflake endpoints in your VPC
To configure your Snowflake endpoints, complete the following steps:
- On the Route 53 console, choose Hosted Zones în panoul de navigare.
- Alege Creați o zonă găzduită.
- Pentru Numele domeniului, enter the value you stored for
privatelink-account-urlfrom the previous steps.
In this field, we remove the Snowflake account ID from the DNS name and only use the value starting with the Region identifier (for example, <region>.privatelink.snowflakecomputing.com). We create a resource record set later for the subdomain.
- Pentru Tip, Selectați Private hosted zone.

Your Region code may not be us-west-2; reference the DNS name returned to you by Snowflake.
- În VPCs to associate with the hosted zone section, choose the Region in which your VPC is located and the VPC ID used in previous steps.

- Alege Creați o zonă găzduită.
Next. we create two records: one for privatelink-account-url și unul pentru privatelink_ocsp-url.
- Pe Hosted zones pagina, alege Create record set.
- Pentru Numele înregistrării, enter your Snowflake account ID (the first eight characters in
privatelink-account-url). - Pentru Tipul de înregistrare, alege CNAME.
- Pentru Valoare, enter the DNS name for the Regional VPC endpoint we retrieved in the previous section.
- Alege Creați înregistrări.

- Repeat these steps for the OCSP record we notated as
privatelink-ocsp-urlearlier, starting withocspthrough the eight-character Snowflake ID for the record name (for example,ocsp.xxxxxxxx).

Configure a Route 53 resolver inbound endpoint for your VPC
QuickSight doesn’t use the standard AWS resolver (the VPC’s .2 resolver). To resolve private DNS from QuickSight, you need to set up Route 53 resolver endpoints.
First, we create a security group for the Route 53 resolver inbound endpoint.
- Pe Grupuri de securitate page of the Amazon VPC console, choose Create security group.
- Enter a name for your security group (for example,
quicksight-doc-route53-resolver-sg) și o descriere. - Choose the VPC ID used in previous steps.
- Create rules that allow for DNS (Port 53) over UDP and TCP from within the VPC CIDR block.
- Alege Create security group.
- Note the security group ID, because we now add a rule to allow traffic to the VPC endpoint security group.

Now we create the Route 53 resolver inbound endpoint for our VPC.
- On the Route 53 console, choose Inbound endpoint în panoul de navigare.
- Alege Creați un punct final de intrare.
- Pentru Numele finalului, introduceți un nume (de exemplu,
quicksight-inbound-resolver). - Pentru VPC în regiune, choose the VPC ID used in previous steps.
- Pentru Security group for the endpoint, choose the security group ID you saved earlier.

- În Adresa IP section, choose two Availability Zones and subnets, and leave Use an IP address that is selected automatically selectat.

- Alege Trimite mesaj.
- Choose the inbound endpoint after it’s created and take note of the two IP addresses for the resolvers.

Connect a VPC to QuickSight
To connect a VPC to QuickSight, complete the following steps:
- Pe Grupuri de securitate page of the Amazon VPC console, choose Create security group.
- Introduceți un nume (de exemplu,
quicksight-snowflake-privatelink-sg) și o descriere. - Choose the VPC ID used in previous steps.
Security groups for QuickSight are different from other security groups in that they are stateless, rather than stateful. This means you must explicitly allow return traffic from the targeted security group. The inbound rule in your security group must allow traffic on all ports. It needs to do this because the destination port number of any inbound return packets is set to a randomly allocated port number. For more information, see Reguli de intrare.


- Alege Create security group.
- Take note of the security group ID, because we now add a rule to allow traffic to the VPC endpoint security group.
- Pe Grupuri de securitate page, search for the security group ID that is used for the VPC endpoint.
- Alege Editați regulile de intrare.
- Add rules for both HTTPS and HTTP traffic, using the security group ID for the security group you created as the source.
- Alege Salvează regulile.

Next, we move to the QuickSight console to configure the VPC connection.
- Navigați la consola QuickSight.
- Choose the user name and choose Gestionați QuickSight.

- În panoul de navigare, alegeți Manage VPC connections.
- Alege Add a VPC connection.
- Pentru VPC connection name, introduceți un nume (de exemplu,
snowflake-privatelink). - Pentru ID VPC, choose the VPC used in previous steps.
- Pentru ID de subrețea, choose one of the subnets that has a VPC endpoint, as specified when you created the endpoint earlier.
- Pentru Security group ID, enter the ID of the security group you created.
- Pentru DNS resolver endpoints, enter the two IPs for the inbound resolver endpoint you created earlier.

- Alege Crea.
Set up a Snowflake data source through the VPC
To set up a Snowflake data source, complete the following steps.
- Pe consola QuickSight, alegeți Datasets în pagina de navigare.
- Alege Set de date nou.
- Choose the Snowflake option.
- Pentru Numele sursei de date, introduceți un nume (de exemplu,
snowflake). - Pentru Tipul conexiunii¸ choose the VPC connection you created earlier (
snowflake-privatelink). - Pentru Server de baze de date, introduce
privatelink-account-url. - Pentru Numele bazei de date, enter the name of your database.
- Pentru Depozit, enter the name of a running Snowflake warehouse.
- Pentru Nume de utilizator, enter your Snowflake username.
- Pentru Parolă, enter your Snowflake password.
- Alege valida.
- Upon successful validation, choose Creați sursa de date.

Create your first QuickSight dashboard
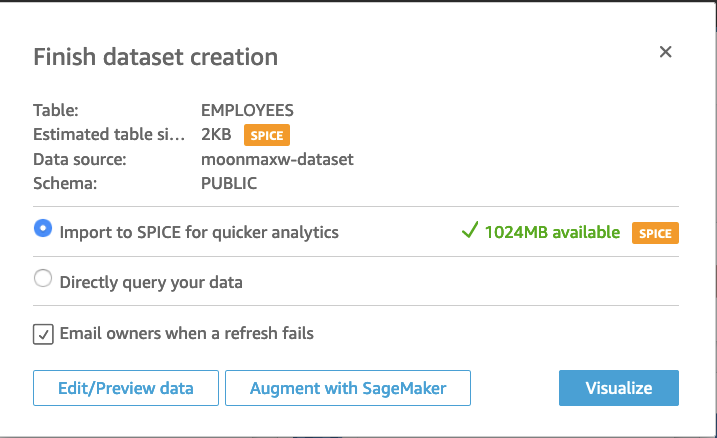
In this section, we cover creating a dataset in QuickSight, then using this data in a visualization. We’re using a dummy dataset that has information about fictional employees.
- Pentru Schemă, choose your schema.
- Pentru Mese, select your tables.
- Alege Selectați.

În Finalizați crearea setului de date section, you can determine if QuickSight imports your dataset into SPICE to improve query performance or directly queries your data each time a dashboard is loaded. For more information about SPICE, see Import de date în SPICE.
- Pentru această postare, selectăm Importați în SPICE pentru analize mai rapide.
- Alege imagina.
Now that we have the schema, table, and SPICE configuration for the dataset, we can create our first visualization.
- Choose a field from the available fields list. For this post, we choose Oraș.
- Choose a visualization in the Tipuri vizuale

This only scratches the surface of the visualization capabilities of QuickSight. For more information, see Working with Amazon QuickSight Visuals.
Next, we cover a network configuration that allows for QuickSight to be connected to one VPC with AWS PrivateLink in another VPC, and use VPC peering to allow QuickSight to use the AWS PrivateLink connection.
QuickSight connection to Snowflake via AWS PrivateLink and VPC peering within the same Region
In this section, we show you how to connect to Snowflake with QuickSight with two VPCs peered and AWS PrivateLink. The following diagram illustrates the solution architecture.

Configurați peeringul VPC
First, we create the VPC peering connection from the requesting VPC.
- Pe Conexiuni peering page of the Amazon VPC console, choose Creați o conexiune de peering.
- Pentru Selectați un VPC local cu care să vă conectați, choose the VPC in which you configured your Snowflake AWS PrivateLink connection.

- În Selectați un alt VPC cu care să vă conectați section, leave the default options for Cont și Regiune (Contul meu și This Region, respectiv).
- Pentru VPC (Acceptator), choose the VPC where your QuickSight is connected to.

- Alege Creați o conexiune de peering.
Next, we accept the VPC connection from the accepting VPC.
- Pe Conexiuni peering page, select the connection you created.
- Pe Acţiuni meniu, alegeți Accept.
- Review the information about the request. If everything looks correct, choose Da, Accept.

Next, we configure DNS to resolve between the two VPCs.
- Pe Conexiuni peering page, choose your new peering connection.
- Pe DNS tab, check if the two options show as Invalid.
If they’re enabled, you can skip to the steps on creating route tables.
- Pe Acţiuni meniu, alegeți Edit DNS Settings.
This requires your VPC to have DNS host name and resolution enabled.
- Select both check boxes to allow DNS to resolve from both the acceptor and requestor VPCs.
- Alege Economisiți.
Next, create the route table entry to allow for routes to propagate between the two VPCs.
- Pe Tabelele de rute page, choose the route tables in your requesting VPC.
- Pe Traseul fila, alegeți Edit routes.
- Add a route for the CIDR block that your peered VPC uses (for this post, 172.31.0.0/16).
- Alege Save routes.

- Repeat for the route tables in your accepter VPC.

Configure DNS in the accepter VPC
In this section, we associate the accepter VPC that with the same private hosted zone as the requester VPC (<region>.privatelink.snowflakecomputing.com).
- On the Route 53 console, choose Hosted zones în panoul de navigare.
- Select the hosted zone
<region>.privatelink.snowflakecomputing.comȘi alegeți Editati. - În VPCs to associate with the hosted zone secțiune, pentru a alege Add VPC.
- Choose the Region and VPC ID associated with the accepter VPC.

- Alege Salvează modificările.
Configure Route 53 resolver inbound endpoints in the accepter VPC
To configure your Route 53 resolver inbound endpoints, complete the following steps:
- Pe Grupuri de securitate page of the Amazon VPC console, choose Create security group.
- Introduceți un nume (de exemplu,
quicksight-doc-route53-resolver-sg) și o descriere. - Choose the VPC ID used in previous steps.
- Create rules that allow for DNS (port 53) over UDP and TCP from within the VPC CIDR block (for this post, 172.31.0.0/16).
- Alege Create security group.

- Take note of the security group ID, because we now add a rule to allow traffic to the VPC endpoint security group.
Next, we set up the Route 53 inbound endpoint for this VPC.
- On the Route 53 console, choose Inbound endpoint în panoul de navigare.
- Alege Creați un punct final de intrare.
- Enter a name for the endpoint (for example,
quicksight-inbound-resolver). - Pentru VPC în regiune, choose the VPC ID for the accepter VPC.
- Pentru Grup de securitate, choose the security group ID you saved earlier.
- În Adresa IP section, select two Availability Zones and subnets, and leave Use an IP address that is selected automatically
- Alege Trimite mesaj.
- Choose the inbound endpoint after it’s created.
- After the inbound endpoint has provisioned, note the two IP addresses for the resolvers.

Connect the accepter VPC to QuickSight
To start, we need to create a security group for QuickSight to allow traffic to the Route 53 resolver inbound endpoints, the VPC endpoint for AWS PrivateLink, and traffic within the local network.
- Pe Grupuri de securitate page of the Amazon VPC console, choose Create security group.
- Introduceți un nume (de exemplu,
quicksight-snowflake-privatelink-vpc-peering-sg) și o descriere. - Choose the VPC ID for the accepter VPC.
- Create the following ingress rules:
-
- One rule for the local network for all TCP ports (e.g., 172.31.0.0/16).
- One rule allowing DNS traffic from the security group for the Route 53 resolver inbound endpoint for all TCP ports.
- One rule allowing DNS traffic from the security group for the Route 53 resolver inbound endpoint for all UDP ports.
- One rule allowing traffic to the security group for the VPC endpoint (located in the peered VPC).

As discussed earlier, security groups for QuickSight are different from other security groups. You must explicitly allow return traffic from the targeted security group, and the inbound rule in your security group must allow traffic on all ports. For more information, see Reguli de intrare.
Next, we modify the security group for the Route 53 resolver inbound endpoint to allow traffic from the security group we created.
- Pe Grupuri de securitate page, search for the security group ID used for the Route 53 resolver inbound endpoint.
- Alege Editați regulile de intrare.
- Add rules for both DNS over UDP and DNS over TCP, using the security group ID for the security group we created for QuickSight as the source.

- Alege Salvează regulile.
Next, modify the security group that was created for the VPC endpoint for the AWS PrivateLink connection.
- Pe Grupuri de securitate page, search for the security group ID used for the VPC endpoint for the AWS PrivateLink connection.
- Alege Editați regulile de intrare.
- Add rules for both HTTPS and HTTP, using the security group ID for the security group created for QuickSight as the source.
- Alege Salvează regulile.

Next, we set up the VPC connection in QuickSight.
- On the QuickSight console, choose the user name and choose Gestionați QuickSight.
- În panoul de navigare, alegeți Manage VPC connections.
- Alege Add a VPC connection.
- Pentru VPC connection name¸ introduceți un nume (de exemplu,
snowflake-privatelink-vpc-peering). - Pentru Subrețea, choose a subnet ID that has a route table with a peering connection to the requester VPC where the AWS PrivateLink connection resides.
- Pentru Security group ID, enter the ID of the security group created earlier.
- Pentru DNS resolver endpoints, enter the two IPs for the inbound resolver endpoint you created.
- Alege Crea.

Set up a Snowflake data source in QuickSight through the VPC
To set up a Snowflake data source in QuickSight, complete the following steps:
- Pe consola QuickSight, alegeți Datasets în panoul de navigare.
- Alege Set de date nou.
- Choose the Snowflake option.
- Enter a data source name (for example,
snowflake-dataset). - Choose the VPC connection you created (
snowflake-privatelink). - Pentru Server de baze de date, introduceți tasta
privatelink-account-url. - Pentru Numele bazei de date, enter the name of your database.
- Pentru Depozit, enter the name of a running Snowflake warehouse.
- Pentru Nume de utilizator, enter your Snowflake username.
- Pentru Parolă, enter your Snowflake password.
- Alege valida.
- Upon successful validation, choose Creați sursa de date.
For steps to create a dashboard, see the earlier section, Create your first QuickSight dashboard.
In the next section, we cover a similar network configuration, with the difference being that we use cross-Region VPC peering.
QuickSight connection to Snowflake via AWS PrivateLink and VPC peering across Regions
In this section, we show you how to connect to Snowflake with QuickSight over AWS PrivateLink with two VPCs peered across Regions.
We refer to Regions generically throughout this post, denoting the Region that has the Snowflake AWS PrivateLink connection as Region A and the Region in which QuickSight is set up as Region B.
Următoarea diagramă ilustrează arhitectura soluției noastre.

Set up VPC peering between two Regions
First, we create the VPC peering connection from the requesting VPC.
- Navigați către Conexiuni peering page on the Amazon VPC console in Region B (the Region in which you plan to use QuickSight to deploy dashboards).
- Alege Creați o conexiune de peering.
- În Selectați un VPC local cu care să vă conectați secțiune, pt VPC (solicitant), choose the VPC in which you have connected or intend to connect QuickSight.

- Pentru Selectați un alt VPC cu care să vă conectați, Selectați Contul meu și Another Region.
- Choose the Region in which your Snowflake AWS PrivateLink connection exists.
- Pentru VPC ID (Accepter), enter the VPC ID for the VPC in which your Snowflake AWS PrivateLink exists.

- Alege Creați o conexiune de peering.
- Copy the VPC peering connection ID so we can easily locate it in the next steps (it looks like
pcx-xxxxxxxxxxxx).
Next, we accept the VPC peering connection from the Region in which you created your AWS PrivateLink connection.
- Navigate to the Amazon VPC console in Region A (where your Snowflake AWS PrivateLink connection exists).
- Search for and select the peering connection you created.
- Pe Acţiuni meniu, alegeți Acceptați cererea.

- Review the information about the request. If everything looks correct, choose Da, Accept.

Next, we configure DNS to resolve between the two VPCs.
- Pe Conexiuni peering page of the Amazon VPC console, choose your newly created VPC peering connection.
- Pe DNS tab, check if the two options show Invalid.
If they’re enabled, skip to the steps on creating route tables.
- Pe Acţiuni meniu, alegeți Editați setările DNS.
This requires your VPC to have DNS host name and resolution enabled.
- Select both check boxes to allow DNS to resolve from both the accepter and requestor VPCs.
- Alege Economisiți.
Next, we create the route table entry to allow for routes to propagate between the two VPCs for Region B.
- Navigate to the Amazon VPC console in Region B (the Region in which you plan to use QuickSight to deploy dashboards).
- În panoul de navigare, alegeți Tabelele de rute.
- Select the route tables in your requesting VPC.
- Pe Traseul fila, alegeți Edit routes.
- Add a route for the CIDR block that your peered VPC uses (for this post, 10.0.0.0/16 is the CIDR block for the VPC in which the Snowflake AWS PrivateLink connection resides).
- Alege Save routes.
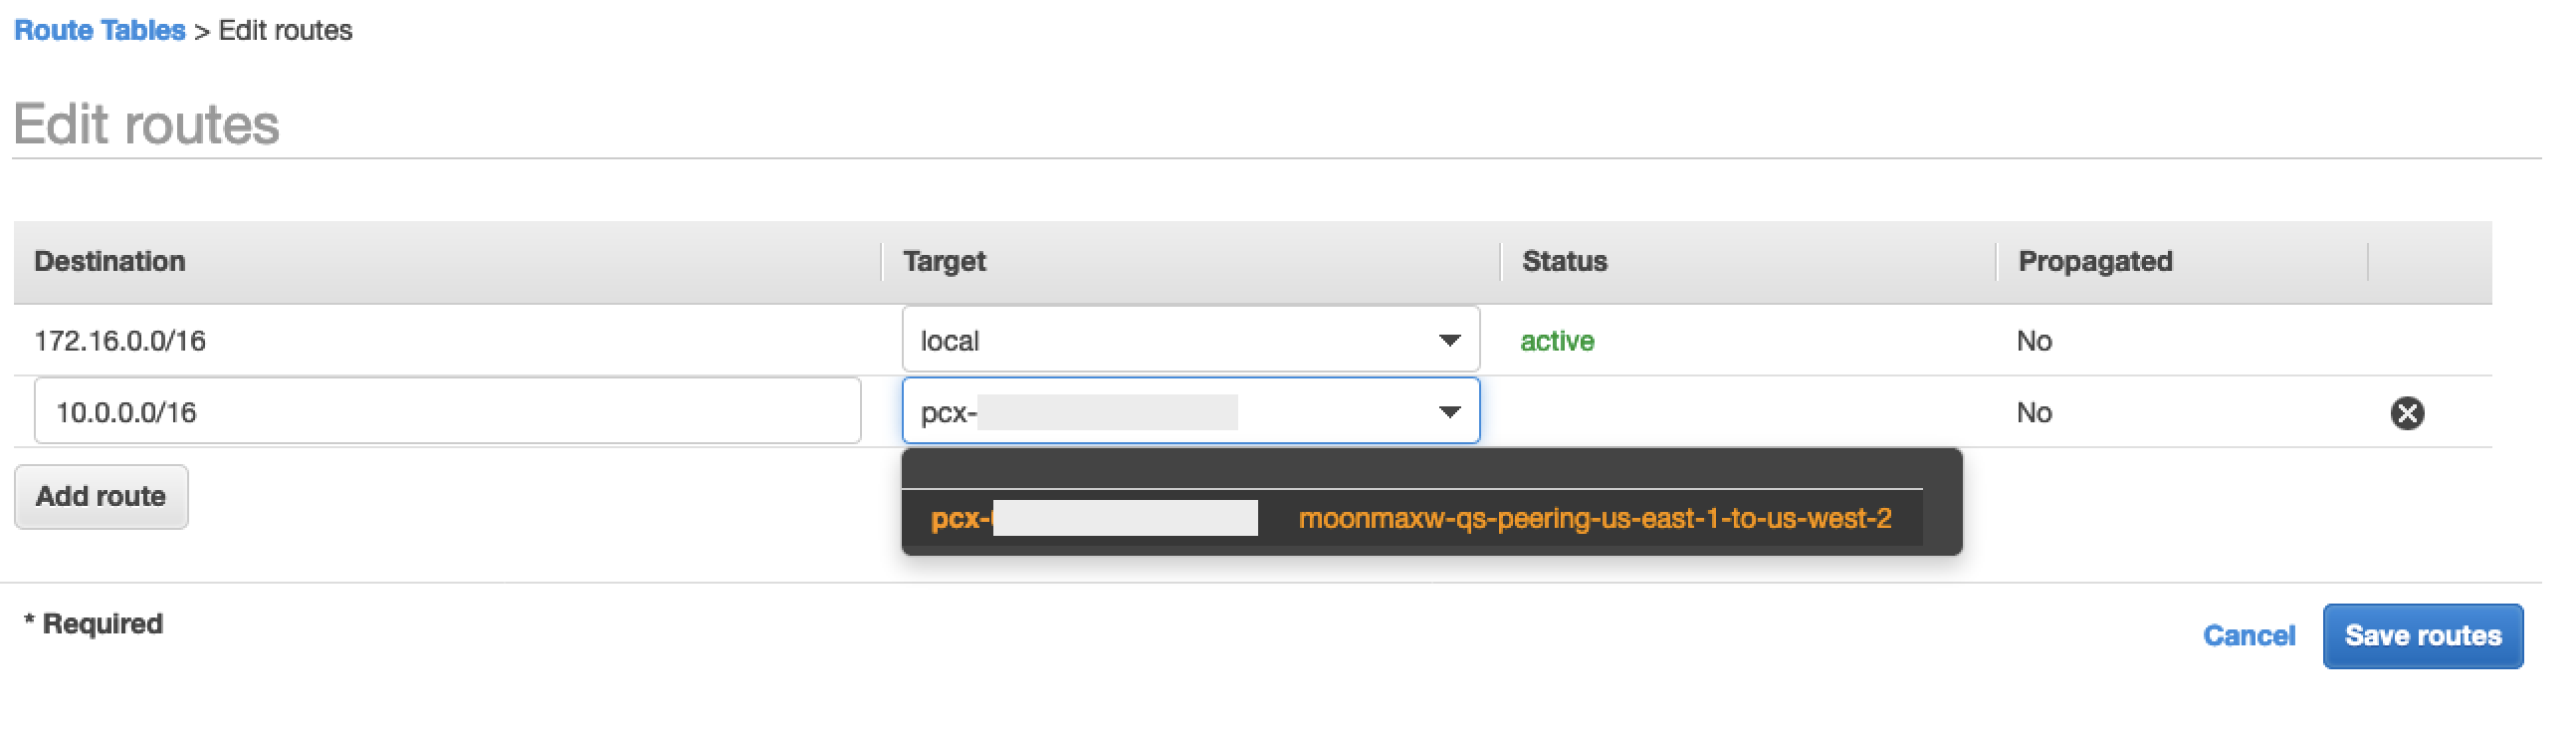
Next, create the route table entry to allow for routes to propagate between the two VPCs for Region A.
- Navigate to the Amazon VPC console in Region A (where your Snowflake AWS PrivateLink connection exists).
- Repeat the previous steps, using the CIDR block for the peered VPC (in this post, 172.16.0.0/16).

Configure DNS in the VPC in Region B
First, we need to associate the VPC in Region B (where you deploy QuickSight) with the same private hosted zone as the VPC in Region A where your Snowflake AWS PrivateLink connection exists (<region>.privatelink.snowflakecomputing.com).
- On the Route 53 console, choose Hosted zones în panoul de navigare.
- Select the private hosted zone
<region>.privatelink.snowflakecomputing.comȘi alegeți Editati. - În VPCs to associate with the hosted zone secțiune, pentru a alege Add VPC.
- Choose the Region and VPC ID associated with the accepter VPC.

- Alege Salvează modificările.
Configure the Route 53 resolver inbound endpoint for your VPC in Region B
To configure the resolver inbound endpoint in Region B, complete the following steps:
- Pe Grupuri de securitate page on the Amazon VPC console, choose Create security group.
- Introduceți un nume (de exemplu,
quicksight-doc-route53-resolver-sg) și o descriere. - Choose the VPC ID used in previous steps.
- Create rules that allow for DNS (port 53) over UDP and TCP from within the VPC CIDR block (for this post, 172.16.0.0/16).

- Alege Create security group.
- Take note the security group ID, because we now add a rule to allow traffic to the VPC endpoint security group.
Next, we set up the Route 53 inbound endpoint for this VPC.
- On the Route 53 console, choose Inbound endpoint în panoul de navigare.
- Alege Creați un punct final de intrare.
- Enter a name for the endpoint (for example,
quicksight-inbound-resolver). - Pentru VPC în regiune, choose the VPC ID used in previous steps.
- Pentru Grup de securitate, choose the security group ID from the previous step.
- În Adresa IP section, select two Availability Zones and subnets, and leave Use an IP address that is selected automatically
- Alege Trimite mesaj.
- Choose the inbound endpoint after it’s created.
- After the inbound endpoint has provisioned, note the two IP addresses for the resolvers.
Connect the VPC to QuickSight in Region B
To start, we need to create a security group for QuickSight to allow traffic to the Route 53 resolver inbound endpoints, the VPC endpoint for AWS PrivateLink, and traffic within the local network.
- Pe Grupuri de securitate page of the Amazon VPC console in Region B, choose Create security group.
- Introduceți un nume (de exemplu,
quicksight-snowflake-sg) și o descriere. - Choose the VPC ID for the VPC where you previously created the VPC peering connection.
- Create the following ingress rules:
-
- One for the local network all TCP ports (for example, 172.16.0.0/16).
- One rule allowing DNS traffic from the security group for the Route 53 resolver inbound endpoint for all TCP ports.
- One rule allowing DNS traffic from the security group for the Route 53 resolver inbound endpoint for all UDP ports.
- One allowing traffic for all TCP ports to the CIDR block for the VPC located in Region A, where your Snowflake AWS PrivateLink connection exists (for this post, 10.0.0.0/16).

As discussed earlier, security groups for QuickSight are different from other security groups. You must explicitly allow return traffic from the targeted security group, and the inbound rule in your security group must allow traffic on all ports. For more information, see Reguli de intrare.
Next, we modify the security group for the Route 53 resolver inbound endpoint in Region B to allow traffic from the security group we created.
- Pe Grupuri de securitate page, search for the security group ID used for the Route 53 resolver inbound endpoint.
- Alege Editați regulile de intrare.
- Add rules for both DNS over UDP and DNS over TCP, using the CIDR block for the VPC in Region B (for this post, 172.16.0.0/16).

- Alege Salvează regulile.
Next, we need to modify the security group we’re using for the AWS PrivateLink connection.
- Navigați către Grupuri de securitate page on the Amazon VPC console in Region A.
- Search for the security group ID that is used for the VPC endpoint for the AWS PrivateLink connection.
- Alege Editați regulile de intrare.
- Add rules for both HTTPS and HTTP, using the CIDR Block for the VPC in Region B as the source (for this post, 172.16.0.0/16).

- Alege Salvează regulile.
Finally, we set up the QuickSight VPC connection.
- Navigate to the QuickSight console in Region B.
- Choose the user name and choose Gestionați QuickSight.
- În panoul de navigare, alegeți Manage VPC connection.
- Alege Add a VPC connection.
- Pentru VPC connection name, introduceți un nume de conexiune (de exemplu,
snowflake-privatelink-cross-region). - Pentru ID VPC, choose the VPC ID of the VPC in Region B.
- Pentru Subrețea, choose a subnet ID from the VPC in Region B that has a route table with a peering connection to the VPC where the AWS PrivateLink connection resides.
- Pentru Security group ID, enter the ID of the security group you created.
- Pentru DNS resolver endpoints, enter the two IPs for the inbound resolver endpoint created earlier.

- Alege Crea.
Set up a Snowflake data source in QuickSight through the VPC
To set up a Snowflake data source in QuickSight, complete the following steps:
- Pe consola QuickSight, alegeți Datasets în panoul de navigare.
- Alege Set de date nou.
- Choose the Snowflake option.
- Enter a name for your data source (for example,
snowflake-dataset). - Choose the VPC connection you created (
snowflake-privatelink). - Pentru Server de baze de date, introduceți tasta
privatelink-account-url. - Pentru Numele bazei de date, enter the name of your database.
- Pentru Depozit, enter the name of a running Snowflake warehouse.
- Pentru Nume de utilizator, enter your Snowflake username.
- Pentru Parolă, enter your Snowflake password.
- Alege valida.
- Upon successful validation, choose Creați sursa de date.
For steps to create a dashboard, see the earlier section, Create your first QuickSight dashboard.
For our last configuration, we cover how to set up a QuickSight connection to Snowflake without AWS PrivateLink.
QuickSight connection to Snowflake without AWS PrivateLink
In this section, we show you how to connect to Snowflake with QuickSight without using AWS PrivateLink.
- Pe consola QuickSight, alegeți Datasets în panoul de navigare.
- Alege Set de date nou.
- Choose the Snowflake option.
- Enter a data source name (for example,
snowflake-dataset). - Leave the connection type as Retea publica.
- Pentru Numele bazei de date, enter the name of your database.
- For your database server, enter the URL you use to log in to your Snowflake (
xxxxxxxx.snowflakecomputing.com). - Pentru Depozit, enter the name of a running Snowflake warehouse.
- Pentru Nume de utilizator, enter your Snowflake username.
- Pentru Parolă, enter your Snowflake password.
- Alege valida.
- Alege Creați sursa de date.
For steps to create a dashboard, see the earlier section, Create your first QuickSight dashboard.
A curăța
If your work with QuickSight, Snowflake, and PrivateLink is complete, remove your Route53 resolver inbound endpoint, Route 53 private host zone, Şi Punct final VPC for Snowflake in order to avoid incurring additional fees.
Concluzie
In this post, we covered four scenarios for connecting QuickSight to Snowflake as a data source using AWS PrivateLink for connectivity in three different scenarios: the same VPC, with VPC peering in the same Region, and with VPC peering across Regions. We also covered how to connect QuickSight to Snowflake without AWS PrivateLink.
After you set up the data source, you can gain further insights from your data by setting up ML Insights in QuickSight, set up graphical representations of your data using QuickSight vizuale, Sau alătura data from multiple datasets, as well as all other QuickSight features.
Despre autor
 Maxwell Moon is a Senior Solutions Architect at AWS working with Independent Software Vendors (ISVs) to design and scale their applications on AWS. Outside of work, Maxwell is a dad to two cats, is an avid supporter of the Wolverhampton Wanderers Football Club, and is patiently waiting for a new wave of ska music.
 Bosco Albuquerque is a Sr Partner Solution Architect at AWS and has over 20 years of experience in working with database and analytics products, from enterprise database vendors, and cloud providers and has helped large technology companies in designing data analytics solutions as well as led engineering teams is designing and implementing data analytics platforms and data products.
- '
- "
- 100
- 11
- 7
- 9
- acces
- Cont
- Suplimentar
- TOATE
- Permiterea
- Amazon
- Google Analytics
- aplicatii
- arhitectură
- disponibilitate
- AWS
- frontieră
- afaceri
- business intelligence
- apel
- Pisici
- Cloud
- club
- cod
- Companii
- Conexiuni
- Suport conectare
- Crearea
- tablou de bord
- de date
- Analiza datelor
- Baza de date
- Amenajări
- dns
- editor
- de angajați
- Punct final
- Securitatea punctului final
- Inginerie
- Afacere
- Extinde
- DESCRIERE
- Taxe
- Domenii
- First
- Fotbal
- Înainte
- Complet
- Verde
- grup
- Înalt
- Cum
- Cum Pentru a
- HTTPS
- IAM
- Identitate
- Inclusiv
- informații
- perspective
- integrare
- Inteligență
- interactiv
- IP
- Adresa IP
- IT
- mare
- Led
- Limitat
- Linie
- LINK
- Listă
- local
- muta
- Muzică
- nume
- Navigare
- reţea
- promoții
- deschide
- Opțiune
- Opţiuni
- comandă
- Altele
- partener
- Parolă
- performanță
- Platforme
- porturi
- privat
- Produse
- public
- publica
- înregistrări
- Cerinţe
- resursă
- Resurse
- Traseul
- norme
- funcţionare
- Scară
- Ecran
- Caută
- securitate
- selectate
- serverless
- set
- instalare
- simplu
- So
- Software
- soluţii
- Începe
- depozitare
- subdomeniu
- de succes
- a sustine
- Suprafață
- Tehnologia
- Sursa
- timp
- trafic
- ui
- valoare
- furnizori
- Vizualizare
- Virtual
- vizualizare
- Depozit
- Val
- site-uri web
- în
- Apartamente
- ani