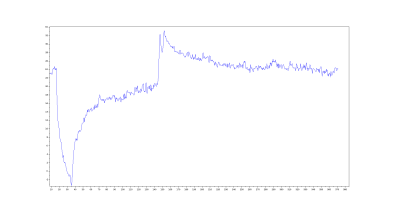
Plot of the temperature measurement using the improvised CH32V003 -based temperature sensor. (Credit: eeucalyptus)
” data-medium-file=”https://platoaistream.net/wp-content/uploads/2023/11/adding-temperature-sensor-functionality-to-the-ch32v003-mcu.png” data-large-file=”https://platoaistream.net/wp-content/uploads/2023/11/adding-temperature-sensor-functionality-to-the-ch32v003-mcu-1.png?w=800″ decoding=”async” class=”size-medium wp-image-639484″ src=”https://platoaistream.net/wp-content/uploads/2023/11/adding-temperature-sensor-functionality-to-the-ch32v003-mcu.png” alt=”Plot of the temperature measurement using the improvised CH32V003 -based temperature sensor. (Credit: eeucalyptus)” width=”400″ height=”214″ srcset=”https://platoaistream.net/wp-content/uploads/2023/11/adding-temperature-sensor-functionality-to-the-ch32v003-mcu-1.png 1920w, https://platoaistream.net/wp-content/uploads/2023/11/adding-temperature-sensor-functionality-to-the-ch32v003-mcu-1.png?resize=250,134 250w, https://platoaistream.net/wp-content/uploads/2023/11/adding-temperature-sensor-functionality-to-the-ch32v003-mcu-1.png?resize=400,214 400w, https://platoaistream.net/wp-content/uploads/2023/11/adding-temperature-sensor-functionality-to-the-ch32v003-mcu-1.png?resize=800,428 800w, https://platoaistream.net/wp-content/uploads/2023/11/adding-temperature-sensor-functionality-to-the-ch32v003-mcu-1.png?resize=1536,821 1536w” sizes=”(max-width: 400px) 100vw, 400px”>
As cheap as the WCH CH32V003 MCU is, its approximately $0.10 price tag looks far less attractive when you need to start adding on external ICs for missing basic features, such as temperature measurement. This is a feature that’s commonly found on even basic STM32 MCUs. Fear not though, as [eeucalyptus] shows, you can improvise a working solution by finding alternative sources that can act as a thermometer.
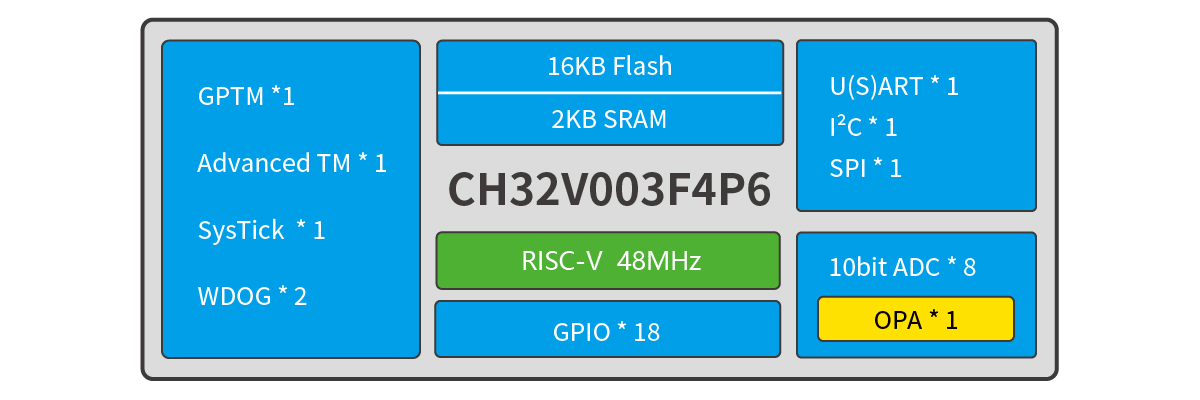
The CH32V003 is a low-end, 32-bit RISC-V-based MCU by the China-based Nanjing Qinheng Microelectronics, commonly known abbreviated as ‘WCH’, and featured on Hackaday previously. Although it features a single-core, 48 MHz CPU, its selection of peripherals is fairly basic:
Internal diagram of the CH32V003 MCU. (Credit: WCH)
” data-medium-file=”https://platoaistream.net/wp-content/uploads/2023/11/adding-temperature-sensor-functionality-to-the-ch32v003-mcu-1.jpg?w=400″ data-large-file=”https://platoaistream.net/wp-content/uploads/2023/11/adding-temperature-sensor-functionality-to-the-ch32v003-mcu.jpg” decoding=”async” class=”wp-image-639486 size-large” src=”https://platoaistream.net/wp-content/uploads/2023/11/adding-temperature-sensor-functionality-to-the-ch32v003-mcu.jpg” alt=”Internal diagram of the CH32V003 MCU. (Credit: WCH)” width=”800″ height=”267″ srcset=”https://platoaistream.net/wp-content/uploads/2023/11/adding-temperature-sensor-functionality-to-the-ch32v003-mcu-1.jpg 1200w, https://platoaistream.net/wp-content/uploads/2023/11/adding-temperature-sensor-functionality-to-the-ch32v003-mcu-1.jpg?resize=250,83 250w, https://platoaistream.net/wp-content/uploads/2023/11/adding-temperature-sensor-functionality-to-the-ch32v003-mcu-1.jpg?resize=400,133 400w, https://platoaistream.net/wp-content/uploads/2023/11/adding-temperature-sensor-functionality-to-the-ch32v003-mcu-1.jpg?resize=800,267 800w” sizes=”(max-width: 800px) 100vw, 800px”>
So how do you create an internal temperature sensor using just this? [eeucalyptus] figured that all that’s needed is to measure the drift between two internal clocks – such as the LSI and HSI – as temperatures change and use this to calibrate a temperature graph. Unfortunately, the LSI isn’t readily accessible, even through the Timer peripheral. This left the AWU (automatic wake-up unit) which also uses the LSI as a clock source. By letting it go to sleep and wake up after N LSI cycles, the AWU enabled indirect access to the LSI.
After calibrating against room temperature (~22 °C) and ice water (0 °C), a temperature plot was obtained, which could conceivably be somewhat accurate. As [eeucalyptus] warns, this is a kind of calibration that likely differs per MCU, and no attempt to quantify the absolute accuracy of this method has been made yet. Even so, as a crude temperature measurement, it might just be good enough.
- SEO Powered Content & PR Distribution. Get Amplified Today.
- PlatoData.Network Vertical Generative Ai. Empower Yourself. Access Here.
- PlatoAiStream. Web3 Intelligence. Knowledge Amplified. Access Here.
- PlatoESG. Carbon, CleanTech, Energy, Environment, Solar, Waste Management. Access Here.
- PlatoHealth. Biotech and Clinical Trials Intelligence. Access Here.
- Source: https://hackaday.com/2023/11/05/adding-temperature-sensor-functionality-to-the-ch32v003-mcu/
- :has
- :is
- :not
- $UP
- 1
- 10
- 214
- 400
- a
- Absolute
- access
- accessible
- accuracy
- accurate
- Act
- adding
- After
- against
- All
- also
- alternative
- Although
- an
- and
- approximately
- AS
- attempt
- attractive
- Automatic
- basic
- BE
- been
- between
- by
- CAN
- change
- cheap
- Clock
- Clocks
- commonly
- could
- CPU
- create
- credit
- crude
- cycles
- do
- enabled
- enough
- Ether (ETH)
- Even
- external
- fairly
- far
- fear
- Feature
- Features
- figured
- For
- found
- functionality
- Go
- good
- graph
- How
- HTML
- HTTPS
- ICE
- ICS
- internal
- IT
- ITS
- jpg
- just
- Kind
- known
- left
- less
- letting
- likely
- LOOKS
- made
- max-width
- MCU
- measure
- measurement
- method
- might
- missing
- nanjing
- Need
- needed
- no
- obtained
- of
- on
- per
- peripheral
- peripherals
- plato
- Plato Data Intelligence
- PlatoData
- previously
- price
- readily
- Room
- selection
- Shows
- sleep
- So
- solution
- somewhat
- Source
- start
- STM32
- such
- TAG
- that
- The
- this
- though?
- Through
- to
- two
- unfortunately
- unit
- use
- uses
- using
- Wake
- Wake Up
- Warns
- was
- Water
- when
- which
- working
- yet
- you
- zephyrnet


