The MORS distinguishes itself from most Modern Warfare 3 sniper rifles for one reason: It’s freakin’ railgun. While still classified as a sniper rifle, the one huge advantage of the MORS is that you must “reload” after every shot. But all that entails is a simple pull of the bolt, rather than loading in a fresh magazine or individual bullets, so it’s much quicker than its peers.
The MORS additionally has the ability to fire charged shots, which deal immense damage, and you can even customize it to be much better at taking down vehicles and armor. Snipers in Modern Warfare 3 are apt at either close-quarters combat via quickscoping or for extremely long-range engagements, but the unique thing about the MORS is that it can essentially do both — you just have to build it right.
Here’s the best MORS loadout in Modern Warfare 3 and how to unlock it via the battle pass.
How to unlock the MORS in MW3
To unlock the MORS in Modern Warfare 3 Season 3, you must complete Sector 4 on the battle pass. The quickest route there is just by completing Sector 1 and 2 along the bottom of the grid. The MORS is free to unlock too, so you don’t need to own the premium battle pass. Simply earn a grand total of 15 battle pass tokens and you can nab the MORS.
Best MORS loadout in MW3
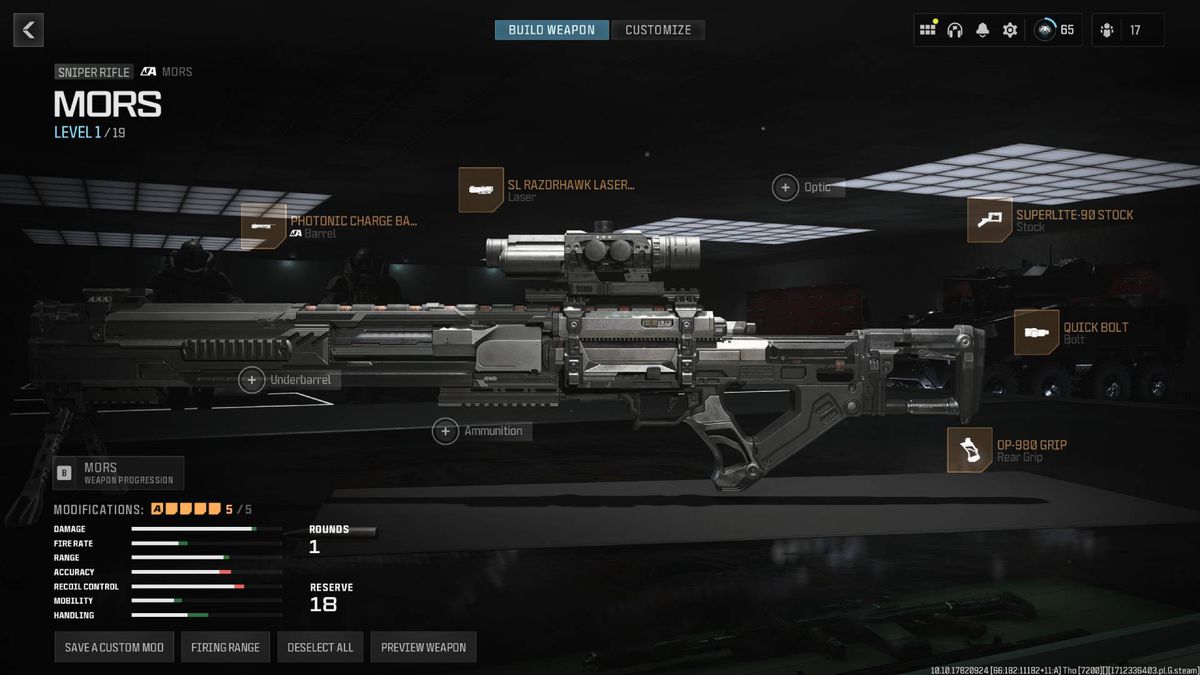
Image: Sledgehammer Games/Activision via Polygon
Here is the best MORS loadout in Modern Warfare 3:
- Barrel: Photonic Charge Barrel
- Laser: SL Razorhawk Laser Light
- Stock: Superlite-90 Stock
- Bolt: Quick Bolt
- Rear Grip: OP-980 Grip
As explained, this MORS loadout is geared toward versatility, so you can deal with enemies up close by quick-scoping, but you can also slow down your play and pick them off from afar when necessary. The star of the show in this regard is the Photonic Charge Barrel, which allows you to hold down the trigger in order to charge a shot for more damage. The stat payoff is that charged shots do much more damage, but non-charged shots aren’t actually that much weaker than using the gun without the attachment.
The most important thing to bear in mind is that the barrel also affects bullet velocity, so when you’re quick-scoping with it and not charging your shots, that isn’t a problem because your foe is likely to be fairly close. However, if you’re not charging your shots at distance, the bullet will fall short. It’s a minor trade-off for the benefits it offers.
Thanks to the Photonic Charge carrying the gun at long range, it’s best to gear the rest of your attachments toward its quickscoping element, something the SL Razorhawk Laser Light excels at. This buffs your aim walking steadiness, tac stance spread, sprint to fire speed, and your aim down sight speed, and the only trade-off is that your laser and flashlight will be visible when aiming down the sights. A very minor con when it comes to this sniper.
The other three attachments have the same thinking behind them, including the Superlite-90 Stock, which exchanges recoil control for speed in plenty of areas; the Quick Bolt, which allows you to rechamber your next shot much quicker; and the OP-980 Grip for much faster ADS speed. This is the most flexible attachment slot, though, so if you want to focus on dealing vehicle damage you can switch this out for a new ammo type, or for an underbarrel attachment instead as there are plenty to choose from.
Best MORS class in MW3
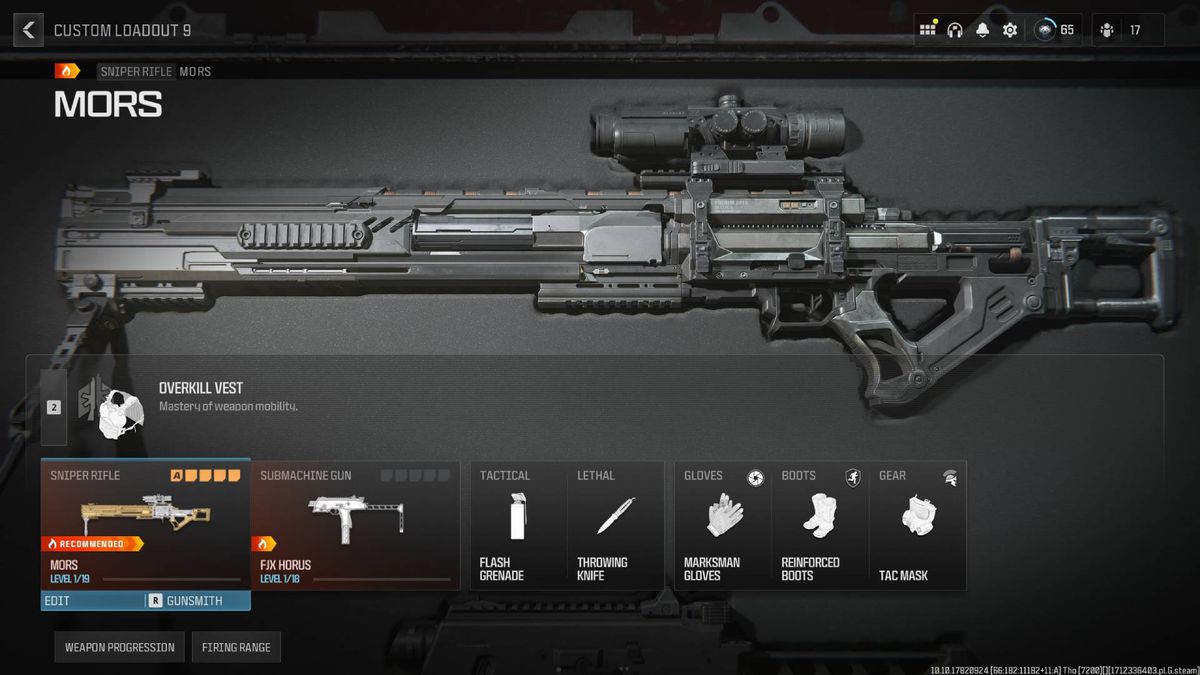
Image: Sledgehammer Games/Activision via Polygon
Here is the best class to use alongside the MORS in Modern Warfare 3:
- Vest: Overkill Vest
- Secondary: FJX Horus
- Tactical: Flash Grenade
- Lethal: Throwing Knife
- Gloves: Marksman Gloves
- Boots: Reinforced Boots
- Gear: Tac Mask
Since using any sniper rifle can put you in a sticky situation if you miss a few shots, rolling with the Overkill Vest makes sense, and what better gun to use it with than the FJX Horus? The SMG packs a serious punch (especially if you kit it out with the right loadout) and you can switch to it at close range when needed. The Overkill Vest also has the benefit of making weapon swaps faster, alongside letting you reload while sprinting.
The Flash Grenade is a fairly standard tactical, helpful when clearing rooms, while the Throwing Knife is perfect for helping finish enemies off at close range thanks to the fact it’s a one-hit kill. When it comes to the gloves, none of the options are great for this build, but the Overkill Vest also gives you the effects of Marksman Gloves if you have the Quick-Grip Gloves or Commando Gloves equipped anyway, so you may as well equip the Marksman Gloves from the get-go.
The Reinforced Boots make you immune to movement reduction effects, which can be a pain with a fast-paced agility focus class like this. Finally, the Tac Mask will reduce the effects of enemy tactical grenades, a perk whose helpfulness cannot be overstated.
For more Modern Warfare 3 guides, see how to switch to Tactical Stance, and check our guides on the best TAQ Evolvere loadout, best Striker loadout, best SVS 545 loadout, best XRK Stalker loadout, best MCW loadout, and best AMR9 loadout.
If you’re jumping into the campaign, find all of the items and weapons in “Precious Cargo” and “Reactor,” see how to earn the Back in the Field trophy and the A Shot Blocked achievement, or check out our walkthrough for “Deep Cover.”
- SEO Powered Content & PR Distribution. Get Amplified Today.
- PlatoData.Network Vertical Generative Ai. Empower Yourself. Access Here.
- PlatoAiStream. Web3 Intelligence. Knowledge Amplified. Access Here.
- PlatoESG. Carbon, CleanTech, Energy, Environment, Solar, Waste Management. Access Here.
- PlatoHealth. Biotech and Clinical Trials Intelligence. Access Here.
- Source: https://www.polygon.com/modern-warfare-3-guides/24122389/best-mors-loadout-class-build-mw3
- :has
- :is
- :not
- $UP
- 1
- 15%
- 2%
- 4
- a
- ability
- About
- actually
- Additionally
- Ads
- ADvantage
- afar
- affects
- After
- aim
- Aiming
- All
- allows
- along
- alongside
- also
- an
- and
- any
- anyway
- APT
- ARE
- areas
- AS
- At
- Battle
- Battle Pass
- BE
- Bear
- because
- behind
- benefit
- benefits
- BEST
- Better
- blocked
- Bolt
- both
- Bottom
- build
- but
- by
- Campaign
- CAN
- cannot
- carrying
- charge
- charged
- charging
- check
- Choose
- class
- classified
- Clearing
- Close
- combat
- comes
- complete
- completing
- control
- cover
- customize
- damage
- deal
- dealing
- distance
- distinguishes
- do
- Dont
- down
- earn
- effects
- either
- element
- enemies
- engagements
- entails
- equip
- equipped
- especially
- essentially
- Ether (ETH)
- Even
- Every
- Exchanges
- explained
- extremely
- fact
- fairly
- Fall
- fast-paced
- faster
- few
- field
- Finally
- Find
- finish
- Fire
- flexible
- Focus
- For
- Free
- fresh
- from
- Gear
- geared
- gives
- grand
- Grid
- Guides
- Have
- helpful
- helping
- hold
- How
- How To
- However
- HTTPS
- huge
- if
- immense
- immune
- important
- in
- Including
- individual
- instead
- into
- IT
- items
- ITS
- itself
- jpg
- just
- Kill
- kit
- laser
- letting
- like
- likely
- loading
- Loadout
- Long
- magazine
- make
- MAKES
- Making
- May..
- Menu
- mind
- minor
- miss
- Modern
- Modern Warfare
- more
- most
- movement
- much
- must
- NAB
- necessary
- Need
- needed
- New
- next
- None
- of
- off
- Offers
- on
- ONE
- only
- Options
- or
- order
- Other
- our
- out
- overstated
- own
- Packs
- Pain
- pass
- peers
- perfect
- perk
- pick
- plato
- Plato Data Intelligence
- PlatoData
- Play
- Plenty
- Polygon
- Premium
- Problem
- punch
- put
- quicker
- quickest
- range
- rather
- reason
- Recoil
- reduce
- reduction
- regard
- REST
- right
- Rolling
- Rooms
- Route
- same
- sector
- see
- sense
- serious
- Short
- shot
- shots
- show
- Shows
- Sight
- Sights
- Simple
- simply
- situation
- Sledgehammer
- slot
- slow
- So
- something
- speed
- spread
- Sprint
- stance
- standard
- Star
- sticky
- Still
- Swaps
- Switch
- tactical
- taking
- than
- thanks
- that
- The
- Them
- There.
- thing
- Thinking
- this
- though?
- three
- to
- Tokens
- too
- Total
- toward
- trigger
- type
- unique
- unlock
- use
- using
- vehicle
- Vehicles
- VeloCity
- versatility
- very
- via
- visible
- walking
- walkthrough
- want
- weaker
- Weapons
- webp
- WELL
- What
- when
- which
- while
- whose
- will
- with
- without
- you
- Your
- zephyrnet