by Wax
GSL Code S’s reputation as the most difficult SC2 competition in the world may have faded considerably over the years, but Group B of the RO16 demonstrated why some fans still believe it deserves that designation. In the same night, elite Zerg and former world champion  Reynor was eliminated with a 0-2 (0-4 map score) record, while an allegedly washed-up soO showed his veteran class and advanced in second place.
At least the first place finish went according to popular predictions, as last season’s runner-up herO advanced in first place. He looked very much like the best PvZ player in the world, as he took one-sided 2-0 victories against both Reynor and soO to punch his RO8 ticket. One of the burning questions headed into the group was why herO had decided to pick Reynor as his initial opponent in the group selections. In his post-match interview, herO said that he had wanted to play ZvP, but being friendly with all the other Zerg options made it difficult to pick from among them.
After losing herO in his initial match, Reynor was given the boot from Code S in his losers’ match against GuMiho. The Towel Terran brought his signature mech TvZ to the match, and Reynor’s inability to find an answer to the unorthodox composition led to his defeat.
While GuMiho’s mech shined against Reynor, his insistence on playing bio against soO helped the six-time Code S silver medalist advance in second place. While GuMiho’s infantry’s play left much to be desired, soO turned the clock back to 2014 and smashed through the Terran lines with swarms of Lair-tech units. soO ended up taking two BO3 victories against GuMiho (2-0 and 2-1), which was enough to see him through to the Code S RO8 for the first time since 2022.
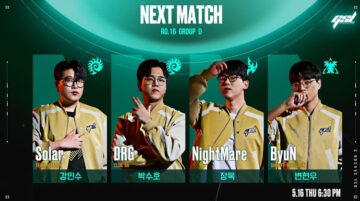
Code S will resume on Thursday, May 16 9:30am GMT (GMT+00:00) with Solar, DRG, NightMare, and ByuN playing in Group D of the RO16 (Group C will be placed on May 23rd).
Recommended Games
GuMiho vs Reynor – Losers Match (VOD): While this group wasn’t quite as entertaining as the other RO16 groups we’ve seen this year, GuMiho made sure to keep things interesting by bringing his unique brand of TvZ mech to the table.
Match Recaps
Group B –
[embedded content]
Initial Match #1: herO 2 – 0 Reynor
Game 1 – Oceanborn (herO win): herO started the series by playing an Oracle opener into a Chargelot-Immortal-Archon +1 timing off of three bases, while Reynor also decided to play aggressively by cutting Drones at 65 and going for a Roach-Ravager-Queendrop attack. The two players were largely unaware of each other’s intentions until the two forces met in the middle of the map, and both players decided to fight it out then and there. herO’s forces ended up carrying the day, and he pushed into Reynor’s territory and killed 20+ Drones before he was repulsed. While Reynor managed to do a bit of damage with his counterattack, it didn’t take long for herO to use his stronger economy to reconstitute his forces and finish Reynor off.
Game 2 – Ghost River (herO win): herO sent a Probe to harass Reynor from the opening bell, blocking Reynor’s natural Hatchery and forcing a Pool-first start. Reynor tried to get back at herO with an offensive Hatchery at the Protoss natural, but herO had Probes ready to thwart the attempt. Reynor’s initial batch of Zerglings barely got anything done, which turned the situation into an all-around disaster for the Italian Zerg.
herO quickly went about trying to finish his impoverished opponent, harassing with Oracle-Adept and preparing for a Robo-less Blink-Stalker all-in off of three bases. While Reynor did a decent job stalling with backdoor attacks, in the end, he was playing from too far behind to stop herO’s overwhelming Stalker-Zealot army.
Initial Match #2: soO 2 – 0 GuMiho
Game 1 – Crimson Court (soO win): GuMiho opened with a greedy fast 3-CC opener (Rax-CC-Fact-CC), while soO went for a fast Lair off of two bases.GuMiho got a good early scout with his Reaper, but he was unprepared for soO’s 6-minute attack with Roach-Ravager-Queen. And even though soO was not fully committed and was Droning up behind the attack, he was able to inflict catastrophic SCV damage against GuMiho’s minimal defense. GuMiho tried to play the game out for a while longer, but it wasn’t long before soO ended it with more Roach-Ravager.
Game 2 – Site Delta (soO win): GuMiho tried to play the same greedy build again, and this time he was unpunished as soO played a typical 3-Hatch start. Things got even better for GuMiho as his Hellions found a gap in soO’s defense and roasted 14 Drones, setting himself up nicely for the mid-game.
However, GuMiho’s first two infantry excursions were debacles, and his troops were wiped out by Hydra-Bane when they walked onto Creep. soO’s macro was really on point in this game, and it wasn’t long before he had Creep covering most of the map and a strong economy pumping out floods of units. soO didn’t give GuMiho any time to turtle up or try to take the game late, and closed things out with waves of Hydra-Bane.
Winners’ Match: herO 2 – 0 soO
Game 1 – Goldenaura (herO win): The two players settled in for a normal-ish build up in PvZ, but with herO throwing in a twist to his normal Stargate play by going for a Void Ray before Oracle. After picking off some Overlords, herO decided to go for a double-Robo Colossus & Blink Stalker timing, while soO looked to go for a Swarm Host-Roach combination.
This choice of builds ended up working heavily in herO’s favor, as he attacked with his 4-Colossus + Stalkers army soon after soO’s Swarm Hosts hatched. soO was forced to use his first wave of Locusts to try and stall, but the Colossus lasers quickly burned them up. herO continued to push forward, incinerating each new wave of Locusts until soO had to GG out.
Game 2 – Site Delta (herO win): soO looked like he was opening standard at first, but soon revealed his devious hand by stopping at 20 Drones for a fast Zergling-Baneling bust to exploit herO’s tendency of using a Pylon as part of his walloff. soO’s attack busted through herO’s wall, but he only managed to kill 12 Probes before Adepts and Oracles cleaned up the surviving Zerglings. Since soO’s build left him with no chance of winning if he didn’t do crippling damage, he shrewdly GG’d out after he realized he had failed to achieve his objective.
Losers’ Match: GuMiho 2 – 0 Reynor
Game 1 – Oceanborn (GuMiho win): GuMiho continued with his fast 3-CC openers from the soO series, while Reynor went for a typical macro start. However, GuMiho gave his build a twist, faking Hellion-Banshee into bio while actually going for one of his old school builds: a 2-Thor drop + Hellbat timing. Fortunately for Reynor, he had prepared plenty of Queens and Banelings to stop some kind of attack and he managed to narrowly hold off the attack while getting in a backdoor attack with Speedlings.
GuMiho decided to slow the game down from there, sitting back and going into turtle-mech mode. Reynor took the opportunity to take temporary map control and strengthen his economy, but was wary of trying to attack into entrenched Terran positions. As for GuMiho, he sat back and started to build a high-value army of Battlecruisers and Thors, all while refusing to risk taking any of the corner bases. Later, he used drops and BC’s to also deny Reynor from taking the corner bases himself, as the Zerg army had transitioned into a more powerful but immobile Brood Lord-Corruptor-Infestor force.
With both players starting to run out of resources at their five ‘safe’ expansions, a series of game-deciding fights were forced around control of the remaining corner bases. The two forces eluded each other at first, wiping out each other’s pivotal expansions. However, eventually the BC-Thor force came to clash head on with the BL-Corruptor-Infestor-Viper swarm over control of Reynor’s most important mining base.
While Reynor’s good use of spellcasters saw him fare surprisingly well, GuMiho ultimately came out with a slight edge in the key battle. Moreover, GuMiho had the advantage in terms of remaining resources and economy (MULEs playing a big role), allowing him to churn out the necessary reinforcements to finally secure the all-important corner bases. Having almost completely run out of steam, Reynor was forced to concede the GG.
Game 2 – Site Delta (GuMiho win): GuMiho finally diverged from his fast 3-CC plan, opening with a Hellbat-Banshee rush on two bases. While GuMiho didn’t inflict much direct economic damage, he forced enough Zergling and Queen production to put Reynor in an economic hole. However, Reynor wasted no time in forcing a Roach-Ravager-Queendrop counterattack, absorbing Banshee fire while crossing the map. Reynor hit the window before GuMiho could complete his transition to mass Cyclone production, and he inflicted just enough damage to keep himself in the game for the time being.
The two players proceeded to engage in some intense Roach-Ravager vs Cyclone-Hellion fighting, with Cyclones proving to be surprisingly effective despite their nerf in the previous balance patch. This was due to GuMiho’s investment in double-Armory upgrades early on, whereas GuMiho’s early Hellbat strike had left Reynor too threadbare to focus on upgrades. Eventually, GuMiho switched to a more defensive stance with Tanks, knowing his upgrade advantage would carry him to victory if he played more patiently.
Reynor used the respite to sneakily tech up to Greater Spire, and he managed to surprise GuMiho’s almost purely Cyclone-Tank force with the sudden appearance of nine Brood Lords. However, GuMiho reacted to this situation perfectly by immediately initiating a multi-front basetrade with his now ‘obsolete’ Cyclones, ignoring the Brood Lords to rip through Reynor’s expansions. That forced a lose/lose decision upon Reynor: Keep basetrading with 0/0 Brood Lords vs 3/3 Cyclones, or call your excruciatingly slow Brood Lords back on defense. Reynor opted for the latter, which resulted in the Cyclones utterly devastating his economy and infrastructure before the Brood Lords finally arrived to defend.
From there, it was a rudimentary clean-up job for GuMiho, and Reynor GG’d out after a doomed basetrade (the one he opted out of earlier).
Decider Match: soO 2 – 1 GuMiho
Game 1 – Site Delta (GuMiho win): soO played against his reputation by opening Pool-Hatch for some early Zergling and Roach pressure, which caught GuMiho and his no-scout start off-guard. However, soO couldn’t inflict quite enough damage to make his considerable early investment worthwhile, and he decided to double-down by reloading for another attack. However, GuMiho played it safe by building a Bunker and a full wall at his natural, which left soO in an even deeper hole after the failed attack.
While some questionable army control from GuMiho allowed soO to stick around in the game for a surprisingly long time, the overwhelming Terran economy won out in the end.
Game 2 – Alcyone (soO win): GuMiho opened with 2-Barracks Reapers and got off to a strong start by forcing a cancel on soO’s third Hatchery. That seemed to open the path to a smooth macro build-up at first, but his poor army control (one of the themes of the night) saw his mid-game infantry pressure be much less successful than he would have hoped. On the other hand, soO’s macro was in full 2014 mode, and he shrugged off his early setback to establish a monster production infrastructure. The 2014 nostalgia continued as soO just flung waves of Lair-tech units at GuMiho until he was forced to GG out.
Game 3 – Dynasty (soO win): GuMiho went back to greedy play by taking both his gold base and natural quicky, while soO went for a more conservative start by taking his two ‘normal’ bases. While GuMiho looked to play a normal bio/macro game once more, soO stopped at 66 Drones to hit a massive 1/1 Roach-Ravager timing.
soO’s first attack inflicted considerable damage against the porous Terran defense, putting GuMiho up against the ropes. However, subsequent attacks were less successful, and GuMiho started to slowly stabilize and bring himself back to even. However, GuMiho made the unwise decision to send out a detachment of troops to harass before he was in the clear, opening the way for soO to launch the decisive attack that would break the Terran economy for good.
- SEO Powered Content & PR Distribution. Get Amplified Today.
- PlatoData.Network Vertical Generative Ai. Empower Yourself. Access Here.
- PlatoAiStream. Web3 Intelligence. Knowledge Amplified. Access Here.
- PlatoESG. Carbon, CleanTech, Energy, Environment, Solar, Waste Management. Access Here.
- PlatoHealth. Biotech and Clinical Trials Intelligence. Access Here.
- Source: https://tl.net/forum/starcraft-2/625419-code-s-ro16-group-b-hero-and-soo-advance
- :not
- $UP
- 00
- 1
- 12
- 14
- 16
- 2%
- 20
- 2014
- 2022
- 500
- 65
- 66
- 9
- a
- Able
- About
- According
- Achieve
- actually
- advance
- advanced
- ADvantage
- After
- again
- against
- aggressively
- All
- all-around
- allegedly
- allowed
- Allowing
- almost
- also
- among
- an
- and
- and infrastructure
- Another
- answer
- any
- anything
- appearance
- Army
- around
- arrived
- AS
- At
- attack
- attacked
- Attacks
- attempt
- b
- back
- backdoor
- Balance
- base
- Battle
- BE
- before
- behind
- being
- believe
- Bell
- BEST
- Better
- Big
- bio
- Bit
- Blink
- blocking
- both
- brand
- Break
- bring
- Bringing
- brought
- build
- Building
- builds
- burned
- burning
- bust
- but
- by
- call
- came
- carry
- carrying
- catastrophic
- caught
- champion
- Chance
- choice
- Clash
- class
- clear
- Clock
- closed
- code
- combination
- committed
- competition
- complete
- completely
- composition
- conservative
- considerable
- considerably
- content
- continued
- control
- Corner
- could
- couldn
- Court
- covering
- crippling
- crossing
- CSS
- cutting
- damage
- day
- decided
- decision
- decisive
- deeper
- defend
- Defense
- defensive
- Delta
- demonstrated
- deserves
- designation
- desired
- Despite
- devastating
- devious
- DID
- didn
- difficult
- direct
- disaster
- do
- done
- Doomed
- down
- Drones
- Drop
- Drops
- due
- each
- Earlier
- Early
- Economic
- economic damage
- economy
- Edge
- Effective
- eliminated
- elite
- embedded
- end
- ended
- engage
- enough
- entertaining
- entrenched
- establish
- Ether (ETH)
- Even
- eventually
- Exploit
- Failed
- fans
- far
- FAST
- favor
- fight
- fighting
- fights
- Finally
- Find
- finish
- Fire
- First
- first time
- five
- Focus
- For
- Force
- forced
- Forces
- forcing
- Former
- Fortunately
- Forward
- found
- friendly
- from
- full
- fully
- game
- gap
- gave
- get
- getting
- Ghost
- Give
- given
- GMT
- Go
- going
- Gold
- good
- got
- greater
- Greedy
- Group
- Group’s
- had
- hand
- Have
- having
- he
- head
- headed
- heavily
- helped
- Hero
- him
- himself
- his
- Hit
- hold
- Hole
- hosts
- However
- HTTPS
- if
- immediately
- important
- in
- inability
- inflict
- Infrastructure
- initial
- initiating
- intense
- intentions
- interesting
- Interview
- into
- investment
- IT
- Italian
- Job
- join
- just
- Keep
- Key
- Kill
- Kind
- Knowing
- largely
- lasers
- Last
- Late
- later
- latter
- launch
- least
- Led
- left
- less
- like
- lines
- Long
- long time
- longer
- looked
- Lords
- Losers
- losing
- Macro
- made
- make
- managed
- map
- Mass
- massive
- Match
- May..
- met
- Middle
- minimal
- Mining
- Mode
- more
- Moreover
- most
- much
- Natural
- necessary
- Nerf
- New
- nicely
- night
- nine
- no
- normal
- now
- objective
- obsolete
- of
- off
- offensive
- Old
- on
- once
- ONE
- only
- onto
- open
- opened
- opening
- Opportunity
- Options
- or
- oracle
- Oracles
- Other
- out
- over
- overwhelming
- part
- Patch
- path
- patiently
- perfectly
- pick
- picking
- pivotal
- Place
- placed
- plan
- plato
- Plato Data Intelligence
- PlatoData
- Play
- played
- player
- players
- playing
- Plenty
- Point
- poor
- Popular
- positions
- powerful
- Predictions
- prepared
- preparing
- pressure
- previous
- probe
- Production
- proving
- pumping
- punch
- purely
- Push
- pushed
- put
- Putting
- queen
- queens
- Questions
- quickly
- quite
- RAY
- reacted
- ready
- realized
- really
- record
- refusing
- remaining
- reputation
- Resources
- respite
- resulted
- resume
- Revealed
- Risk
- River
- Role
- Run
- rush
- s
- safe
- Said
- same
- saw
- School
- score
- Scout
- Season
- Second
- secure
- see
- seemed
- seen
- send
- sent
- Series
- setting
- Settled
- showed
- signature
- Silver
- since
- site
- Sitting
- situation
- slight
- slow
- Slowly
- smooth
- some
- Soon
- stabilize
- stalling
- stance
- standard
- Stargate
- start
- started
- Starting
- Steam
- Stick
- Still
- Stop
- stopped
- stopping
- Strengthen
- strike
- strong
- stronger
- subsequent
- successful
- sudden
- sure
- surprise
- surprisingly
- Swarm
- switched
- T
- table
- Take
- taking
- Tanks
- tech
- temporary
- tendency
- terms
- territory
- than
- that
- The
- the world
- their
- Them
- themes
- then
- There.
- they
- things
- Third
- this
- this year
- though?
- three
- Through
- Throwing
- thwart
- ticket
- time
- timing
- to
- too
- took
- transition
- transitioned
- tried
- try
- trying
- Turned
- twist
- two
- typical
- Ultimately
- unaware
- unique
- units
- until
- upgrade
- upgrades
- upon
- use
- used
- using
- Ve
- very
- veteran
- victories
- victory
- View
- vs
- walked
- Wall
- wanted
- was
- wasn
- wasted
- Wave
- waves
- Way..
- we
- WELL
- went
- were
- when
- whereas
- which
- while
- why
- will
- win
- window
- winning
- wiping
- with
- Won
- working
- world
- worthwhile
- would
- year
- years
- Your
- youtube
- zephyrnet