AWS Glue is a serverless data integration service that makes it straightforward to discover, prepare, move, and integrate data from multiple sources for analytics, machine learning (ML), and application development.
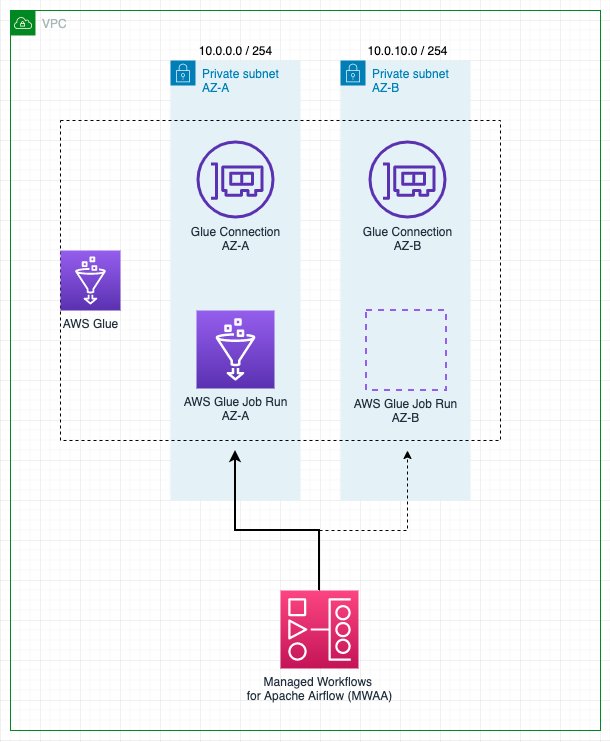
AWS Glue customers often have to meet strict security requirements, which sometimes involve locking down the network connectivity allowed to the job, or running inside a specific VPC to access another service. To run inside the VPC, the jobs needs to be assigned to a single subnet, but the most suitable subnet can change over time (for instance, based on the usage and availability), so you may prefer to make that decision at runtime, based on your own strategy.
Amazon Managed Workflows for Apache Airflow (Amazon MWAA) is an AWS service to run managed Airflow workflows, which allow writing custom logic to coordinate how tasks such as AWS Glue jobs run.
In this post, we show how to run an AWS Glue job as part of an Airflow workflow, with dynamic configurable selection of the VPC subnet assigned to the job at runtime.
Solution overview
To run inside a VPC, an AWS Glue job needs to be assigned at least a connection that includes network configuration. Any connection allows specifying a VPC, subnet, and security group, but for simplicity, this post uses connections of type: NETWORK, which just defines the network configuration and doesn’t involve external systems.
If the job has a fixed subnet assigned by a single connection, in case of a service outage on the Availability Zones or if the subnet isn’t available for other reasons, the job can’t run. Furthermore, each node (driver or worker) in an AWS Glue job requires an IP address assigned from the subnet. When running many large jobs concurrently, this could lead to an IP address shortage and the job running with fewer nodes than intended or not running at all.
AWS Glue extract, transform, and load (ETL) jobs allow multiple connections to be specified with multiple network configurations. However, the job will always try to use the connections’ network configuration in the order listed and pick the first one that passes the health checks and has at least two IP addresses to get the job started, which might not be the optimal option.
With this solution, you can enhance and customize that behavior by reordering the connections dynamically and defining the selection priority. If a retry is needed, the connections are reprioritized again based on the strategy, because the conditions might have changed since the last run.
As a result, it helps prevent the job from failing to run or running under capacity due to subnet IP address shortage or even an outage, while meeting the network security and connectivity requirements.
The following diagram illustrates the solution architecture.
Prerequisites
To follow the steps of the post, you need a user that can log in to the AWS Management Console and has permission to access Amazon MWAA, Amazon Virtual Private Cloud (Amazon VPC), and AWS Glue. The AWS Region where you choose to deploy the solution needs the capacity to create a VPC and two elastic IP addresses. The default Regional quota for both types of resources is five, so you might need to request an increase via the console.
You also need an AWS Identity and Access Management (IAM) role suitable to run AWS Glue jobs if you don’t have one already. For instructions, refer to Create an IAM role for AWS Glue.
Deploy an Airflow environment and VPC
First, you’ll deploy a new Airflow environment, including the creation of a new VPC with two public subnets and two private ones. This is because Amazon MWAA requires Availability Zone failure tolerance, so it needs to run on two subnets on two different Availability Zones in the Region. The public subnets are used so the NAT Gateway can provide internet access for the private subnets.
Complete the following steps:
- Create an AWS CloudFormation template in your computer by copying the template from the following quick start guide into a local text file.
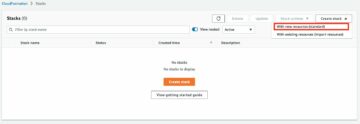
- On the AWS CloudFormation console, choose Stacks in the navigation pane.
- Choose Create stack with the option With new resources (standard).
- Choose Upload a template file and choose the local template file.
- Choose Next.
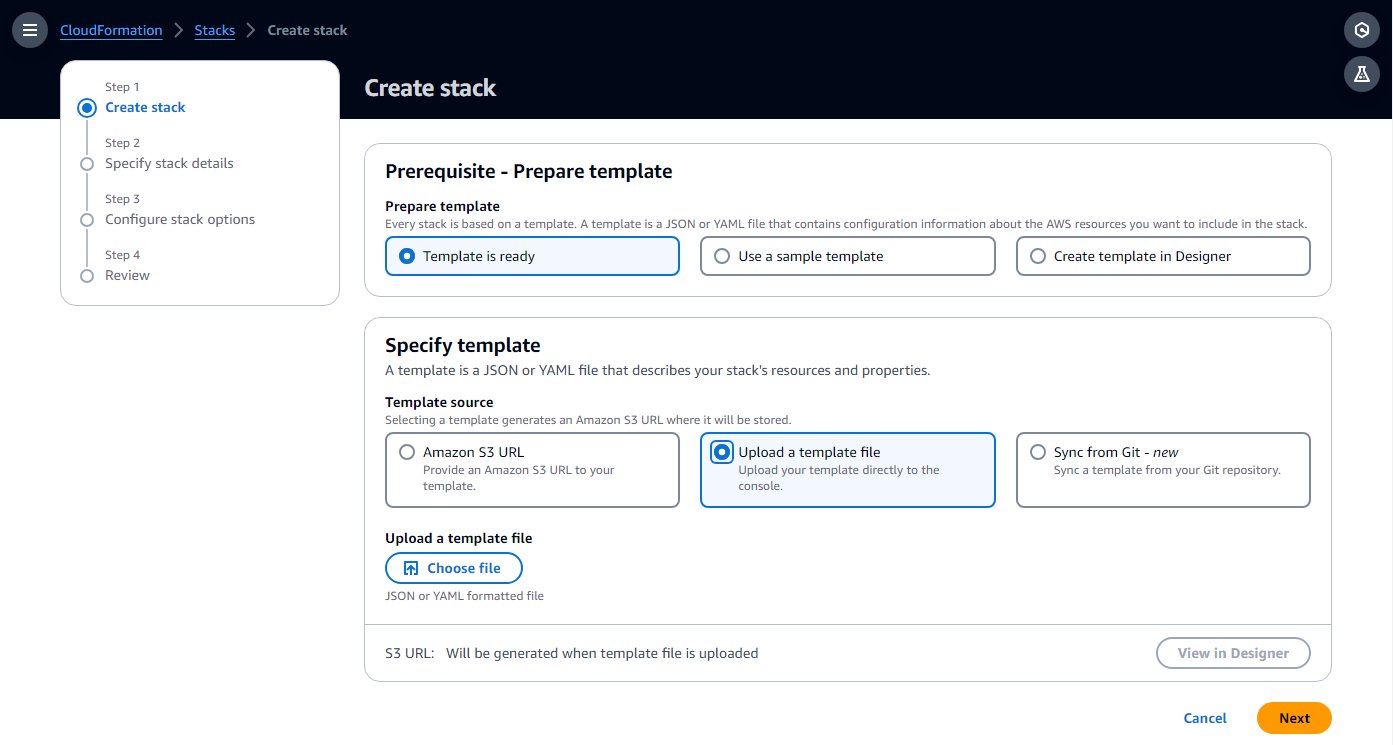
- Complete the setup steps, entering a name for the environment, and leave the rest of the parameters as default.
- On the last step, acknowledge that resources will be created and choose Submit.
The creation can take 20–30 minutes, until the status of the stack changes to CREATE_COMPLETE.
The resource that will take most of time is the Airflow environment. While it’s being created, you can continue with the following steps, until you are required to open the Airflow UI.
- On the stack’s Resources tab, note the IDs for the VPC and two private subnets (
PrivateSubnet1andPrivateSubnet2), to use in the next step.
Create AWS Glue connections
The CloudFormation template deploys two private subnets. In this step, you create an AWS Glue connection to each one so AWS Glue jobs can run in them. Amazon MWAA recently added the capacity to run the Airflow cluster on shared VPCs, which reduces cost and simplifies network management. For more information, refer to Introducing shared VPC support on Amazon MWAA.
Complete the following steps to create the connections:
- On the AWS Glue console, choose Data connections in the navigation pane.
- Choose Create connection.
- Choose Network as the data source.
- Choose the VPC and private subnet (
PrivateSubnet1) created by the CloudFormation stack. - Use the default security group.
- Choose Next.

- For the connection name, enter
MWAA-Glue-Blog-Subnet1. - Review the details and complete the creation.
- Repeat these steps using
PrivateSubnet2and name the connectionMWAA-Glue-Blog-Subnet2.
Create the AWS Glue job
Now you create the AWS Glue job that will be triggered later by the Airflow workflow. The job uses the connections created in the previous section, but instead of assigning them directly on the job, as you would normally do, in this scenario you leave the job connections list empty and let the workflow decide which one to use at runtime.
The job script in this case is not significant and is just intended to demonstrate the job ran in one of the subnets, depending on the connection.
- On the AWS Glue console, choose ETL jobs in the navigation pane, then choose Script editor.
- Leave the default options (Spark engine and Start fresh) and choose Create script.
- Replace the placeholder script with the following Python code:
- Rename the job to
AirflowBlogJob. - On the Job details tab, for IAM Role, choose any role and enter 2 for the number of workers (just for frugality).
- Save these changes so the job is created.
Grant AWS Glue permissions to the Airflow environment role
The role created for Airflow by the CloudFormation template provides the basic permissions to run workflows but not to interact with other services such as AWS Glue. In a production project, you would define your own templates with these additional permissions, but in this post, for simplicity, you add the additional permissions as an inline policy. Complete the following steps:
- On the IAM console, choose Roles in the navigation pane.
- Locate the role created by the template; it will start with the name you assigned to the CloudFormation stack and then
-MwaaExecutionRole-. - On the role details page, on the Add permissions menu, choose Create inline policy.

- Switch from Visual to JSON mode and enter the following JSON on the textbox. It assumes that the AWS Glue role you have follows the convention of starting with
AWSGlueServiceRole. For enhanced security, you can replace the wildcard resource on theec2:DescribeSubnetspermission with the ARNs of the two private subnets from the CloudFormation stack. - Choose Next.
- Enter
GlueRelatedPermissionsas the policy name and complete the creation.
In this example, we use an ETL script job; for a visual job, because it generates the script automatically on save, the Airflow role would need permission to write to the configured script path on Amazon Simple Storage Service (Amazon S3).
Create the Airflow DAG
An Airflow workflow is based on a Directed Acyclic Graph (DAG), which is defined by a Python file that programmatically specifies the different tasks involved and its interdependencies. Complete the following scripts to create the DAG:
- Create a local file named
glue_job_dag.pyusing a text editor.
In each of the following steps, we provide a code snippet to enter into the file and an explanation of what is does.
- The following snippet adds the required Python modules imports. The modules are already installed on Airflow; if that weren’t the case, you would need to use a
requirements.txtfile to indicate to Airflow which modules to install. It also defines the Boto3 clients that the code will use later. By default, they will use the same role and Region as Airflow, that’s why you set up before the role with the additional permissions required. - The following snippet adds three functions to implement the connection order strategy, which defines how to reorder the connections given to establish their priority. This is just an example; you can build your custom code to implement your own logic, as per your needs. The code first checks the IPs available on each connection subnet and separates the ones that have enough IPs available to run the job at full capacity and those that could be used because they have at least two IPs available, which is the minimum a job needs to start. If the strategy is set to
random, it will randomize the order within each of the connection groups previously described and add any other connections. If the strategy iscapacity, it will order them from most IPs free to fewest. - The following code creates the DAG itself with the run job task, which updates the job with the connection order defined by the strategy, runs it, and waits for the results. The job name, connections, and strategy come from Airflow variables, so it can be easily configured and updated. It has two retries with exponential backoff configured, so if the tasks fails, it will repeat the full task including the connection selection. Maybe now the best choice is another connection, or the subnet previously picked randomly is in an Availability Zone that is currently suffering an outage, and by picking a different one, it can recover.
Create the Airflow workflow
Now you create a workflow that invokes the AWS Glue job you just created:
- On the Amazon S3 console, locate the bucket created by the CloudFormation template, which will have a name starting with the name of the stack and then
-environmentbucket-(for example,myairflowstack-environmentbucket-ap1qks3nvvr4). - Inside that bucket, create a folder called
dags, and inside that folder, upload the DAG fileglue_job_dag.pythat you created in the previous section. - On the Amazon MWAA console, navigate to the environment you deployed with the CloudFormation stack.
If the status is not yet Available, wait until it reaches that state. It shouldn’t take longer than 30 minutes since you deployed the CloudFormation stack.
- Choose the environment link on the table to see the environment details.
It’s configured to pick up DAGs from the bucket and folder you used in the previous steps. Airflow will monitor that folder for changes.
- Choose Open Airflow UI to open a new tab accessing the Airflow UI, using the integrated IAM security to log you in.
If there’s any issue with the DAG file you created, it will display an error on top of the page indicating the lines affected. In that case, review the steps and upload again. After a few seconds, it will parse it and update or remove the error banner.
- On the Admin menu, choose Variables.
- Add three variables with the following keys and values:
- Key
glue_job_dag.glue_connectionswith valueMWAA-Glue-Blog-Subnet1,MWAA-Glue-Blog-Subnet2. - Key
glue_job_dag.glue_job_namewith valueAirflowBlogJob. - Key
glue_job_dag.strategywith valuecapacity.
- Key

Run the job with a dynamic subnet assignment
Now you’re ready to run the workflow and see the strategy dynamically reordering the connections.
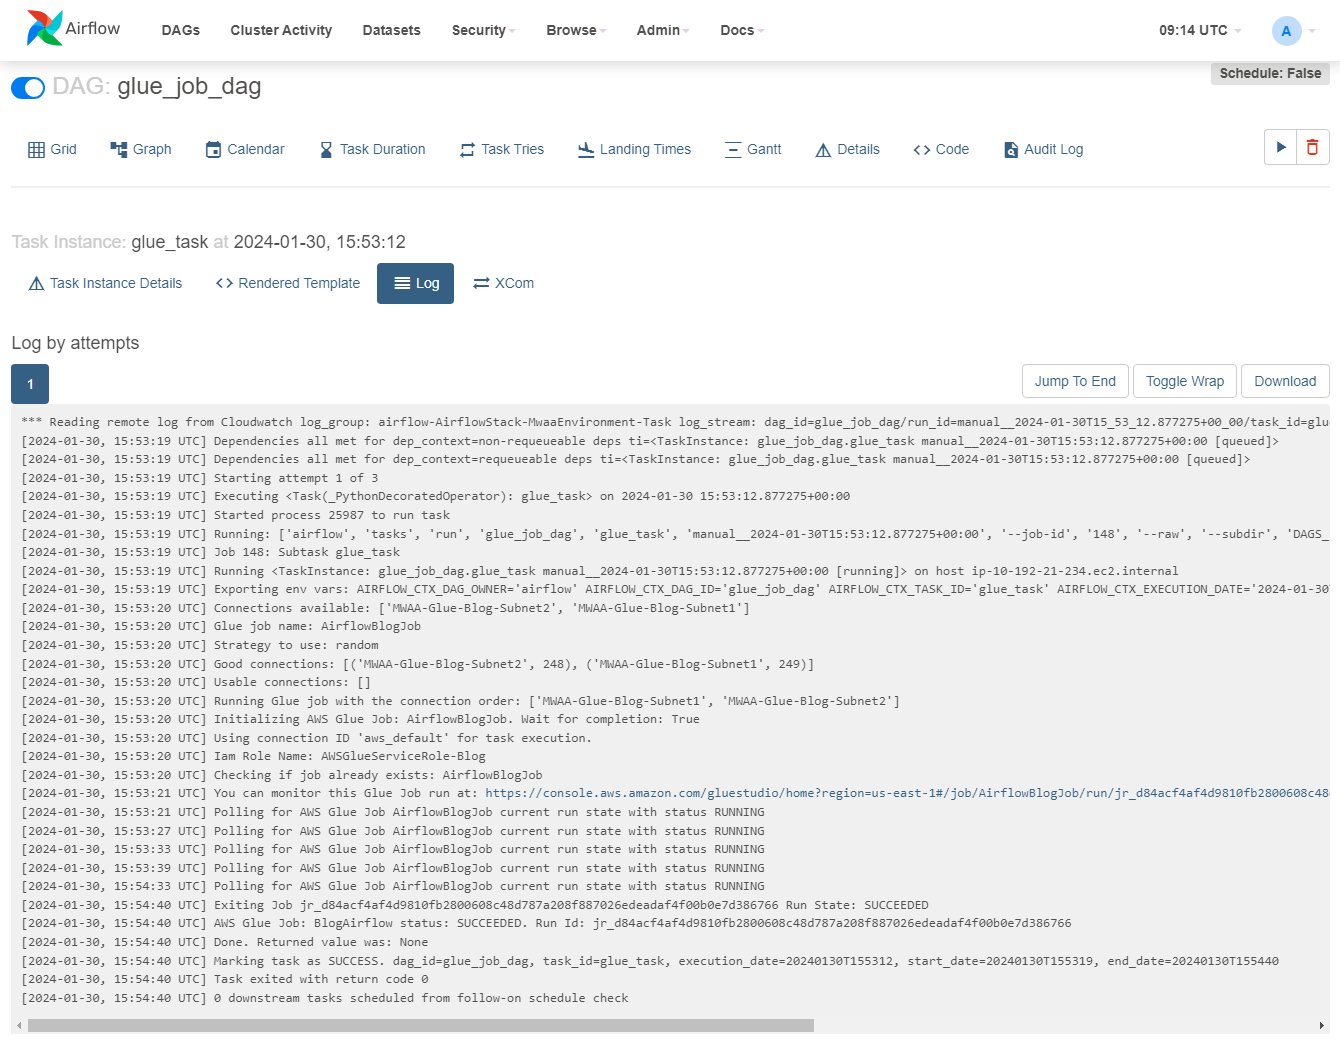
- On the Airflow UI, choose DAGs, and on the row
glue_job_dag, choose the play icon. - On the Browse menu, choose Task instances.
- On the instances table, scroll right to display the
Log Urland choose the icon on it to open the log.
The log will update as the task runs; you can locate the line starting with “Running Glue job with the connection order:” and the previous lines showing details of the connection IPs and the category assigned. If an error occurs, you’ll see the details in this log.
- On the AWS Glue console, choose ETL jobs in the navigation pane, then choose the job
AirflowBlogJob. - On the Runs tab, choose the run instance, then the Output logs link, which will open a new tab.
- On the new tab, use the log stream link to open it.
It will display the IP that the driver was assigned and which subnet it belongs to, which should match the connection indicated by Airflow (if the log is not displayed, choose Resume so it gets updated as soon as it’s available).

- On the Airflow UI, edit the Airflow variable
glue_job_dag.strategyto set it torandom. - Run the DAG multiple times and see how the ordering changes.
Clean up
If you no longer need the deployment, delete the resources to avoid any further charges:
- Delete the Python script you uploaded, so the S3 bucket can be automatically deleted in the next step.
- Delete the CloudFormation stack.
- Delete the AWS Glue job.
- Delete the script that the job saved in Amazon S3.
- Delete the connections you created as part of this post.
Conclusion
In this post, we showed how AWS Glue and Amazon MWAA can work together to build more advanced custom workflows, while minimizing the operational and management overhead. This solution gives you more control about how your AWS Glue job runs to meet special operational, network, or security requirements.
You can deploy your own Amazon MWAA environment in multiple ways, such as with the template used in this post, on the Amazon MWAA console, or using the AWS CLI. You can also implement your own strategies to orchestrate AWS Glue jobs, based on your network architecture and requirements (for instance, to run the job closer to the data when possible).
About the authors
 Michael Greenshtein is an Analytics Specialist Solutions Architect for the Public Sector.
 Gonzalo Herreros is a Senior Big Data Architect on the AWS Glue team.
- SEO Powered Content & PR Distribution. Get Amplified Today.
- PlatoData.Network Vertical Generative Ai. Empower Yourself. Access Here.
- PlatoAiStream. Web3 Intelligence. Knowledge Amplified. Access Here.
- PlatoESG. Carbon, CleanTech, Energy, Environment, Solar, Waste Management. Access Here.
- PlatoHealth. Biotech and Clinical Trials Intelligence. Access Here.
- Source: https://aws.amazon.com/blogs/big-data/combine-aws-glue-and-amazon-mwaa-to-build-advanced-vpc-selection-and-failover-strategies/
- :has
- :is
- :not
- :where
- $UP
- 1
- 10
- 100
- 11
- 12
- 1232
- 1393
- 19
- 2%
- 20
- 2000
- 21
- 28
- 30
- 34
- 4
- 5
- 6
- 610
- 8
- a
- About
- access
- accessing
- acknowledge
- Action
- acyclic
- add
- added
- Additional
- address
- addresses
- Adds
- advanced
- affected
- After
- again
- All
- allow
- allowed
- allows
- already
- also
- always
- Amazon
- Amazon Web Services
- an
- analytics
- and
- Another
- any
- Apache
- Application
- Application Development
- architecture
- ARE
- AS
- assigned
- assumes
- At
- automatically
- availability
- available
- avoid
- AWS
- AWS CloudFormation
- AWS Glue
- banner
- based
- basic
- BE
- because
- been
- before
- behavior
- being
- belongs
- BEST
- Big
- Big Data
- both
- build
- but
- by
- called
- CAN
- Capacity
- case
- catalog
- Category
- change
- changed
- Changes
- charges
- check
- checked
- Checks
- choice
- Choose
- clean
- clients
- closer
- Cluster
- code
- combine
- come
- complete
- computer
- conditions
- Configuration
- configurations
- configured
- connection
- Connections
- Connectivity
- Console
- continue
- control
- Convention
- coordinate
- copying
- Cost
- could
- create
- created
- creates
- creation
- Currently
- custom
- Customers
- customize
- DAG
- data
- data integration
- Date
- datetime
- decide
- decision
- def
- Default
- define
- defined
- Defines
- defining
- del
- delete
- deleted
- Demand
- demonstrate
- Depending
- deploy
- deployed
- deployment
- deploys
- described
- details
- Development
- diagram
- DICT
- different
- directed
- directly
- discover
- Display
- displayed
- do
- does
- Doesn’t
- don
- Dont
- down
- driver
- due
- duration
- dynamic
- dynamically
- e
- each
- easily
- editor
- effect
- else
- empty
- end
- Engine
- enhance
- enhanced
- enough
- Enter
- entering
- Environment
- error
- establish
- Ether (ETH)
- Even
- example
- Except
- exception
- explanation
- exponential
- external
- extract
- Failed
- failing
- fails
- Failure
- few
- fewer
- File
- First
- five
- fixed
- follow
- following
- follows
- For
- Free
- from
- full
- functions
- further
- Furthermore
- gateway
- generates
- get
- gets
- given
- gives
- good
- graph
- Group
- Group’s
- Have
- haven
- helps
- hold
- How
- How To
- However
- HTML
- http
- HTTPS
- IAM
- ICON
- Identity
- ids
- if
- illustrates
- implement
- import
- imports
- in
- includes
- Including
- Increase
- indicate
- indicated
- indicating
- information
- inside
- install
- installed
- instance
- instances
- instead
- instructions
- integrate
- integrated
- integration
- intended
- interact
- Internet
- internet access
- into
- invokes
- involve
- involved
- IP
- IP Address
- IP addresses
- issue
- IT
- ITS
- itself
- Job
- Jobs
- jpg
- json
- just
- Keep
- keys
- large
- Last
- later
- lead
- learning
- least
- Leave
- let
- Line
- lines
- LINK
- List
- Listed
- load
- local
- locking
- log
- logic
- longer
- machine
- machine learning
- make
- MAKES
- manage
- managed
- management
- many
- Match
- May..
- maybe
- Meet
- meeting
- Menu
- might
- minimizing
- minimum
- minutes
- ML
- Mode
- models
- Modules
- Monitor
- more
- most
- move
- multiple
- Multiple connections
- name
- Named
- Navigate
- Navigation
- Need
- needed
- needs
- network
- Network Security
- New
- next
- no
- node
- nodes
- normally
- note
- now
- number
- of
- often
- on
- ONE
- ones
- only
- open
- operational
- operators
- optimal
- Option
- Options
- or
- order
- ordering
- Other
- outage
- over
- overhead
- own
- page
- pane
- parameters
- part
- passes
- path
- per
- permission
- permissions
- pick
- picked
- picking
- placeholder
- plato
- Plato Data Intelligence
- PlatoData
- Play
- policy
- possible
- Post
- prefer
- Prepare
- preserve
- prevent
- previous
- previously
- priority
- private
- Production
- project
- properties
- provide
- providers
- provides
- public
- Python
- raise
- ran
- random
- Reaches
- ready
- reasons
- recently
- Recover
- reduces
- refer
- region
- regional
- remove
- repeat
- replace
- request
- required
- Requirements
- requires
- resource
- Resources
- REST
- result
- Results
- return
- reuse
- review
- right
- Role
- ROW
- Run
- running
- runs
- runtime
- same
- Save
- saved
- scenario
- script
- scripts
- scroll
- seconds
- Section
- sector
- security
- see
- selection
- senior
- Serverless
- service
- Services
- set
- setup
- shared
- shortage
- should
- show
- showed
- showing
- shuffle
- significant
- Simple
- simplicity
- simplifies
- since
- single
- Snippet
- So
- solution
- Solutions
- sometimes
- Soon
- sort
- Source
- Sources
- Spark
- special
- specialist
- specific
- specified
- specifying
- stack
- standard
- start
- started
- Starting
- State
- Statement
- Status
- Step
- Steps
- storage
- straightforward
- strategies
- Strategy
- stream
- strict
- subnet
- subnets
- such
- suffering
- suitable
- support
- Systems
- T
- table
- Take
- Task
- tasks
- team
- template
- templates
- text
- than
- that
- The
- their
- Them
- then
- These
- they
- this
- those
- three
- time
- times
- to
- together
- tolerance
- top
- Transform
- tried
- triggered
- try
- two
- type
- types
- ui
- under
- unknown
- until
- Update
- updated
- Updates
- uploaded
- usable
- Usage
- use
- used
- User
- uses
- using
- value
- Values
- variable
- variables
- version
- via
- Virtual
- visual
- wait
- waits
- warning
- was
- ways
- we
- web
- web services
- What
- What is
- when
- which
- while
- why
- will
- with
- within
- Work
- work together
- worker
- workers
- workflow
- workflows
- would
- writing
- X
- yet
- you
- Your
- zephyrnet
- zone
- zones