Healthcare providers have an opportunity to improve the patient experience by collecting and analyzing broader and more diverse datasets. This includes patient medical history, allergies, immunizations, family disease history, and individuals’ lifestyle data such as workout habits. Having access to those datasets and forming a 360-degree view of patients allows healthcare providers such as claim analysts to see a broader context about each patient and personalize the care they provide for every individual. This is underpinned by building a complete patient profile that enables claim analysts to identify patterns, trends, potential gaps in care, and adherence to care plans. They can then use the result of their analysis to understand a patient’s health status, treatment history, and past or upcoming doctor consultations to make more informed decisions, streamline the claim management process, and improve operational outcomes. Achieving this will also improve general public health through better and more timely interventions, identify health risks through predictive analytics, and accelerate the research and development process.
AWS has invested in a zero-ETL (extract, transform, and load) future so that builders can focus more on creating value from data, instead of having to spend time preparing data for analysis. The solution proposed in this post follows a zero-ETL approach to data integration to facilitate near real-time analytics and deliver a more personalized patient experience. The solution uses AWS services such as AWS HealthLake, Amazon Redshift, Amazon Kinesis Data Streams, and AWS Lake Formation to build a 360 view of patients. These services enable you to collect and analyze data in near real time and put a comprehensive data governance framework in place that uses granular access control to secure sensitive data from unauthorized users.
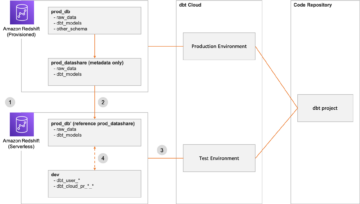
Zero-ETL refers to a set of features on the AWS Cloud that enable integrating different data sources with Amazon Redshift:
Solution overview
Organizations in the healthcare industry are currently spending a significant amount of time and money on building complex ETL pipelines for data movement and integration. This means data will be replicated across multiple data stores via bespoke and in some cases hand-written ETL jobs, resulting in data inconsistency, latency, and potential security and privacy breaches.
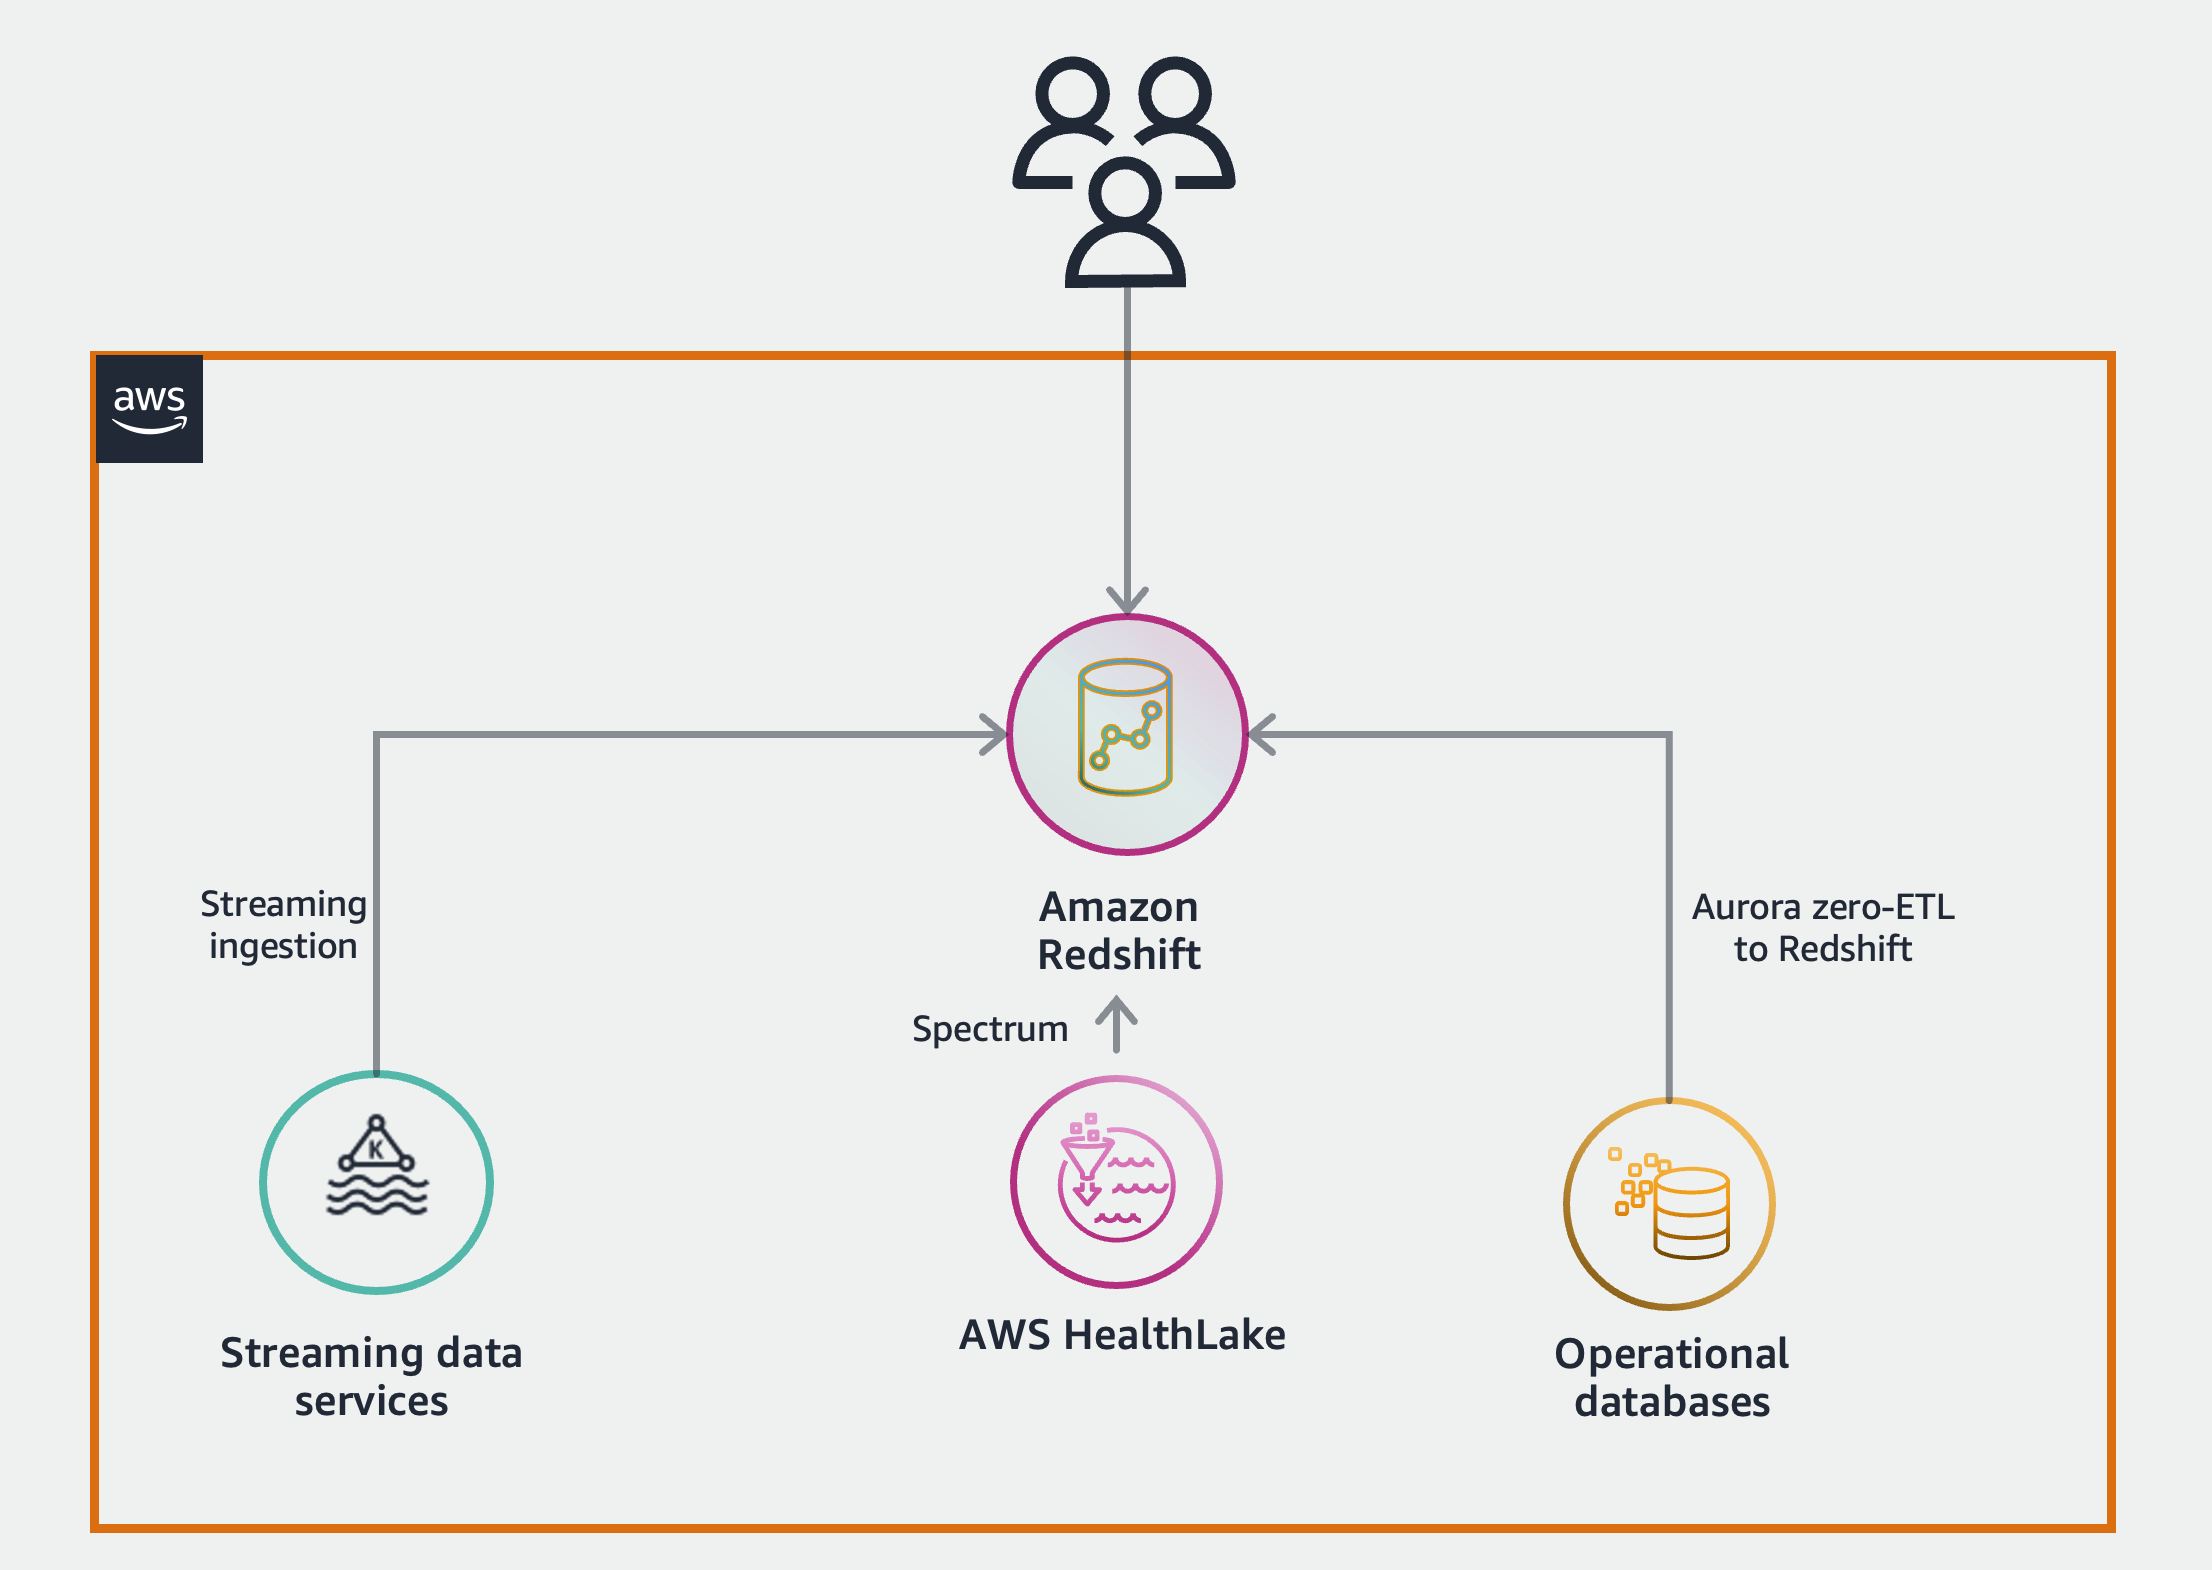
With support for querying cross-account Apache Iceberg tables via Amazon Redshift, you can now build a more comprehensive patient-360 analysis by querying all patient data from one place. This means you can seamlessly combine information such as clinical data stored in HealthLake with data stored in operational databases such as a patient relationship management system, together with data produced from wearable devices in near real-time. Having access to all this data enables healthcare organizations to form a holistic view of patients, improve care coordination across multiple organizations, and provide highly personalized care for each individual.
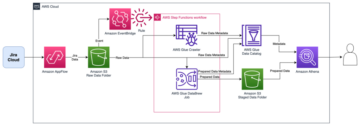
The following diagram depicts the high-level solution we build to achieve these outcomes.
Deploy the solution
You can use the following AWS CloudFormation template to deploy the solution components:
![]()
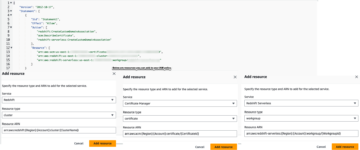
This stack creates the following resources and necessary permissions to integrate the services:
AWS Solution setup
AWS HealthLake
AWS HealthLake enables organizations in the health industry to securely store, transform, transact, and analyze health data. It stores data in HL7 FHIR format, which is an interoperability standard designed for quick and efficient exchange of health data. When you create a HealthLake data store, a Fast Healthcare Interoperability Resources (FHIR) data repository is made available via a RESTful API endpoint. Simultaneously and as part of AWS HealthLake managed service, the nested JSON FHIR data undergoes an ETL process and is stored in Apache Iceberg open table format in Amazon S3.
To create an AWS HealthLake data store, refer to Getting started with AWS HealthLake. Make sure to select the option Preload sample data when creating your data store.

In real-world scenarios and when you use AWS HealthLake in production environments, you don’t need to load sample data into your AWS HealthLake data store. Instead, you can use FHIR REST API operations to manage and search resources in your AWS HealthLake data store.
We use two tables from the sample data stored in HealthLake: patient and allergyintolerance.
Query AWS HealthLake tables with Redshift Serverless
Amazon Redshift is the data warehousing service available on the AWS Cloud that provides up to six times better price-performance than any other cloud data warehouses in the market, with a fully managed, AI-powered, massively parallel processing (MPP) data warehouse built for performance, scale, and availability. With continuous innovations added to Amazon Redshift, it is now more than just a data warehouse. It enables organizations of different sizes and in different industries to access all the data they have in their AWS environments and analyze it from one single location with a set of features under the zero-ETL umbrella. Amazon Redshift integrates with AWS HealthLake and data lakes through Redshift Spectrum and Amazon S3 auto-copy features, enabling you to query data directly from files on Amazon S3.
Query AWS HealthLake data with Amazon Redshift
Amazon Redshift makes it straightforward to query the data stored in S3-based data lakes with automatic mounting of an AWS Glue Data Catalog in the Redshift query editor v2. This means you no longer have to create an external schema in Amazon Redshift to use the data lake tables cataloged in the Data Catalog. To get started with this feature, see Querying the AWS Glue Data Catalog. After it is set up and you’re connected to the Redshift query editor v2, complete the following steps:
- Validate that your tables are visible in the query editor V2. The Data Catalog objects are listed under the
awsdatacatalogdatabase.
FHIR data stored in AWS HealthLake is highly nested. To learn about how to un-nest semi-structured data with Amazon Redshift, see Tutorial: Querying nested data with Amazon Redshift Spectrum.
- Use the following query to un-nest the
allergyintoleranceandpatienttables, join them together, and get patient details and their allergies:
To eliminate the need for Amazon Redshift to un-nest data every time a query is run, you can create a materialized view to hold un-nested and flattened data. Materialized views are an effective mechanism to deal with complex and repeating queries. They contain a precomputed result set, based on a SQL query over one or more base tables. You can issue SELECT statements to query a materialized view, in the same way that you can query other tables or views in the database.
- Use the following SQL to create a materialized view. You use it later to build a complete view of patients:
You have confirmed you can query data in AWS HealthLake via Amazon Redshift. Next, you set up zero-ETL integration between Amazon Redshift and Amazon Aurora MySQL.
Set up zero-ETL integration between Amazon Aurora MySQL and Redshift Serverless
Applications such as front-desk software, which are used to schedule appointments and register new patients, store data in OLTP databases such as Aurora. To get data out of OLTP databases and have them ready for analytics use cases, data teams might have to spend a considerable amount of time to build, test, and deploy ETL jobs that are complex to maintain and scale.
With the Amazon Redshift zero-ETL integration with Amazon Aurora MySQL, you can run analytics on the data stored in OLTP databases and combine them with the rest of the data in Amazon Redshift and AWS HealthLake in near real time. In the next steps in this section, we connect to a MySQL database and set up zero-ETL integration with Amazon Redshift.
Connect to an Aurora MySQL database and set up data
Connect to your Aurora MySQL database using your editor of choice using AdminUsername and AdminPassword that you entered when running the CloudFormation stack. (For simplicity, it is the same for Amazon Redshift and Aurora.)
When you’re connected to your database, complete the following steps:
- Create a new database by running the following command:
- Create a new table. This table simulates storing patient information as they visit clinics and other healthcare centers. For simplicity and to demonstrate specific capabilities, we assume that patient IDs are the same in AWS HealthLake and the front-of-office application. In real-world scenarios, this can be a hashed version of a national health care number:
Having a primary key in the table is mandatory for zero-ETL integration to work.
- Insert new records into the source table in the Aurora MySQL database. To demonstrate the required functionalities, make sure the
patient_idof the sample records inserted into the MySQL database match the ones in AWS HealthLake. Replace[patient_id_1]and[patient_id_2]in the following query with the ones from the Redshift query you ran previously (the query that joinedallergyintoleranceand patient):
Now that your source table is populated with sample records, you can set up zero-ETL and have data ingested into Amazon Redshift.
Set up zero-ETL integration between Amazon Aurora MySQL and Amazon Redshift
Complete the following steps to create your zero-ETL integration:
- On the Amazon RDS console, choose Databases in the navigation pane.
- Choose the DB identifier of your cluster (not the instance).
- On the Zero-ETL Integration tab, choose Create zero-ETL integration.
- Follow the steps to create your integration.
Create a Redshift database from the integration
Next, you create a target database from the integration. You can do this by running a couple of simple SQL commands on Amazon Redshift. Log in to the query editor V2 and run the following commands:
- Get the integration ID of the zero-ETL you set up between your source database and Amazon Redshift:

- Create a database using the integration ID:

- Query the database and validate that a new table is created and populated with data from your source MySQL database:
It might take a few seconds for the first set of records to appear in Amazon Redshift.

This shows that the integration is working as expected. To validate it further, you can insert a new record in your Aurora MySQL database, and it will be available in Amazon Redshift for querying in near real time within a few seconds.
Set up streaming ingestion for Amazon Redshift
Another aspect of zero-ETL on AWS, for real-time and streaming data, is realized through Amazon Redshift Streaming Ingestion. It provides low-latency, high-speed ingestion of streaming data from Kinesis Data Streams and Amazon MSK. It lowers the effort required to have data ready for analytics workloads, lowers the cost of running such workloads on the cloud, and decreases the operational burden of maintaining the solution.
In the context of healthcare, understanding an individual’s exercise and movement patterns can help with overall health assessment and better treatment planning. In this section, you send simulated data from wearable devices to Kinesis Data Streams and integrate it with the rest of the data you already have access to from your Redshift Serverless data warehouse.
For step-by-step instructions, refer to Real-time analytics with Amazon Redshift streaming ingestion. Note the following steps when you set up streaming ingestion for Amazon Redshift:
- Select
wearables_streamand use the following template when sending data to Amazon Kinesis Data Streams via Kinesis Data Generator, to simulate data generated by wearable devices. Replace [PATIENT_ID_1] and [PATIENT_ID_2] with the patient IDs you earlier when inserting new records into your Aurora MySQL table: - Create an external schema called
from_kdsby running the following query and replacing [IAM_ROLE_ARN] with the ARN of the role created by the CloudFormation stack (Patient360BlogRole): - Use the following SQL when creating a materialized view to consume data from the stream:
- To validate that streaming ingestion works as expected, refresh the materialized view to get the data you already sent to the data stream and query the table to make sure data has landed in Amazon Redshift:
Query and analyze patient wearable data
The results in the data column of the preceding query are in JSON format. Amazon Redshift makes it straightforward to work with semi-structured data in JSON format. It uses PartiQL language to offer SQL-compatible access to relational, semi-structured, and nested data. Use the following query to flatten data:
The result looks like the following screenshot.
 Now that you know how to flatten JSON data, you can analyze it further. Use the following query to get the number of minutes a patient has been physically active per day, based on their heart rate (greater than 80):
Create a complete patient 360
Now that you are able to query all patient data with Redshift Serverless, you can combine the three datasets you used in this post and form a comprehensive patient 360 view with the following query:
You can use the solution and queries used here to expand the datasets used in your analysis. For example, you can include other tables from AWS HealthLake as needed.
Clean up
To clean up resources you created, complete the following steps:
- Delete the zero-ETL integration between Amazon RDS and Amazon Redshift.
- Delete the CloudFormation stack.
- Delete AWS HealthLake data store
Conclusion
Forming a comprehensive 360 view of patients by integrating data from various different sources offers numerous benefits for organizations operating in the healthcare industry. It enables healthcare providers to gain a holistic understanding of a patient’s medical journey, enhances clinical decision-making, and allows for more accurate diagnosis and tailored treatment plans. With zero-ETL features for data integration on AWS, it is effortless to build a view of patients securely, cost-effectively, and with minimal effort.
You can then use visualization tools such as Amazon QuickSight to build dashboards or use Amazon Redshift ML to enable data analysts and database developers to train machine learning (ML) models with the data integrated through Amazon Redshift zero-ETL. The result is a set of ML models that are trained with a broader view into patients, their medical history, and their lifestyle, and therefore enable you make more accurate predictions about their upcoming health needs.
About the Authors
 Saeed Barghi is a Sr. Analytics Specialist Solutions Architect specializing in architecting enterprise data platforms. He has extensive experience in the fields of data warehousing, data engineering, data lakes, and AI/ML. Based in Melbourne, Australia, Saeed works with public sector customers in Australia and New Zealand.
 Satesh Sonti is a Sr. Analytics Specialist Solutions Architect based out of Atlanta, specialized in building enterprise data platforms, data warehousing, and analytics solutions. He has over 17 years of experience in building data assets and leading complex data platform programs for banking and insurance clients across the globe.
- SEO Powered Content & PR Distribution. Get Amplified Today.
- PlatoData.Network Vertical Generative Ai. Empower Yourself. Access Here.
- PlatoAiStream. Web3 Intelligence. Knowledge Amplified. Access Here.
- PlatoESG. Carbon, CleanTech, Energy, Environment, Solar, Waste Management. Access Here.
- PlatoHealth. Biotech and Clinical Trials Intelligence. Access Here.
- Source: https://aws.amazon.com/blogs/big-data/improve-healthcare-services-through-patient-360-a-zero-etl-approach-to-enable-near-real-time-data-analytics/
- :has
- :is
- :not
- :where
- ][p
- $UP
- 00
- 08
- 1
- 10
- 100
- 11
- 12
- 13
- 14
- 15%
- 17
- 2%
- 250
- 27
- 28
- 30
- 33
- 360
- 360-degree
- 45
- 5
- 500
- 7
- 8
- 80
- 9
- a
- Able
- About
- accelerate
- access
- accurate
- Achieve
- achieving
- across
- active
- added
- adherence
- After
- AI-powered
- AI/ML
- All
- Allergies
- allows
- already
- also
- Amazon
- Amazon Kinesis
- Amazon RDS
- Amazon Web Services
- amount
- an
- analysis
- Analysts
- analytics
- analyze
- analyzing
- and
- any
- Apache
- api
- appear
- Application
- appointments
- approach
- ARE
- AS
- aspect
- assessment
- Assets
- assume
- Atlanta
- Aurora
- Australia
- auto
- Automatic
- availability
- available
- AWS
- AWS Glue
- Banking
- base
- based
- BE
- been
- benefits
- bespoke
- Better
- between
- breaches
- broader
- build
- builders
- Building
- built
- burden
- by
- called
- CAN
- capabilities
- care
- cases
- catalog
- Category
- CD
- Centers
- choice
- Choose
- claim
- clean
- clients
- Clinical
- clinics
- Cloud
- Cluster
- code
- Coding
- collect
- Collecting
- Column
- combine
- complete
- complex
- components
- comprehensive
- CONFIRMED
- Connect
- connected
- considerable
- Console
- consultations
- consume
- contain
- context
- continuous
- control
- coordination
- Cost
- Couple
- create
- created
- creates
- Creating
- Creating Value
- Currently
- Customers
- dashboards
- data
- Data Analytics
- data integration
- Data Lake
- Data Platform
- data warehouse
- data warehouses
- Database
- databases
- datasets
- Date
- datetime
- day
- deal
- Decision Making
- decisions
- decreases
- deliver
- demonstrate
- deploy
- designed
- details
- developers
- Development
- Devices
- diagnosis
- diagram
- different
- directly
- Disease
- Display
- distinct
- diverse
- do
- Doctor
- Dont
- each
- Earlier
- editor
- Effective
- efficient
- effort
- effortless
- eliminate
- enable
- enables
- enabling
- Endpoint
- Engineering
- Enhances
- entered
- Enterprise
- environments
- Ether (ETH)
- Every
- example
- exchange
- Exercise
- Expand
- expected
- experience
- extensive
- Extensive Experience
- external
- extract
- facilitate
- family
- FAST
- Feature
- Features
- few
- Fields
- Files
- First
- flattened
- Focus
- following
- follows
- For
- form
- format
- forming
- Framework
- from
- fully
- functionalities
- further
- future
- Gain
- gaps
- Gender
- General
- general public
- generated
- generator
- get
- given
- globe
- governance
- granular
- greater
- Group
- habits
- hashed
- Have
- having
- he
- Health
- Health Care
- healthcare
- healthcare industry
- Heart
- help
- here
- high-level
- highly
- history
- hold
- holistic
- hour
- How
- How To
- HTML
- http
- HTTPS
- ID
- identifier
- identify
- ids
- improve
- in
- include
- includes
- individual
- industries
- industry
- information
- informed
- innovations
- instance
- instead
- instructions
- insurance
- integer
- integrate
- integrated
- Integrates
- Integrating
- integration
- Interoperability
- interventions
- into
- invested
- issue
- IT
- Jobs
- join
- joined
- journey
- jpg
- json
- just
- Key
- Kinesis Data Streams
- Know
- lake
- lakes
- language
- Latency
- later
- leading
- LEARN
- learning
- left
- lifestyle
- like
- Listed
- load
- location
- log
- longer
- LOOKS
- lowers
- machine
- machine learning
- made
- maintain
- maintaining
- make
- MAKES
- manage
- managed
- management
- management system
- mandatory
- Market
- massively
- Match
- max
- means
- mechanism
- medical
- Melbourne
- might
- min
- minimal
- minute
- minutes
- ML
- models
- money
- more
- movement
- multiple
- MySQL
- name
- National
- Navigation
- Near
- necessary
- Need
- needed
- needs
- nested
- New
- New Zealand
- next
- no
- note
- now
- number
- numerous
- numerous benefits
- objects
- of
- offer
- Offers
- on
- ONE
- ones
- open
- operating
- operational
- Operations
- Opportunity
- Option
- or
- order
- organizations
- Other
- out
- outcomes
- over
- overall
- pane
- Parallel
- part
- past
- patient
- patient data
- patients
- patterns
- per
- performance
- permissions
- personalize
- Personalized
- Physically
- Place
- planning
- plans
- platform
- Platforms
- plato
- Plato Data Intelligence
- PlatoData
- populated
- Post
- potential
- ppi
- pr
- Predictions
- predictive
- Predictive Analytics
- preparing
- previously
- primary
- privacy
- process
- processing
- Produced
- Production
- Profile
- Programs
- proposed
- provide
- providers
- provides
- public
- public health
- put
- queries
- query
- Quick
- R
- ran
- Rate
- reaction
- ready
- real
- real world
- real-time
- real-time data
- realized
- record
- records
- refer
- reference
- refers
- register
- relationship
- Relationship Management
- replace
- replicated
- repository
- required
- research
- research and development
- Resources
- REST
- result
- resulting
- Results
- risks
- Role
- Run
- running
- same
- sample
- Scale
- scenarios
- schedule
- seamlessly
- Search
- seconds
- Section
- sector
- secure
- securely
- security
- see
- select
- send
- sending
- sensitive
- sent
- Serverless
- service
- Services
- set
- Shows
- significant
- Simple
- simplicity
- simulate
- simulates
- simultaneously
- single
- SIX
- sizes
- So
- Software
- solution
- Solutions
- some
- Source
- Sources
- specialist
- specialized
- specializing
- specific
- Spectrum
- spend
- Spending
- SQL
- stack
- standard
- started
- statements
- Status
- Steps
- store
- stored
- stores
- storing
- straightforward
- stream
- streaming
- streamline
- streams
- such
- support
- sure
- system
- table
- tailored
- Take
- Target
- teams
- template
- test
- than
- that
- The
- The Source
- their
- Them
- then
- therefore
- These
- they
- this
- those
- three
- Through
- time
- timely
- times
- to
- together
- tools
- Train
- trained
- transact
- Transform
- treatment
- Trends
- true
- two
- umbrella
- unauthorized
- under
- undergoes
- underpinned
- understand
- understanding
- upcoming
- use
- used
- users
- uses
- using
- VALIDATE
- value
- various
- version
- via
- View
- views
- visible
- Visit
- visualization
- Warehouse
- Warehousing
- Way..
- we
- wearable
- wearable devices
- web
- web services
- when
- which
- will
- with
- within
- Work
- working
- workout
- works
- yaml
- years
- yes
- you
- Your
- Zealand
- zephyrnet