Introduction
As 2023 is coming to an end, the exciting news for the computer vision community is that Google has recently made strides in the world of zero-shot object detection with the release of OWLv2. This cutting-edge model is now available in 🤗 Transformers and represents one of the most robust zero-shot object detection systems to date. It builds upon the foundation laid by OWL-ViT v1, which was introduced last year.
In this article, we will introduce this model’s behavior and architecture and see a practical approach to how to run inference. Let us get started.
Learning Objectives
- Understand the concept of zero-shot object detection in computer vision.
- Learn about the technology and self-training approach behind Google’s OWLv2 model.
- A practical approach for using OWLv2.
This article was published as a part of the Data Science Blogathon.
Table of contents
The Technology Behind OWLv2
OWLv2’s impressive capabilities can be attributed to its novel self-training approach. The model was trained on a web-scale dataset comprising over 1 billion examples. To achieve this, the authors harnessed the power of OWL-ViT v1, using it to generate pseudo labels, which in turn were used to train OWLv2.

Additionally, the model underwent fine-tuning on detection data, resulting in performance improvements over its predecessor, OWL-ViT v1. The self-training opens up web-scale training for open-world localization, mirroring the trends seen in object classification and language modeling.
OWLv2 Architecture
While the architecture of OWLv2 is similar to OWL-ViT, there’s a notable addition to its object detection head. It now includes an objectness classifier that predicts the likelihood that a predicted box contains an object. The objectness score gives insights and can be used to rank or filter predictions independently of text queries.
Zero-Shot Object Detection
Zero-shot learning is a new terminology that has become popular since the trend of GenAI. It is commonly seen in Large Language Model(LLM) fine-tuning. It involves finetuning base models using some data so that, a model extends to new categories. Zero-shot object detection is a game-changer in the field of computer vision. It’s all about empowering models to detect objects in images without the need for manually annotated bounding boxes. This not only speeds up the process but removes manual annotation, making it more exciting for humans and less boring.
How to Use OWLv2?
OWLv2 follows a similar approach to OWL-ViT but features an updated image processor, Owlv2ImageProcessor. Additionally, the model relies on CLIPTokenizer to encode text. The Owlv2Processor is a handy tool that combines Owlv2ImageProcessor and CLIPTokenizer, simplifying the process of encoding text. Here’s an example of how to perform object detection using Owlv2Processor and Owlv2ForObjectDetection.
Find the entire code here: https://github.com/inuwamobarak/OWLv2
Step 1: Setting the Environment
In this step, we start by installing the 🤗 Transformers library from GitHub.
# Install the 🤗 Transformers library from GitHub.
!pip install -q git+https://github.com/huggingface/transformers.git
Step 2: Load Model and Processor
Here, we load an OWLv2 checkpoint from the hub. Note that checkpoint options are available, and in this example, we load an ensemble checkpoint.
# Load an OWLv2 checkpoint from the hub.
from transformers import Owlv2Processor, Owlv2ForObjectDetection
# Load the processor and model.
processor = Owlv2Processor.from_pretrained(“google/owlv2-base-patch16-ensemble”)
model = Owlv2ForObjectDetection.from_pretrained(“google/owlv2-base-patch16-ensemble”)
# Load an OWLv2 checkpoint from the hub.
from transformers import Owlv2Processor, Owlv2ForObjectDetection # Load the processor and model.
processor = Owlv2Processor.from_pretrained("google/owlv2-base-patch16-ensemble")
model = Owlv2ForObjectDetection.from_pretrained("google/owlv2-base-patch16-ensemble")
Step 3: Load and Process Images
In this step, we load an image on which we want to detect objects.
# Load an image that you want to analyze.
from huggingface_hub import hf_hub_download
from PIL import Image # Replace the file paths accordingly.
filepath = hf_hub_download(repo_id="adirik/OWL-ViT", repo_type="space", filename="assets/astronaut.png")
image = Image.open(filepath)
Step 4: Prepare Image and Queries for the Model
OWLv2 is capable of detecting objects given text queries. In this step, we prepare the image and text queries for the model using the processor.
# Define the text queries that you want the model to detect.
texts = [['face', 'bag', 'shoe', 'hair']] # Prepare the image and text for the model using the processor.
inputs = processor(text=texts, images=image, return_tensors="pt") # Print the shapes of input tensors.
for key, val in inputs.items(): print(f"{key}: {val.shape}")
Step 5: Forward Pass
In this step, we forward the inputs through the model. We use torch.no_grad() to reduce memory usage since we don’t need gradients at inference time.
# Import the torch library.
import torch # Perform a forward pass through the model.
with torch.no_grad(): outputs = model(**inputs)
Step 6: Visualize Results
In this final step, we convert the model’s outputs to COCO API format and visualize the results by drawing bounding boxes and labels on the image.
# Convert model outputs to COCO API format.
target_sizes = torch.Tensor([image.size[::-1]])
results = processor.post_process_object_detection(outputs=outputs, target_sizes=target_sizes, threshold=0.2) # Retrieve predictions for the first image.
i = 0
text = texts[i]
boxes, scores, labels = results[i]["boxes"], results[i]["scores"], results[i]["labels"] # Draw bounding boxes and labels on the image.
from PIL import ImageDraw
draw = ImageDraw.Draw(image) for box, score, label in zip(boxes, scores, labels): box = [round(i, 2) for i in box.tolist()] x1, y1, x2, y2 = tuple(box) draw.rectangle(xy=((x1, y1), (x2, y2)), outline="red") draw.text(xy=(x1, y1), text=text[label]) # Display the image with bounding boxes and labels.
image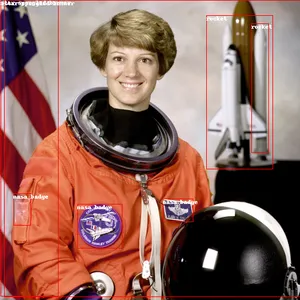
Image-Guided One-Shot Object Detection
We perform the image-guided one-shot object detection using OWLv2. This means we detect objects in a new image based on an example query image.
Code: https://github.com/inuwamobarak/OWLv2
# Import necessary libraries
# %matplotlib inline # Uncomment this line for compatibility if using Jupyter Notebook.
import cv2
from PIL import Image
import requests
import torch
from matplotlib import rcParams
import matplotlib.pyplot as plt # Set the figure size
rcParams['figure.figsize'] = 11, 8 # Load the input image
url = "http://images.cocodataset.org/val2017/000000039769.jpg"
image = Image.open(requests.get(url, stream=True).raw)
target_sizes = torch.Tensor([image.size[::-1]) # Load the query image
query_url = "http://images.cocodataset.org/val2017/000000058111.jpg"
query_image = Image.open(requests.get(query_url, stream=True).raw) # Display the input image and query image side by side.
fig, ax = plt.subplots(1, 2)
ax[0].imshow(image)
ax[1].imshow(query_image)
After loading the two images, we preprocess the input and print the shape.
# Define the device to use for processing.
device = "cuda" if torch.cuda.is_available() else "cpu" # Process input and query images using the preprocessor.
inputs = processor(images=image, query_images=query_image, return_tensors="pt").to(device) # Print the input names and shapes.
for key, val in inputs.items(): print(f"{key}: {val.shape}")
Below, we perform image-guided object detection. We print the shapes of the model’s outputs, including vision model outputs.
# Perform image-guided object detection using the model.
with torch.no_grad(): outputs = model.image_guided_detection(**inputs) # Print the shapes of the model's outputs.
for k, val in outputs.items(): if k not in {"text_model_output", "vision_model_output"}: print(f"{k}: shape of {val.shape}") print("nVision model outputs")
for k, val in outputs.vision_model_output.items(): print(f"{k}: shape of {val.shape}")
Finally, we visualize the results by drawing bounding boxes on the image. The code handles the conversion of the image to RGB format and post-processes the detection results.
# Visualize the results
import numpy as np # Convert the image to RGB format.
img = cv2.cvtColor(np.array(image), cv2.COLOR_BGR2RGB)
outputs.logits = outputs.logits.cpu()
outputs.target_pred_boxes = outputs.target_pred_boxes.cpu() # Post-process the detection results.
results = processor.post_process_image_guided_detection(outputs=outputs, threshold=0.9, nms_threshold=0.3, target_sizes=target_sizes)
boxes, scores = results[0]["boxes"], results[0]["scores"] # Draw bounding boxes on the image.
for box, score in zip(boxes, scores): box = [int(i) for i in box.tolist()] img = cv2.rectangle(img, box[:2], box[2:], (255, 0, 0), 5) if box[3] + 25 > 768: y = box[3] - 10 else: y = box[3] + 25 # Display the image with predicted bounding boxes.
plt.imshow(img[:, :, ::-1])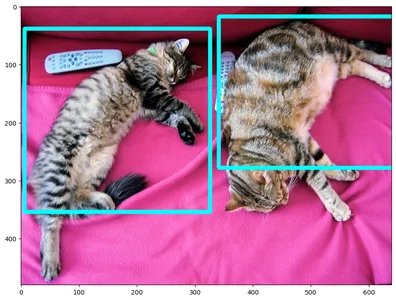
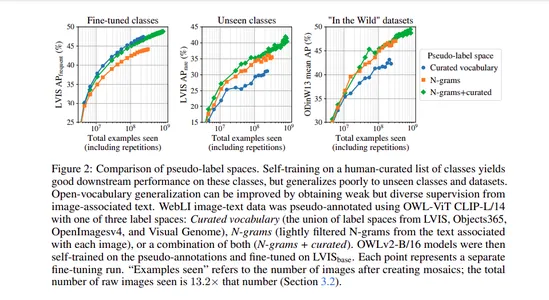
Scaling Open-Vocabulary Object Detection
Open-vocabulary object detection has benefited from pre-trained vision-language models. However, it’s often hindered by the limited availability of detection training data. To address this, the authors turned to self-training and existing detectors to generate pseudo-box annotations on image-text pairs. Scaling self-training presents its own set of challenges, including the choice of label space, pseudo-annotation filtering, and training efficiency.
OWLv2 and the OWL-ST self-training recipe have been developed to overcome these challenges. As a result, OWLv2 now surpasses the performance of earlier state-of-the-art open-vocabulary detectors, even at similar training scales of around 10 million examples.
Impressive Performance and Scaling
OWLv2’s performance is indeed impressive. With an L/14 architecture, OWL-ST improves the Average Precision (AP) on LVIS rare classes. Even when the model has not seen human box annotations for these rare classes, it achieves this improvement, with AP rising from 31.2% to 44.6%.
OWL-ST’s capability to scale to over 1 billion examples signifies achievement in web-scale training for open-world localization, similar to what we’ve witnessed in object classification and language modeling.
Conclusion
OWLv2 and the innovative OWL-ST self-training recipe represent a leap forward in zero-shot object detection. These advancements promise to reshape the landscape of computer vision by making it easier and more efficient to detect objects in images without the need for manually annotated bounding boxes. We encourage you to explore OWLv2 and its applications in your projects. The possibilities are exciting, and we can’t wait to see how the computer vision community leverages this technology for groundbreaking solutions.
Key Takeaways
- OWLv2 is Google’s latest model for zero-shot object detection, available in 🤗 Transformers, and it builds upon the earlier version, OWL-ViT v1.
- Zero-shot object detection eliminates the need for manually annotated bounding boxes, making the process more efficient and less tedious.
- OWLv2 uses self-training on a web-scale dataset of over 1 billion examples and leverages pseudo labels from OWL-ViT v1 to improve performance.
Frequently Asked Questions
A1: Zero-shot object detection is a way for models to detect objects in images without the need for manually annotated bounding boxes. It’s important because it streamlines the object detection process and makes it less labor-intensive.
A2: Self-training involves using an existing detector to generate pseudo-box annotations on image-text pairs. OWLv2 leverages this self-training approach to improve performance and scalability.
A3: The objectness classifier in OWLv2’s object detection head predicts the likelihood that a predicted box contains an object. Use this information to rank or filter predictions independently of text queries.
A4: Use OWLv2 with processors like Owlv2ImageProcessor, CLIPTokenizer, and Owlv2Processor to perform text-conditioned object detection. Practical examples are available in the article.
A5: Self-training addresses challenges like the choice of label space, pseudo-annotation filtering, and training scaled open-vocabulary object detection.
A6: OWLv2’s capabilities have the potential to benefit applications in computer vision, including object detection, image understanding, and more. Researchers and developers can leverage this technology for innovative solutions.
Reference Links
- https://github.com/inuwamobarak/OWLv2
- https://huggingface.co/docs/transformers/main/en/model_doc/owlv2
- https://arxiv.org/abs/2306.09683
- https://huggingface.co/docs/transformers/main/en/model_doc/owlvit
- https://arxiv.org/abs/2205.06230
- Minderer, M., Gritsenko, A., & Houlsby, N. (2023). Scaling Open-Vocabulary Object Detection. ArXiv. /abs/2306.09683
The media shown in this article is not owned by Analytics Vidhya and is used at the Author’s discretion.
Related
- SEO Powered Content & PR Distribution. Get Amplified Today.
- PlatoData.Network Vertical Generative Ai. Empower Yourself. Access Here.
- PlatoAiStream. Web3 Intelligence. Knowledge Amplified. Access Here.
- PlatoESG. Carbon, CleanTech, Energy, Environment, Solar, Waste Management. Access Here.
- PlatoHealth. Biotech and Clinical Trials Intelligence. Access Here.
- Source: https://www.analyticsvidhya.com/blog/2023/10/owlv2-googles-breakthrough-in-zero-shot-object-detection/
- :has
- :is
- :not
- $10 million
- $UP
- 1
- 10
- 11
- 12
- 19
- 2%
- 2023
- 25
- 31
- 8
- 9
- a
- About
- accordingly
- Achieve
- achievement
- Achieves
- addition
- Additionally
- address
- addresses
- advancements
- All
- an
- analytics
- Analytics Vidhya
- analyze
- and
- api
- applications
- approach
- architecture
- ARE
- around
- article
- AS
- asked
- At
- authors
- availability
- available
- average
- bag
- base
- based
- BE
- because
- become
- been
- behavior
- behind
- benefit
- Billion
- blogathon
- Boring
- Box
- boxes
- breakthrough
- builds
- but
- by
- CAN
- capabilities
- capability
- capable
- categories
- challenges
- choice
- classes
- classification
- coco
- code
- combines
- coming
- commonly
- community
- compatibility
- comprising
- computer
- Computer Vision
- concept
- contains
- contribute
- Conversion
- convert
- CPU
- cutting-edge
- data
- Date
- define
- detect
- Detection
- developed
- developers
- Development
- device
- discretion
- Display
- does
- Dont
- draw
- drawing
- Earlier
- easier
- efficiency
- efficient
- eliminates
- else
- empowering
- encourage
- end
- Entire
- Ether (ETH)
- Even
- example
- examples
- exciting
- existing
- explore
- extends
- Face
- Features
- field
- Fig
- Figure
- File
- filter
- filtering
- final
- First
- follows
- For
- format
- Forward
- Foundation
- from
- game-changer
- generate
- get
- GitHub
- given
- gives
- Google’s
- gradients
- groundbreaking
- Hair
- Handles
- handy
- Have
- head
- here
- How
- How To
- However
- http
- HTTPS
- Hub
- human
- Humans
- i
- if
- image
- images
- import
- important
- impressive
- improve
- improvement
- improvements
- improves
- in
- includes
- Including
- indeed
- independently
- information
- innovative
- input
- inputs
- insights
- install
- installing
- introduce
- introduced
- introducing
- involves
- IT
- ITS
- jpg
- Jupyter Notebook
- Key
- Label
- Labels
- landscape
- language
- large
- Last
- Last Year
- latest
- Leap
- learning
- less
- let
- Leverage
- leverages
- libraries
- Library
- like
- likelihood
- Limited
- Line
- load
- loading
- Localization
- made
- MAKES
- Making
- manual
- manually
- matplotlib
- means
- Media
- Memory
- million
- mirroring
- model
- modeling
- models
- more
- more efficient
- most
- my
- names
- necessary
- Need
- New
- news
- notable
- note
- notebook
- novel
- now
- numpy
- object
- Object Detection
- objects
- of
- often
- on
- ONE
- only
- opens
- Options
- or
- outputs
- over
- Overcome
- own
- owned
- pairs
- part
- pass
- perform
- performance
- plato
- Plato Data Intelligence
- PlatoData
- Popular
- possibilities
- potential
- power
- Practical
- Precision
- predecessor
- predicted
- Predictions
- Predicts
- Prepare
- presents
- process
- processing
- Processor
- processors
- projects
- promise
- published
- queries
- rank
- RARE
- Raw
- real world
- recently
- recipe
- Red
- reduce
- release
- replace
- represent
- represents
- requests
- researchers
- reshape
- result
- resulting
- Results
- RGB
- rising
- robust
- Role
- Run
- s
- Scalability
- Scale
- scales
- scaling
- Science
- score
- scores
- see
- seen
- set
- setting
- Shape
- shapes
- shot
- shown
- side
- signifies
- similar
- simplifying
- since
- Size
- So
- Solutions
- some
- Space
- speeds
- start
- started
- state-of-the-art
- Step
- strides
- Systems
- Technology
- terminology
- text
- that
- The
- the hub
- The Landscape
- the world
- These
- this
- Through
- time
- to
- tool
- torch
- Train
- trained
- Training
- transformers
- Trend
- Trends
- TURN
- Turned
- two
- understanding
- underwent
- updated
- upon
- URL
- us
- Usage
- use
- used
- uses
- using
- v1
- VAL
- version
- vision
- visualize
- wait
- want
- was
- Way..
- we
- webp
- were
- What
- What is
- when
- which
- why
- will
- with
- without
- witnessed
- world
- year
- you
- Your
- zephyrnet
- zero