Introduction
In computer vision, different techniques for live object detection exist, including Faster R-CNN, SSD, and YOLO. Each technique has its limitations and advantages. While Faster R-CNN may excel in accuracy, it may not perform as well in real-time scenarios, prompting a shift towards the YOLO algorithm.
Object detection is fundamental in computer vision, enabling machines to identify and locate objects within a frame or screen. Over the years, various object detection algorithms have been developed, with YOLO emerging as one of the most successful. Recently, YOLOv8 has been introduced, further enhancing the algorithm’s capabilities.
In this comprehensive guide, we explore three prominent object detection algorithms: Faster R-CNN, SSD (Single Shot MultiBox Detector), and YOLOv8. We discuss the practical aspects of implementing these algorithms, including setting up a virtual environment and developing a Streamlit application.
Learning Objective
- Understand Faster R-CNN, SSD, and YOLO, and analyze the differences between them.
- Gain practical experience in implementing live object detection systems using OpenCV, Supervision, and YOLOv8.
- Understanding the image segmentation model using the Roboflow annotation.
- Create a Streamlit application for an easy user interface.
Let’s explore how to do image segmentation with YOLOv8!
Table of contents
This article was published as a part of the Data Science Blogathon.
Faster R-CNN
Faster R-CNN (Faster Region-based Convolutional Neural Network) is a deep learning-based object detection algorithm. It is evaluated using the R-CNN and Fast R-CNN frameworks and can be considered an extension of Fast R-CNN.
This algorithm introduces the Region Proposal Network (RPN) to generate region proposals, replacing the selective search used in R-CNN. The RPN shares convolutional layers with the detection network, allowing efficient end-to-end training.
The generated region proposals are then fed into a Fast R-CNN network for bounding box refinement and object classification.
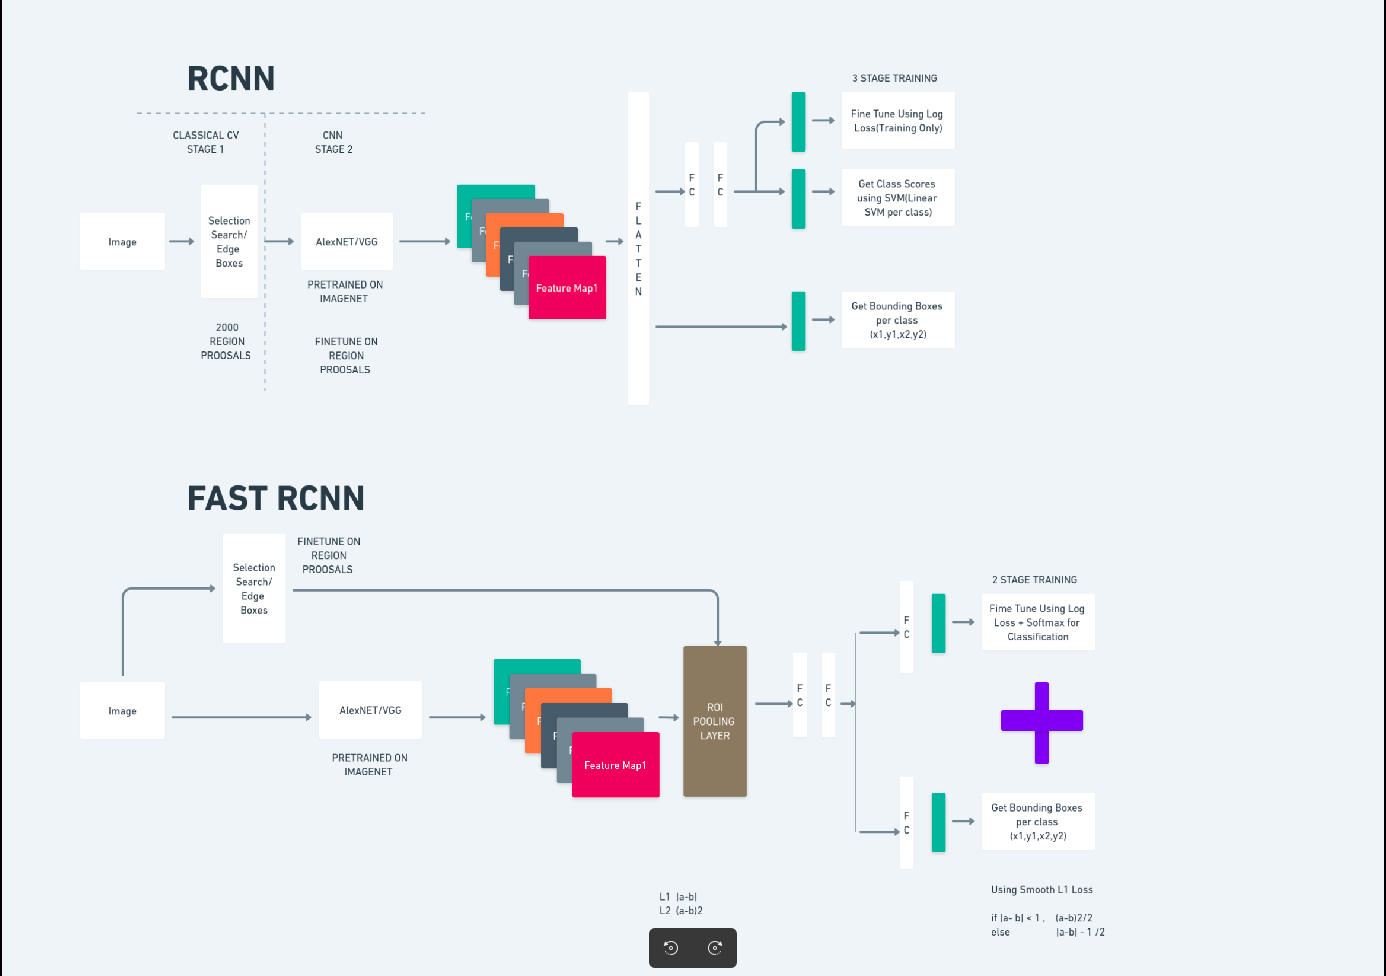
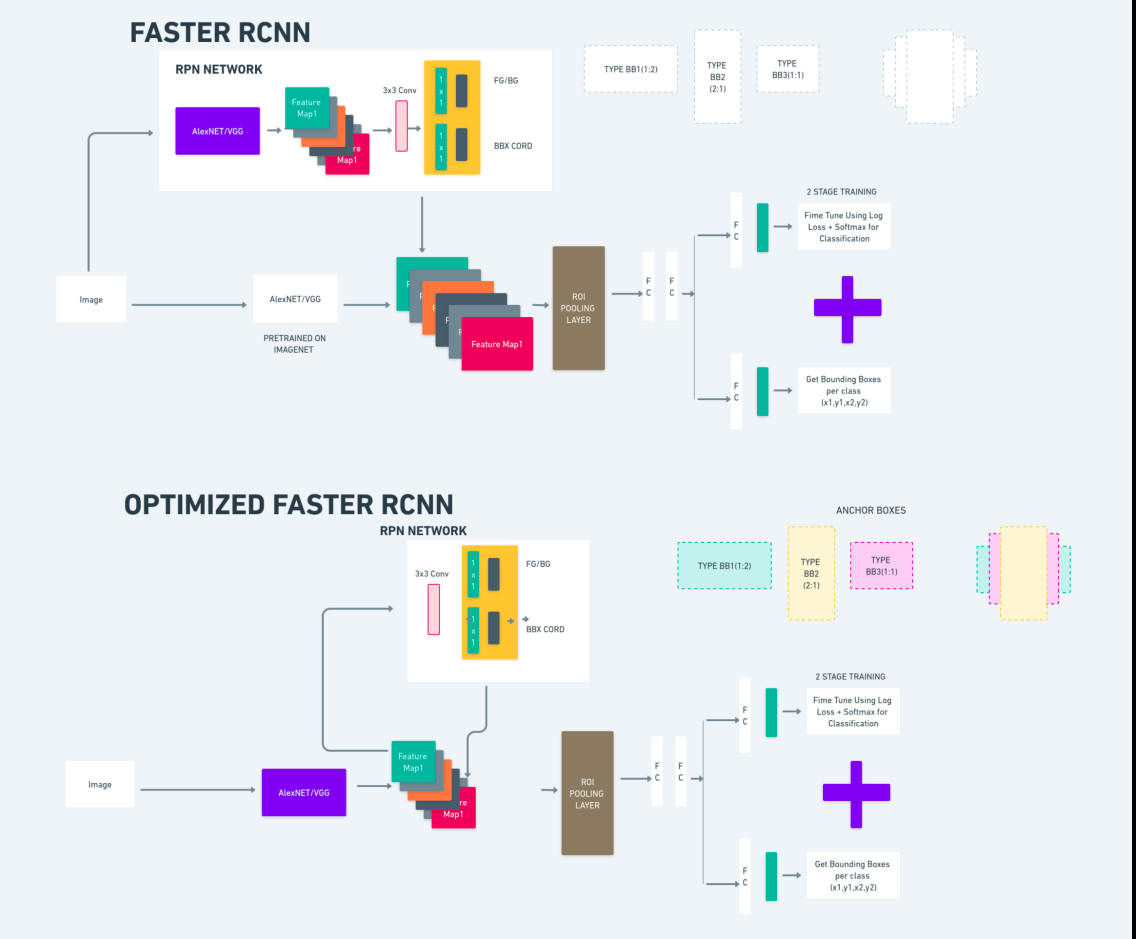
The diagram above illustrates the Faster R-CNN family comprehensively and is easy to understand for evaluating each algorithm.
Single Shot MultiBox Detector(SSD)
The Single Shot MultiBox Detector (SSD) is popular in object detection and primarily used in computer vision tasks. In the previous method, Faster R-CNN, we followed two steps: the first step involved the detection part and the second involved regression. However, with SSD, we only perform a single detection step. SSD was introduced in 2016 to address the need for a fast and accurate object detection model.
SSD has several advantages over earlier object detection methods like Faster R-CNN:
- Efficiency: SSD is a single-stage detector, meaning it directly predicts bounding boxes and class scores without requiring a separate proposal generation step. This makes it faster compared to two-stage detectors like Faster R-CNN.
- End-to-End Training: SSD can be trained end-to-end, optimizing both the base network and the detection head jointly, which simplifies the training process.
- Multi-scale Feature Fusion: SSD operates on feature maps at multiple scales, allowing it to detect objects of varying sizes more effectively.
SSD strikes a good balance between speed and accuracy, making it suitable for real-time applications where both performance and efficiency are critical.
You Only Look Once(YOLOv8)
In 2015, You Only Look Once (YOLO) was introduced as an object-detection algorithm in a research paper by Joseph Redmon, Santosh Divvala, Ross Girshick, and Ali Farhadi. YOLO is a single-shot algorithm that directly classifies an object in a single pass by having only one neural network predict bounding boxes and class probabilities using a full image as input.
Now, Let’s understand YOLOv8 as state-of-the-art advancements in real-time object detection with improved accuracy and speed. YOLOv8 allows you to leverage pre-trained models, which are already trained on a vast dataset such as COCO (Common Objects in Context). Image segmentation provides pixel-level information about each object, enabling more detailed analysis and understanding of the image content.
While image segmentation can be computationally expensive, YOLOv8 integrates this method into its neural-network architecture, allowing for efficient and accurate object segmentation.
Working Principle of YOLOv8
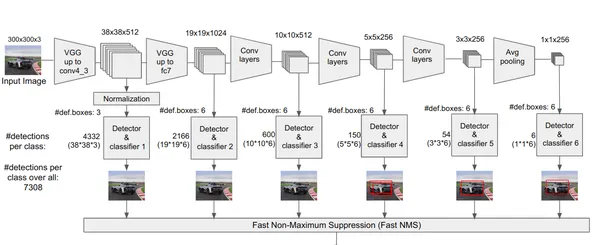
YOLOv8 works by first dividing the input image into grid cells. Using these grid cells, YOLOv8 predicts the bounding boxes (bbox) with probabilities of class.
Afterwards, YOLOv8 employs the NMS algorithm to reduce overlapping. For instance, if there are multiple cars present in the image resulting in overlapping bounding boxes, the NMS algorithm helps in reducing this overlap.
Difference between variants of Yolo V8: YOLOv8 is available in three variants: YOLOv8, YOLOv8-L, and YOLOv8-X. The main difference between the variants is the size of the backbone network. YOLOv8 has the smallest backbone network, while YOLOv8-X has the largest backbone network.
Difference between Faster R-CNN, SSD, and YOLO
| Aspect | Faster R-CNN | SSD | YOLO |
|---|---|---|---|
| Architecture | Two-stage detector with RPN and Fast R-CNN | Single-stage detector | Single-stage detector |
| Region Proposals | Yes | No | No |
| Detection Speed | Slower compared to SSD and YOLO | Faster compared to Faster R-CNN, slower than YOLO | Very fast |
| Accuracy | Generally higher accuracy | Balanced accuracy and speed | Decent accuracy, especially for real-time applications |
| Flexibility | Flexible, can handle various object sizes and aspect ratios | Can handle multiple scales of objects | Can struggle with accurate localization of small objects |
| Unified Detection | No | No | Yes |
| Speed vs Accuracy Tradeoff | Generally sacrifices speed for accuracy | Balances speed and accuracy | Prioritizes speed while maintaining decent accuracy |
What is Segmentation?
As we know segmentation means we are dividing the large image into smaller groups based on certain characteristics. Let’s understand image segmentation which is the computer vision technique used to partition an image into different multiple segments or regions. As the images are made of pixels and In Image segmentation, pixels are grouped together according to the similarity in colour, intensity, texture, or other visual properties.
For example, if an image contains trees, cars, or people then the image segmentation is going to divide the image into different classes which represent meaningful objects or parts of the image. Image segmentation is widely used in different fields like medical imaging, satellite image analysis, object recognition in computer vision, and more.
In the segmentation part, we initially create the first YOLOv8 segmentation model using Robflow. Then, we import the segmentation model to perform the segmentation task. The question arises: why do we create the segmentation model when the task could be completed with a detection algorithm alone?
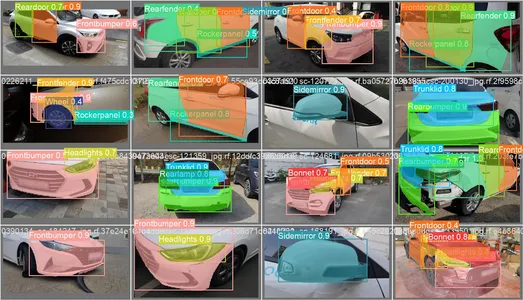
Segmentation allows us to obtain the full body image of a class. While detection algorithms focus on detecting the presence of objects, segmentation provides a more precise understanding by delineating the exact boundaries of objects. This leads to more accurate localization and understanding of the objects present in the image.
However, segmentation typically involves higher time complexity compared to detection algorithms because it requires additional steps such as separating annotations and creating the model. Despite this drawback, the increased precision offered by segmentation can outweigh the computational cost in tasks where precise object delineation is crucial.
Step-by-Step Live Detection and Image Segmentation With YOLOv8
In this concept we ae exploring the steps for creating a virtual environment using conda, activating the venv and installing the requirements packages using pip. first creating the normal python script then we create the streamlit application.
Step1: Create a Virtual Environment using Conda
conda create -p ./venv python=3.8 -yStep2: Activate the Virtual Environment
conda activate ./venv
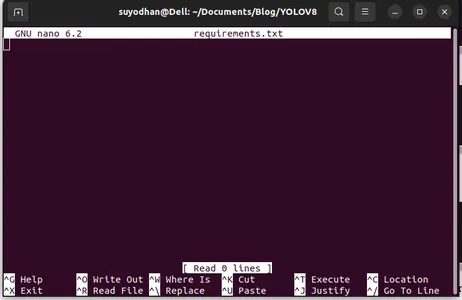
Step3: Create requirements.txt
Open the terminal and paste the below script:
touch requirements.txtStep4: Use the Nano Command and Edit the requirements.txt
After creating the requirements.txt wirte the following command for editing requirements.txt
nano requirements.txtAfter running the above script you can see this UI.
Write her required packages.
ultralytics==8.0.32
supervision==0.2.1
streamlit
Then press the “ctrl+o”(this command saving editing part) then Press the “enter”

After pressing the “Ctrl+x”. you can exit the file. and going to the main path.
Step5: Installing the requirements.txt
pip install -r requirements.txtStep6: Create the Python Script
In the terminal write the following script or we can say command.
touch main.pyAfter creating main.py open the vs code you use the command write in terminal,
code Step7: Writing the Python Script
import cv2
from ultralytics import YOLO
import supervision as sv

# Define the frame width and height for video capture
frame_width = 1280
frame_height = 720

def main():
    # Initialize video capture from default camera
    cap = cv2.VideoCapture(0)
    cap.set(cv2.CAP_PROP_FRAME_WIDTH, frame_width)
    cap.set(cv2.CAP_PROP_FRAME_HEIGHT, frame_height)

    # Load YOLOv8 model
    model = YOLO("yolov8l.pt")

    # Initialize box annotator for visualization
    box_annotator = sv.BoxAnnotator(
        thickness=2,
        text_thickness=2,
        text_scale=1
    )

    # Main loop for video processing
    while True:
        # Read frame from video capture
        ret, frame = cap.read()

        # Perform object detection using YOLOv8
        result = model(frame, agnostic_nms=True)[0]
        detections = sv.Detections.from_yolov8(result)

        # Prepare labels for detected objects
        labels = [
            f"{model.model.names[class_id]} {confidence:0.2f}"
            for _, confidence, class_id, _
            in detections
        ]

        # Annotate frame with bounding boxes and labels
        frame = box_annotator.annotate(
            scene=frame,
            detections=detections,
            labels=labels
        )

        # Display annotated frame
        cv2.imshow("yolov8", frame)

        # Check for quit key
        if cv2.waitKey(1) & 0xFF == ord('q'):
            break

    # Release video capture
    cap.release()
    cv2.destroyAllWindows()

if __name__ == "__main__":
    main()
After running this command you can see the your camera is open and detecting part of you. like gender and background parts.
Step7: Create streamlit App
import cv2
import streamlit as st
from ultralytics import YOLO
import supervision as sv

# Define the frame width and height for video capture
frame_width = 1280
frame_height = 720

def main():
    # Set page title and header
    st.title("Live Object Detection with YOLOv8")

    # Button to start the camera
    start_camera = st.button("Start Camera")

    if start_camera:
        # Initialize video capture from default camera
        cap = cv2.VideoCapture(0)
        cap.set(cv2.CAP_PROP_FRAME_WIDTH, frame_width)
        cap.set(cv2.CAP_PROP_FRAME_HEIGHT, frame_height)

        # Load YOLOv8 model
        model = YOLO("yolov8l.pt")

        # Initialize box annotator for visualization
        box_annotator = sv.BoxAnnotator(
            thickness=2,
            text_thickness=2,
            text_scale=1
        )

        # Main loop for video processing
        while True:
            # Read frame from video capture
            ret, frame = cap.read()

            # Perform object detection using YOLOv8
            result = model(frame, agnostic_nms=True)[0]
            detections = sv.Detections.from_yolov8(result)

            # Prepare labels for detected objects
            labels = [
                f"{model.model.names[class_id]} {confidence:0.2f}"
                for _, confidence, class_id, _
                in detections
            ]

            # Annotate frame with bounding boxes and labels
            frame = box_annotator.annotate(
                scene=frame,
                detections=detections,
                labels=labels
            )

            # Display annotated frame
            st.image(frame, channels="BGR", use_column_width=True)

            # Check for quit key
            if cv2.waitKey(1) & 0xFF == ord('q'):
                break

        # Release video capture
        cap.release()

if __name__ == "__main__":
    main()
In this script, we are creating the streamlit application and creating the button so that after pressing the button your device camera is open and detecting the part in the frame.
Run this script using this command.
streamlit run app.py
# first create the app.py then paste the above code and run this script.
After running the above command suppose you got the reach-out error like,
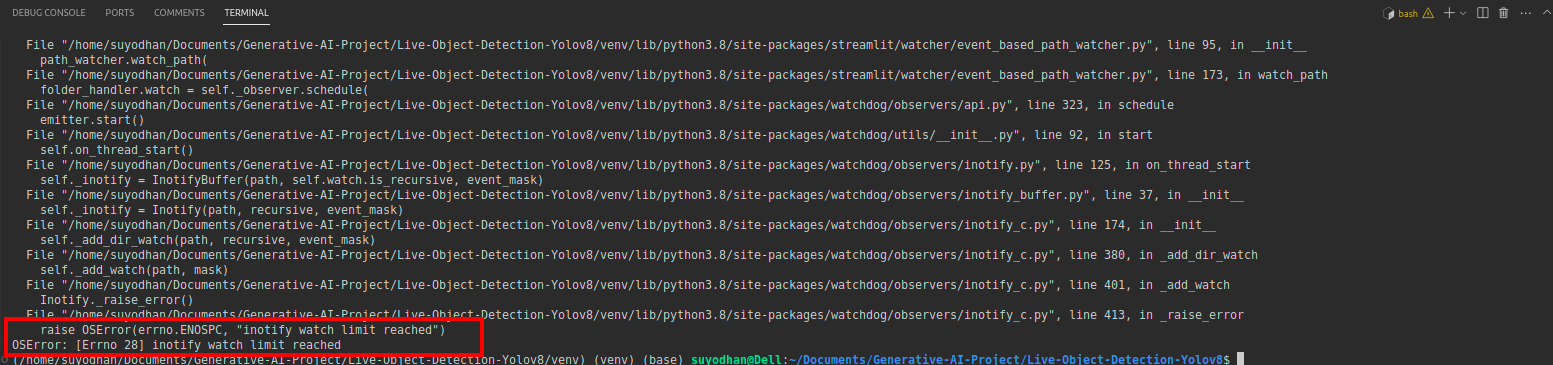
then press this command,
sudo sysctl fs.inotify.max_user_watches=524288After hitting the command you want to write your password by because we are using the sudo command sudo is god:)
Run the script again. and you can see the streamlit application.

Here we can create a successful live detection application in the next part we will see the segmentation part.
Steps For Annotation
Step1: Roboflow Setup
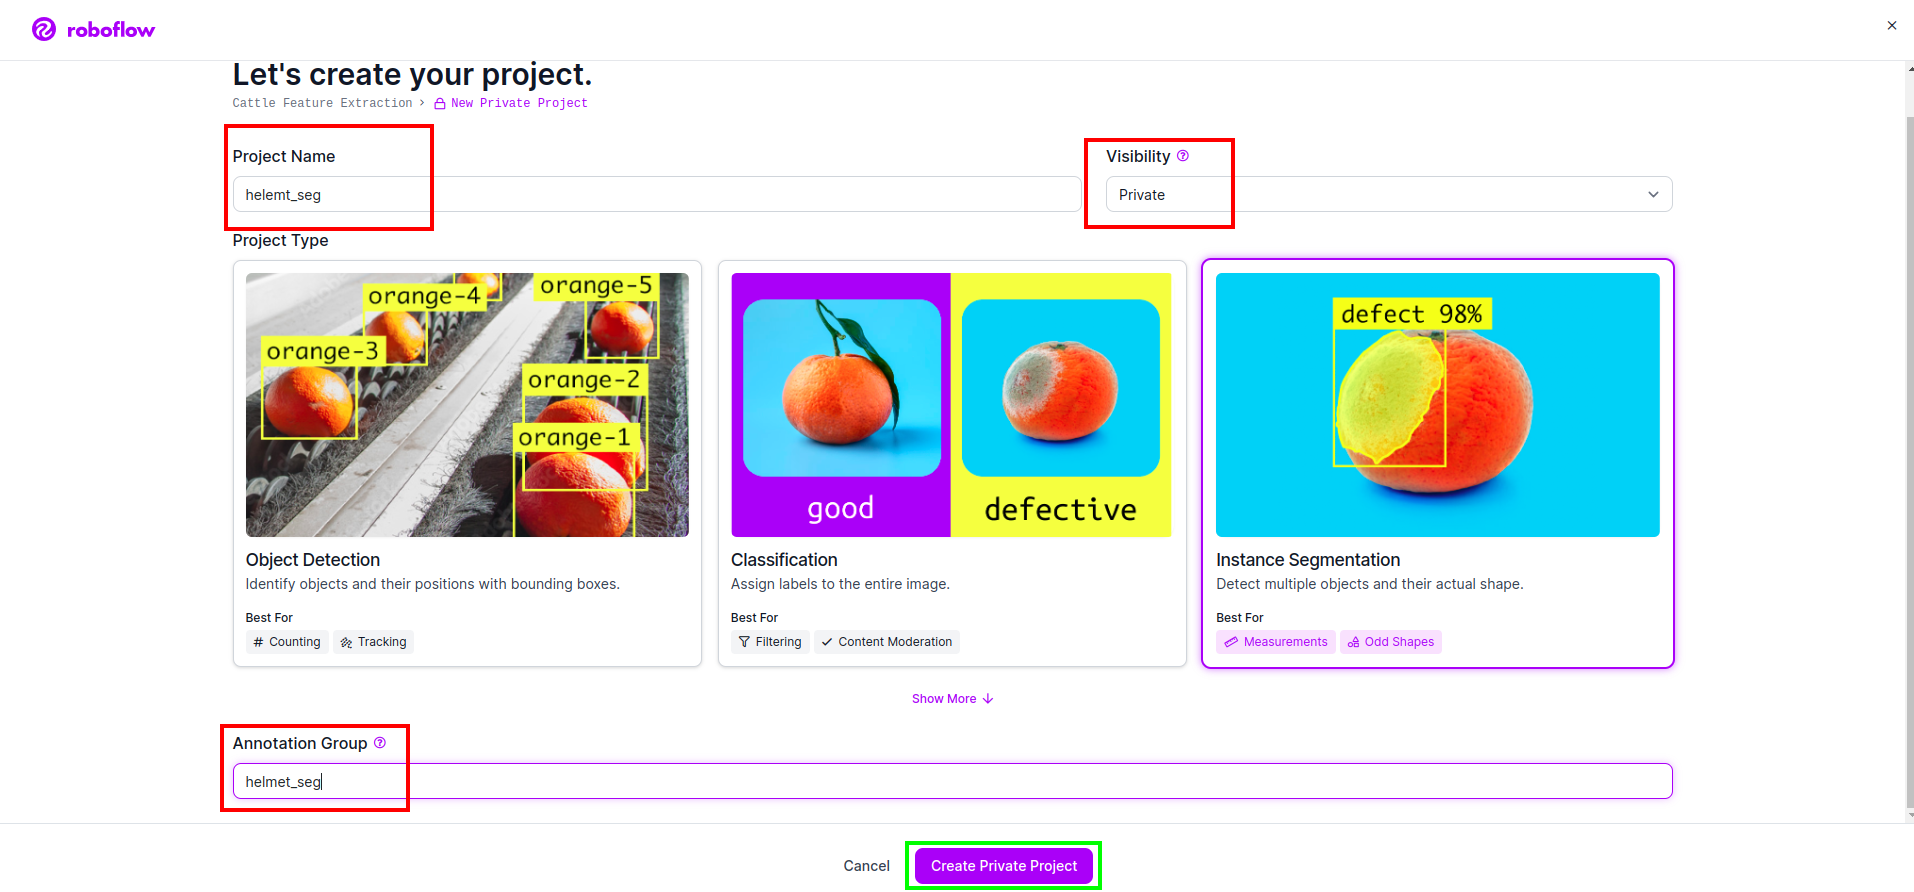
After sigin the “Create Project”. here you can create the project and annotation group.
Step2: Dataset Downloading
Here we consider the simple example but you want to use it on your problem statement so I’m using here duck dataset.
Go the this link and download the duck dataset.
Extract the folder there you can see the three folders: train, test and val.
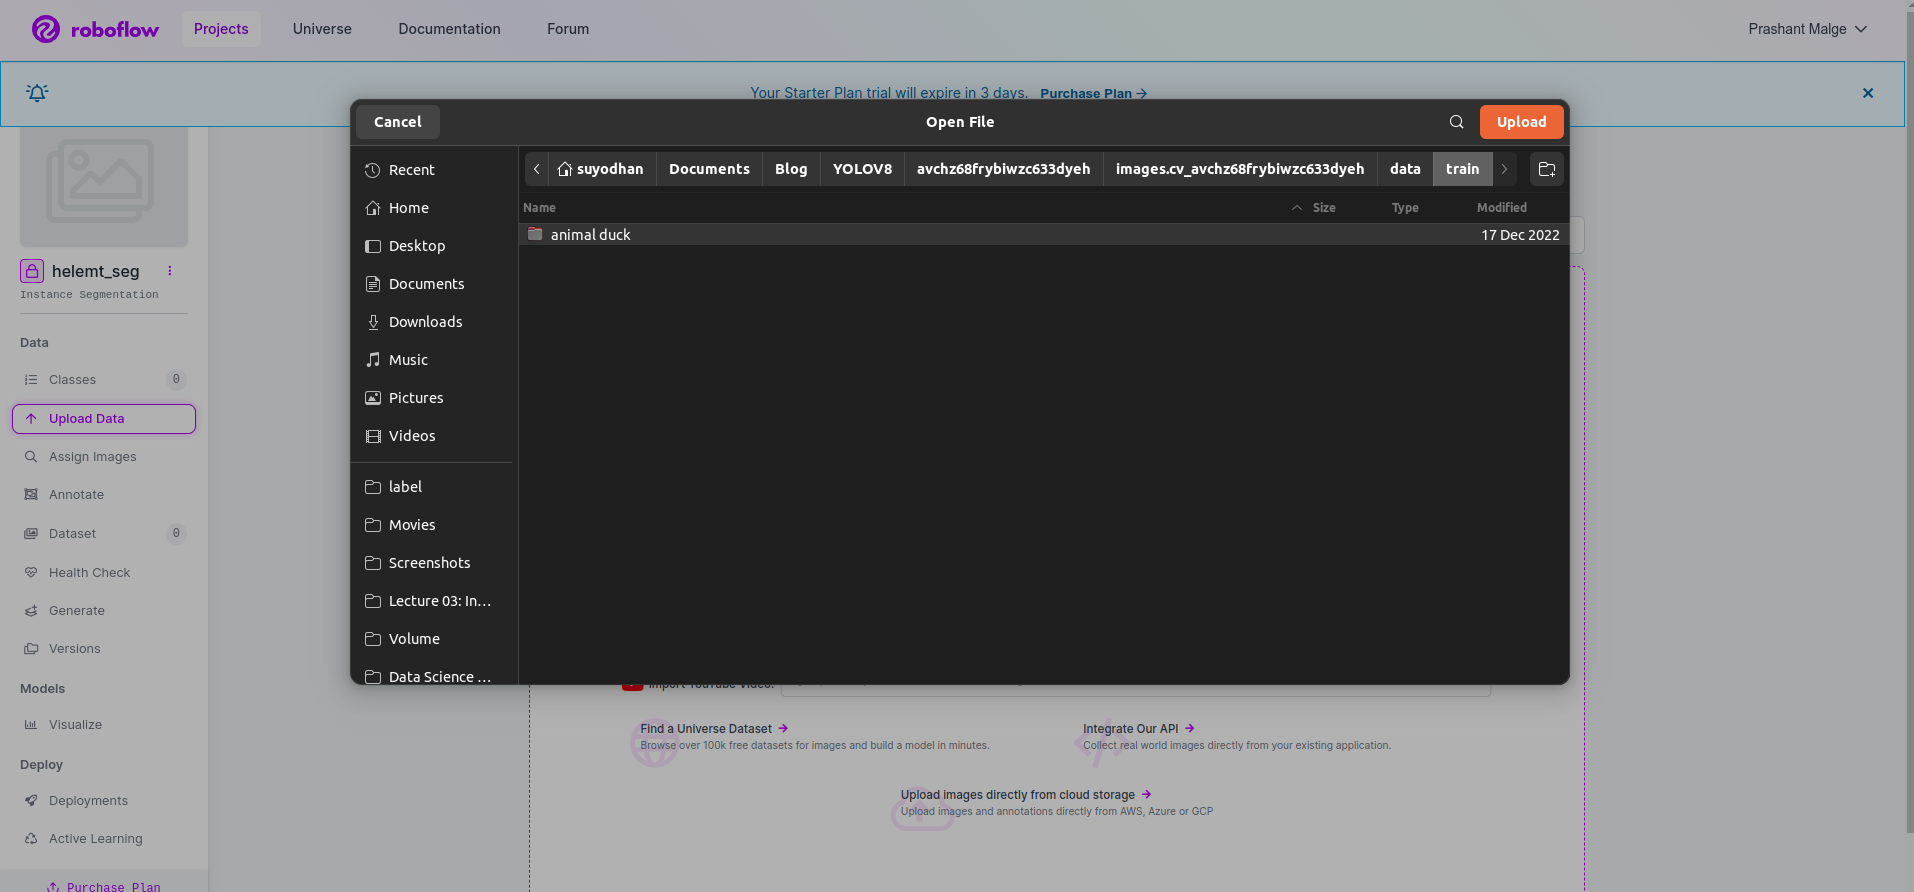
Step3: Uploading the Dataset on roboflow
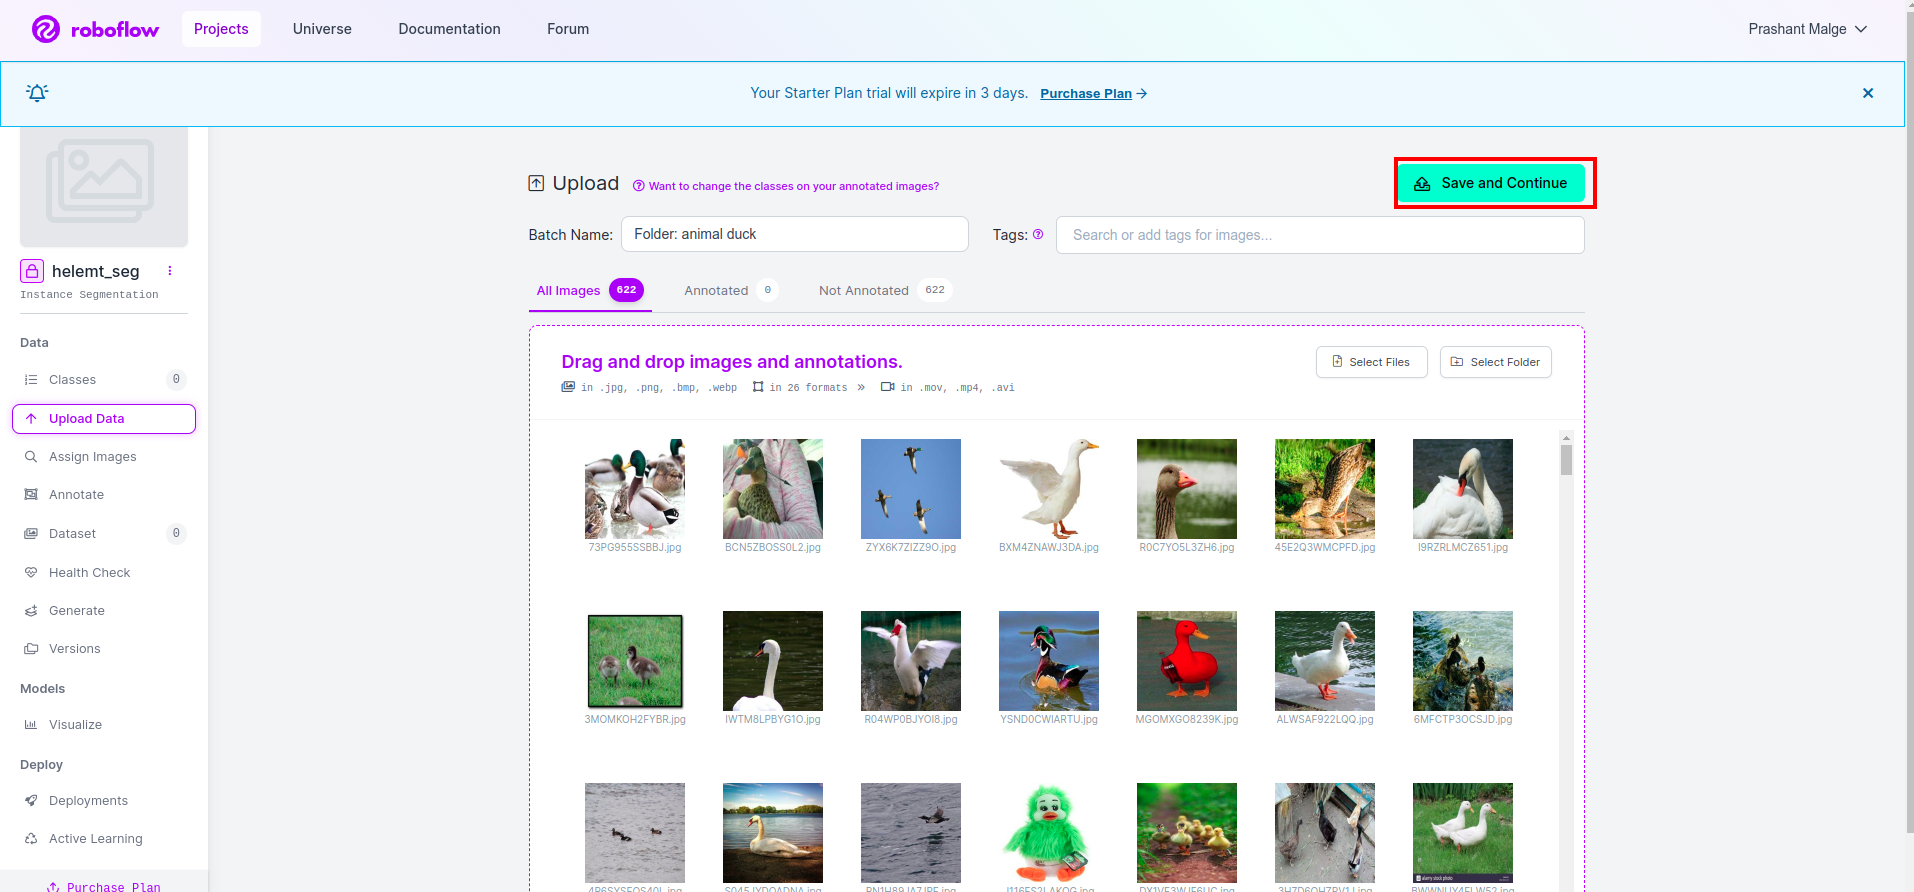
After creating the project in roboflow you can see this UI here you can upload your dataset so are uploading only train part images select the “select folder” option.
Then click the “save and continue” option as I mark in a red rectangle box
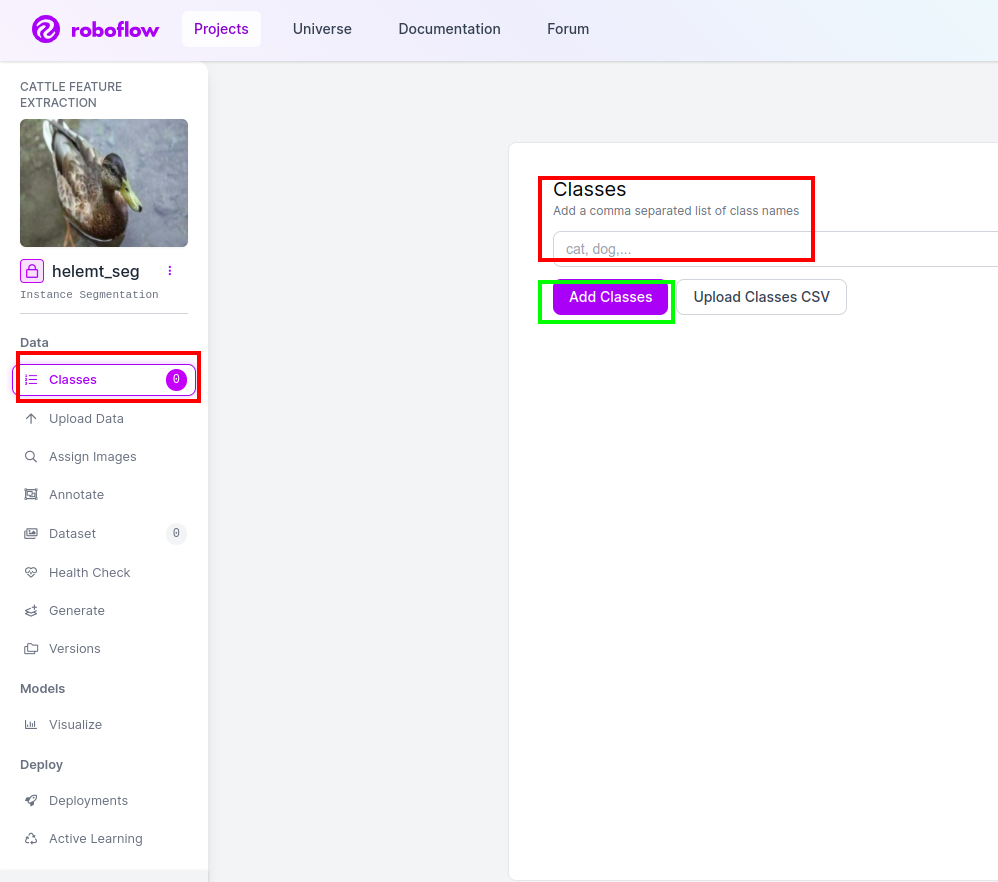
Step4: Add the Class Name
Then go to the class part on the left side of check the red box. and write the class name as duck, after clicking the green box.
Now our setup is complete and the next part like the annotation part also simple.
Step5: Start the annotation part
Go to the annotation option I marked in the red box and then click the start the annoataion part as I marked in the green box.
Click the first image you can see this UI. After seeing this click the manual annotation option.

Then add your email id or your teammate’s name so you can assign the task.
Click the first image you can see this UI. here click the red box so you can select the multi-polynomial model.
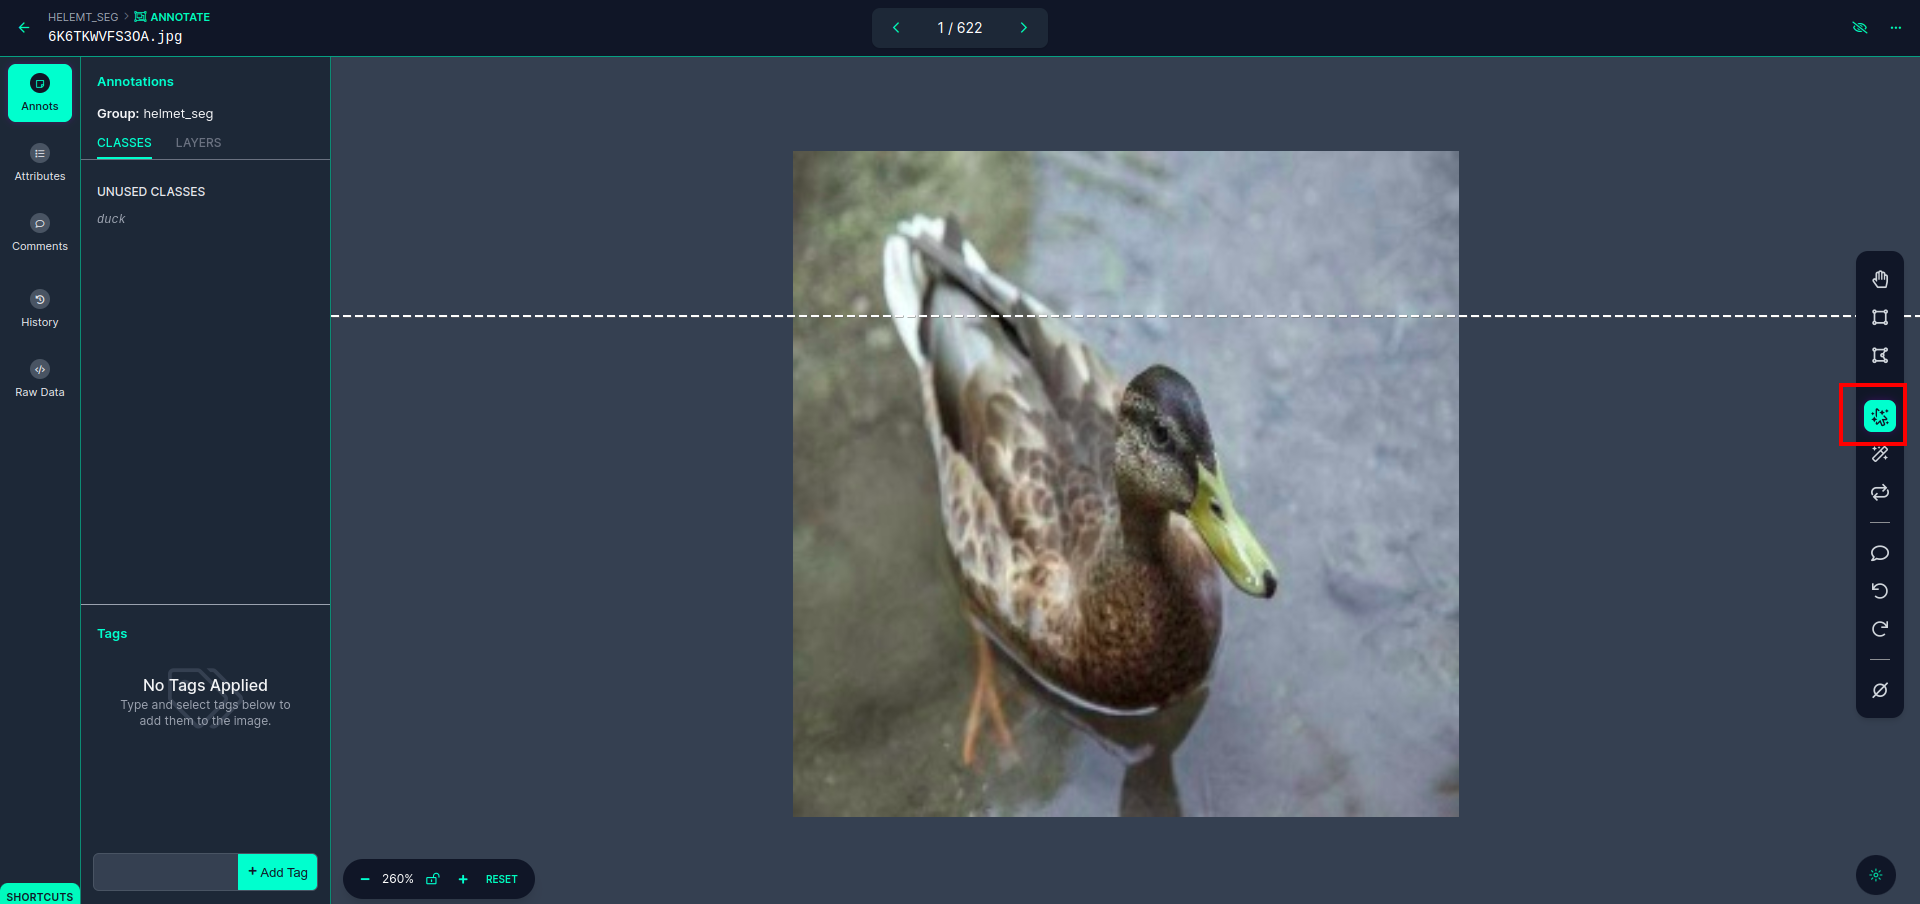
After clicking the red box, select the default model and click on the duck object. This will automatically segment the image. Then, click on the next part and save it. You will then see the left side marked in a red box, where you can see the class name.
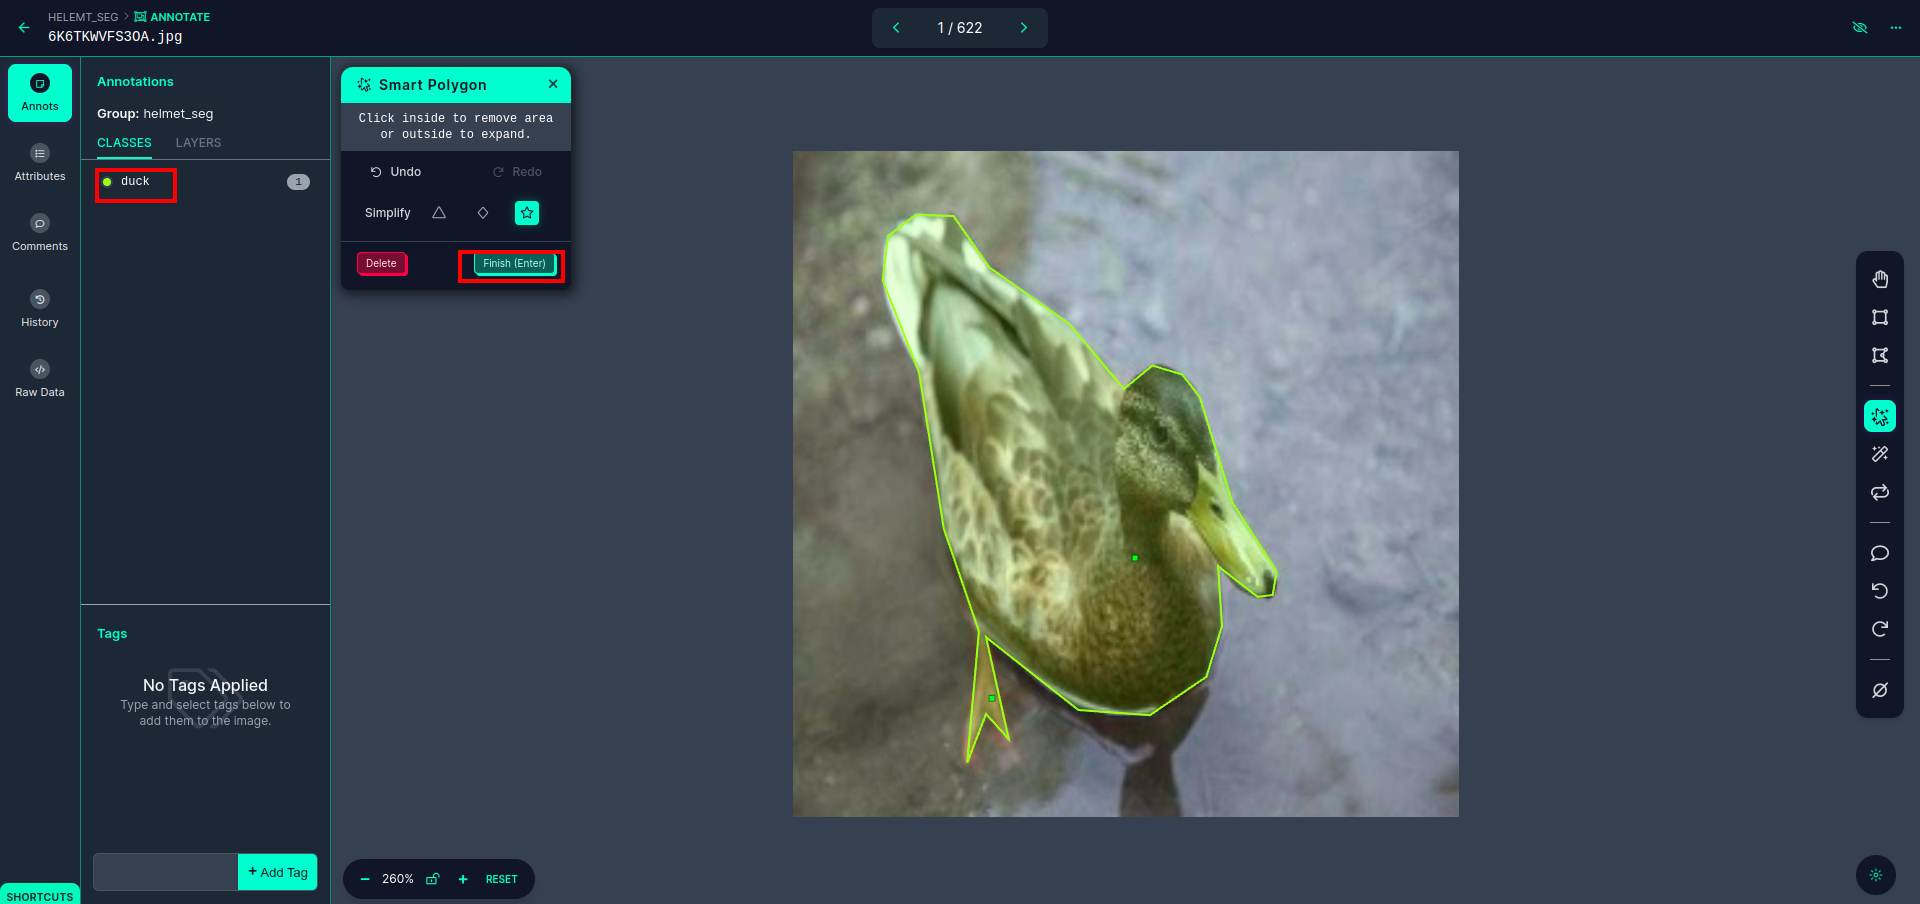
Click the save&enter option. annotate the all the images.
Add the images for YOLOv8 format. On the right side, you will see the option to add images in the annotation section. Here, two parts are created: one for annotated images and one for unannotated images.
- First, click the left-side “annotate” option then add the images to the dataset.
- Then click the next “Add Images“.
Now last, we create the dataset so click the “Generate” option on the left side then check the option and press the conitune option.
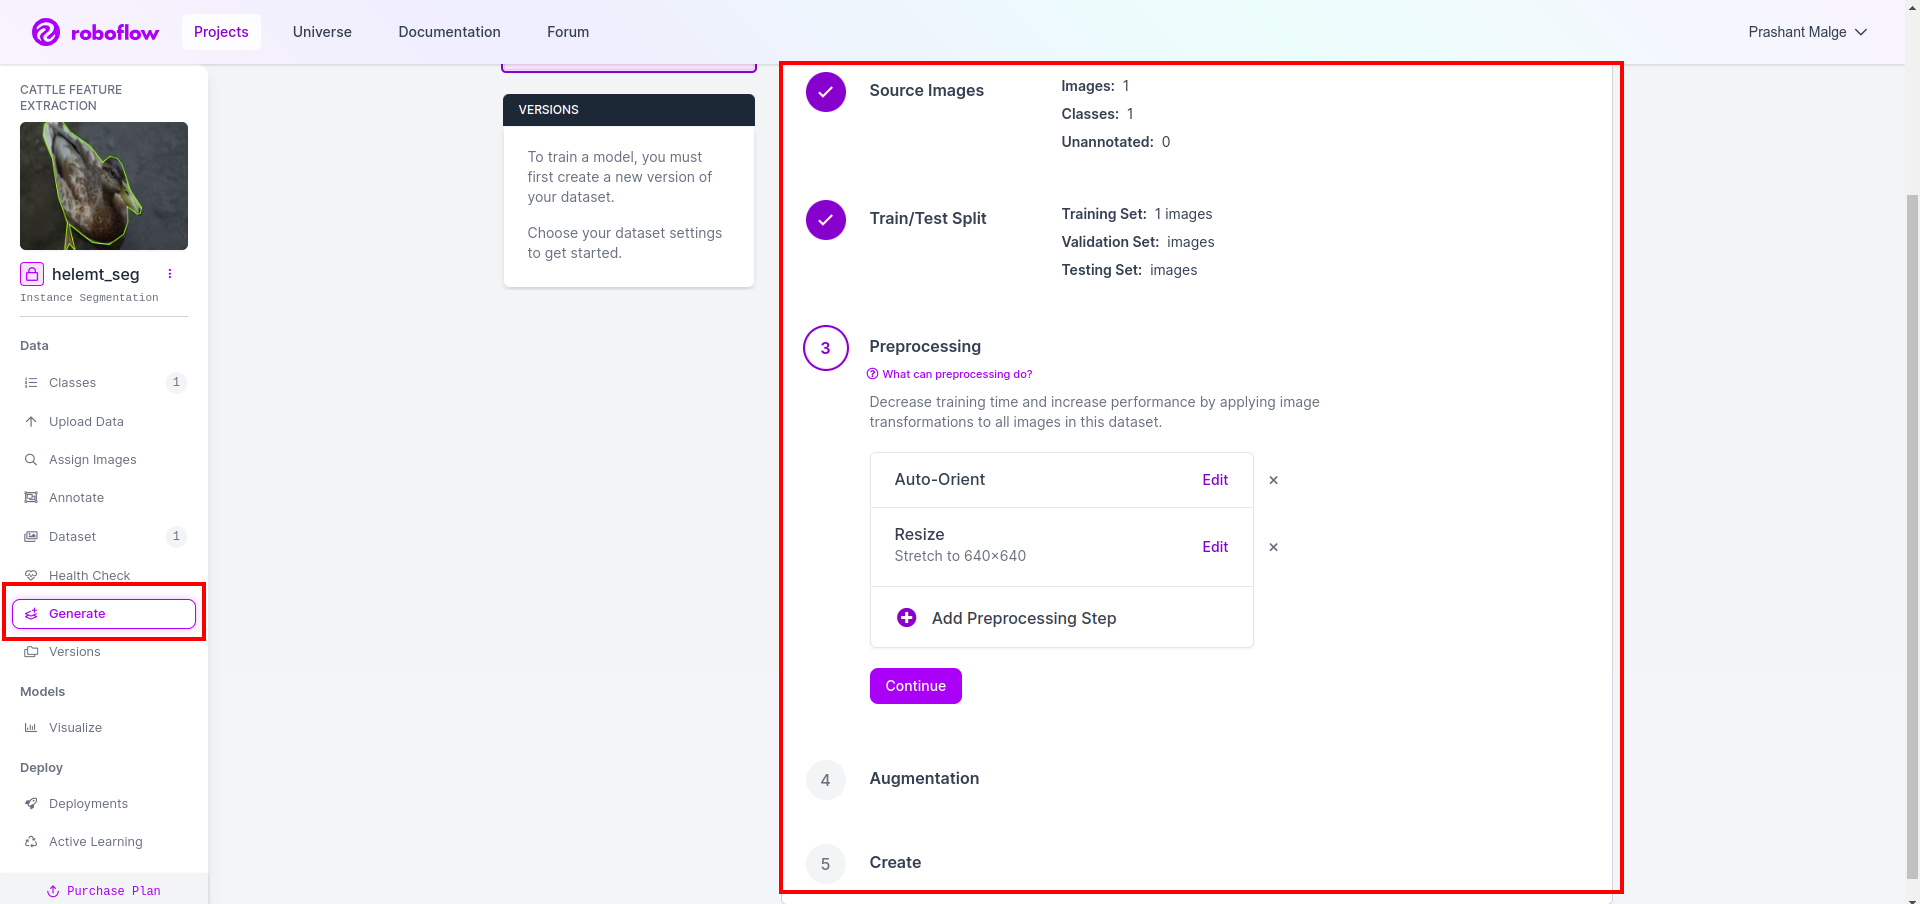
Then you get the UI of the dataset split option here you can check the train, test and val folders their images automatically split. and click the above red box Export Dataset option and download the zip file. the zip file folder structure is like…
root_file.zip
│
├── test
│   ├── Images
│   └── labels
│
├── train
│   ├── Images
│   └── labels
│
├── val
│   ├── Images
│   └── labels
│
├── data.yaml
└── Readme.roboflow.txt
Step6: Write the script for training the image segmentation model
In this part first, you create the Google Collab file using Drive then upload your dataset. and moute the Google Drive using Google Collab.
1. Use this command for Mount Google Drive
from google.colab import drive

drive.mount('/content/gdrive')
2. Define data directory Use the Constant variable.
DATA_DIR = '/content/drive/MyDrive/YoloV8/Data/'3. Installing the required package, Install ultralytics
!pip install ultralytics4. Importing the libraries
import os

from ultralytics import YOLO
5. Load pre-trained YOLOv8 model(here we have different model also check the official documentation there you can see the different model)
model = YOLO('yolov8n-seg.pt')
 # load a pretrained model (recommended for training)
6. Train the Model
model.train(data='/content/drive/MyDrive/YoloV8/Data/data.yaml', epochs=2, imgsz=640)

# Update the path & and join this line together
No check your drive The model name folder is created and there model is saved for the prediction we want this model.
7. Predict the Model
#Update the path
model_path = '/content/drive/MyDrive/YoloV8/Model/train2/weights/last.pt'
#Update the path
image_path = '/content/drive/MyDrive/YoloV8/Data/val/1be566eccffe9561.png'

img = cv2.imread(image_path)
H, W, _ = img.shape

model = YOLO(model_path)

results = model(img)

for result in results:
    for j, mask in enumerate(result.masks.data):

        mask = mask.numpy() * 255

        mask = cv2.resize(mask, (W, H))

        cv2.imwrite('./output.png', mask)
Here you can see the segmentation image is saved.

Now finally we can build both live detection and image segmentation models.
Conclusion
In this blog, we explore live object detection and image segmentation with YOLOv8. For live detection, we import a pre-trained YOLOv8 model and utilize the computer vision library, OpenCV, to open the camera and detect objects. Additionally, we create a Streamlit application for an attractive user interface.
Next, we delve into image segmentation with YOLOv8. We import a pre-trained model and perform transfer learning on a custom dataset. Prior to this, we explored Roboflow for dataset annotation, providing an easy-to-use alternative to tools like LabelImg.
Finally, we predict an image containing a duck. Although the object in the image appears to be a bird, we specify the class name as “duck” for demonstration purposes.
Key Takeaways
- Learning about object detection models like Faster R-CNN, SSD, and the latest YOLOv8.
- Understanding the annotation tool Roboflow and its role in creating datasets for YOLOv8 segmentation models.
- Exploring live object detection using OpenCV (cv2) and Supervision, enhancing practical skills.
- Training and deploying a segmentation model using YOLOv8, gaining hands-on experience.
Frequently Asked Questions
A. Object detection involves identifying and locating multiple objects within an image, typically by drawing bounding boxes around them. Image segmentation, on the other hand, divides an image into segments or regions based on pixel similarity, providing a more detailed understanding of object boundaries.
A. YOLOv8 improves upon previous versions by incorporating advancements in network architecture, training techniques, and optimization. It may offer better accuracy, speed, and efficiency compared to YOLOv3.
A. YOLOv8 can be used for real-time object detection on embedded devices, depending on the hardware capabilities and model optimization. However, it may require optimizations such as model pruning or quantization to achieve real-time performance on resource-constrained devices.
A. Roboflow offers intuitive annotation tools, dataset management features, and support for various annotation formats. It streamlines the annotation process, enables collaboration, and provides version control, making it easier to create and manage datasets for computer vision projects.
- SEO Powered Content & PR Distribution. Get Amplified Today.
- PlatoData.Network Vertical Generative Ai. Empower Yourself. Access Here.
- PlatoAiStream. Web3 Intelligence. Knowledge Amplified. Access Here.
- PlatoESG. Carbon, CleanTech, Energy, Environment, Solar, Waste Management. Access Here.
- PlatoHealth. Biotech and Clinical Trials Intelligence. Access Here.
- Source: https://www.analyticsvidhya.com/blog/2024/03/live-object-detection-and-image-segmentation-with-yolov8/
- :has
- :is
- :not
- :where
- $UP
- 1
- 11
- 13
- 14
- 2%
- 2015
- 2016
- 21
- 32
- 5
- 7
- 8
- a
- About
- above
- According
- accuracy
- accurate
- Achieve
- activate
- activating
- add
- Additional
- Additionally
- address
- advancements
- advantages
- After
- again
- algorithm
- algorithms
- All
- Allowing
- allows
- alone
- already
- also
- alternative
- Although
- an
- analysis
- analyze
- and
- app
- appears
- Application
- applications
- architecture
- ARE
- arises
- around
- article
- AS
- asked
- aspect
- aspects
- assign
- At
- attractive
- automatically
- available
- Backbone
- background
- Balance
- base
- based
- BE
- because
- been
- below
- Better
- between
- bird
- Blog
- blogathon
- body
- both
- boundaries
- Box
- boxes
- Break
- build
- but
- button
- by
- camera
- CAN
- cap
- capabilities
- capture
- cars
- Cells
- certain
- characteristics
- check
- class
- classes
- classification
- click
- clicking
- coco
- code
- collaboration
- Common
- compare
- compared
- complete
- Completed
- complexity
- comprehensive
- computational
- computationally
- computer
- Computer Vision
- concept
- confidence
- Consider
- considered
- constant
- containing
- contains
- content
- context
- control
- convolutional neural network
- Cost
- could
- create
- created
- Creating
- critical
- crucial
- custom
- data
- datasets
- deep
- def
- Default
- define
- delve
- demonstration
- Depending
- deploying
- Despite
- detailed
- detect
- detected
- detecting
- Detection
- developed
- developing
- device
- Devices
- diagram
- difference
- differences
- different
- directly
- directory
- discuss
- Display
- divide
- divides
- dividing
- do
- documentation
- does
- download
- drawing
- drive
- e
- each
- Earlier
- easier
- easy
- easy-to-use
- effectively
- efficiency
- efficient
- embedded
- emerging
- employs
- enables
- enabling
- end-to-end
- enhancing
- Environment
- error
- especially
- Ether (ETH)
- evaluated
- evaluating
- exact
- example
- Excel
- exist
- Exit
- expensive
- experience
- explore
- Explored
- Exploring
- extension
- family
- FAST
- faster
- Feature
- Features
- Fed
- Fields
- File
- Finally
- First
- Focus
- followed
- following
- For
- format
- formats
- FRAME
- frameworks
- from
- FS
- full
- fundamental
- further
- fusion
- gaining
- Gender
- generate
- generated
- generation
- get
- Go
- God
- going
- good
- got
- Green
- Grid
- Group
- Group’s
- guide
- hand
- handle
- hands-on
- Hardware
- Have
- having
- head
- height
- helps
- her
- here
- High
- higher
- hitting
- How
- How To
- However
- HTTPS
- i
- ID
- identify
- identifying
- if
- illustrates
- image
- image analysis
- image segmentation
- images
- Imaging
- implementing
- import
- importing
- improved
- improves
- in
- Including
- incorporating
- increased
- information
- initially
- input
- install
- installing
- instance
- Integrates
- Interface
- into
- introduced
- Introduces
- intuitive
- involved
- involves
- IT
- ITS
- join
- Key
- Know
- Labels
- large
- largest
- Last
- latest
- layers
- Leads
- learning
- left
- Leverage
- Library
- like
- limitations
- Line
- live
- load
- Localization
- locating
- Look
- Machines
- made
- Main
- maintaining
- MAKES
- Making
- manage
- management
- manual
- Maps
- mark
- marked
- mask
- Masks
- max-width
- May..
- meaning
- meaningful
- means
- medical
- medical imaging
- method
- methods
- model
- models
- more
- most
- multiple
- name
- nano
- Need
- network
- Neural
- neural network
- next
- normal
- object
- Object Detection
- objects
- obtain
- of
- offer
- offered
- Offers
- official
- on
- once
- ONE
- only
- open
- OpenCV
- operates
- optimization
- optimizations
- optimizing
- Option
- or
- OS
- Other
- our
- outweigh
- over
- overlap
- package
- packages
- page
- Paper
- part
- parts
- pass
- Password
- path
- People
- perform
- performance
- Pixel
- plato
- Plato Data Intelligence
- PlatoData
- Popular
- Practical
- precise
- Precision
- predict
- prediction
- Predicts
- Prepare
- presence
- present
- press
- pressing
- previous
- primarily
- principle
- Prior
- probabilities
- Problem
- process
- processing
- project
- projects
- prominent
- properties
- proposal
- Proposals
- provides
- providing
- published
- purposes
- Python
- question
- Read
- real-time
- recently
- recognition
- recommended
- Red
- reduce
- reducing
- region
- regions
- regression
- release
- represent
- require
- required
- Requirements
- requires
- research
- result
- resulting
- Results
- right
- Role
- Run
- running
- satellite
- Save
- saved
- saving
- say
- scales
- scenarios
- Science
- scores
- Screen
- script
- Search
- Second
- Section
- see
- seeing
- segment
- segmentation
- segments
- select
- selective
- separate
- separating
- set
- setting
- setup
- several
- Shape
- Shares
- shift
- shot
- side
- Simple
- simplifies
- single
- Size
- sizes
- skills
- slower
- small
- smaller
- smallest
- So
- speed
- split
- st
- start
- state-of-the-art
- Statement
- Step
- Steps
- streamlines
- Strikes
- structure
- Struggle
- successful
- such
- Sudo
- suitable
- supervision
- support
- suppose
- Systems
- table
- Task
- tasks
- technique
- techniques
- Terminal
- test
- than
- that
- The
- their
- Them
- then
- There.
- These
- this
- three
- time
- Title
- to
- together
- tool
- tools
- towards
- Train
- trained
- Training
- transfer
- Trees
- true
- two
- typically
- ui
- understand
- understanding
- Update
- Uploading
- upon
- us
- use
- used
- User
- User Interface
- using
- utilize
- VAL
- variable
- variants
- various
- varying
- version
- version control
- versions
- Video
- Virtual
- vision
- visual
- visualization
- vs
- vs code
- W
- want
- was
- we
- webp
- WELL
- What
- What is
- when
- which
- while
- why
- widely
- will
- with
- within
- without
- works
- write
- writing
- yaml
- years
- Yolo
- you
- Your
- zephyrnet
- Zip