Introduction
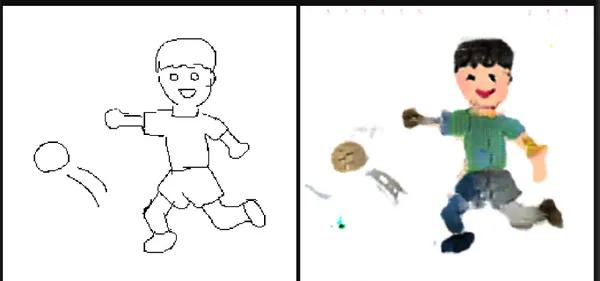
Imagine a special computer program that can make drawings created by children come to life. Do you know those colorful and imaginative pictures kids draw? This program can turn those drawings into real-looking images, almost like magic! And it is called Pix2Pix. We know how the magician can do amazing tricks with a deck of cards. Similarly, Pix2Pix can do amazing things with drawings. Pix2Pix has caused a significant change in how computers understand and work with pictures. It lets us have really careful control over the pictures it creates. It’s like having a superpower for making and changing images!
Learning Objectives
- Learn what Pix2Pix is, how it works, and explore its real-world applications
- Try it out by using Pix2Pix to change drawings into pictures, using a dataset of building facades.
- Understanding the working of pix2pix in the implementation and understanding how pix2pix solves the problem that many image-to-image translation tasks are facing
This article was published as a part of the Data Science Blogathon.
Table of contents
General Adversarial Network (GANs)
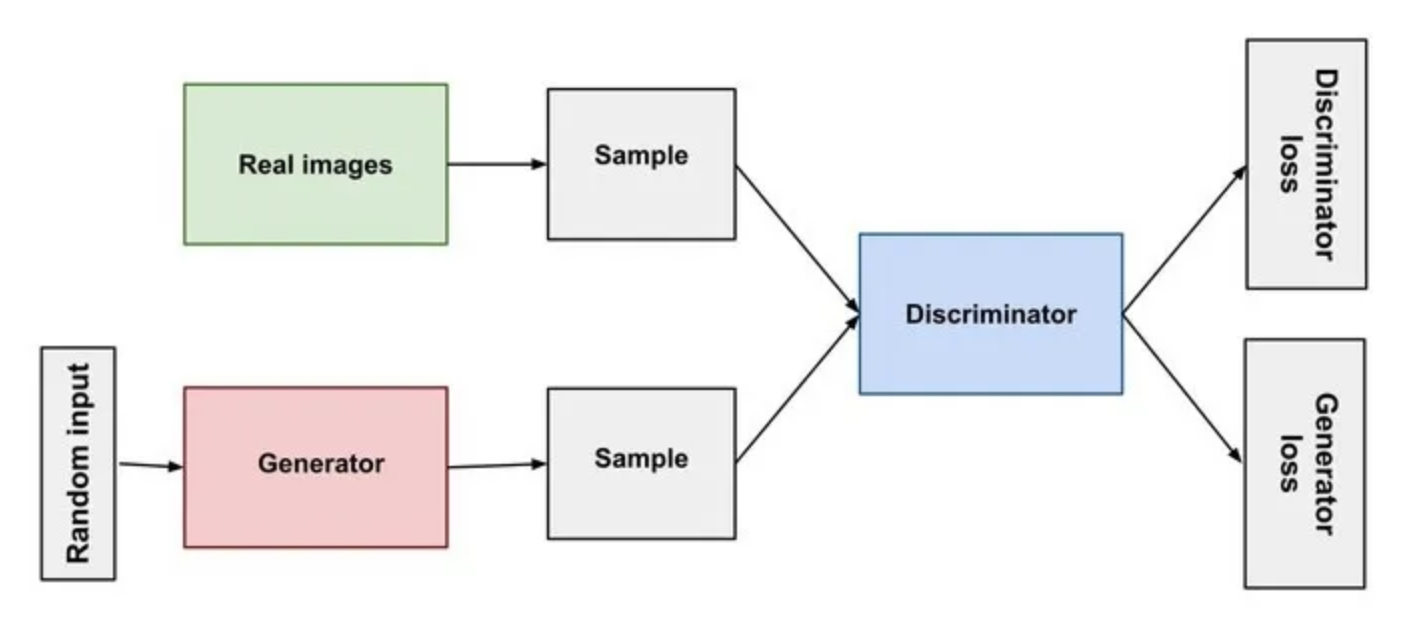
One of the most exciting recent inventions in artificial intelligence is the Generative Adversarial Network or GAN. These powerful neural networks can create new content, including images, music, and text. GANs consist of two neural networks. One is the generator that creates content, and the other is the discriminator that judges the created content.
The Generator is responsible for creating content. It starts with random noise or data and progressively refines it into something meaningful. For example, in image generation, it can create images from scratch. It can start by adjusting random pixel values to resemble beautiful, authentic images. The Discriminator’s role is to evaluate the content generated by the generator. It decides whether the content is real or fake. As it examines more content and provides feedback to the generator, it becomes better and better as the training continues.
Source: Neptune.ai
The whole process of training the GAN is known as Adversarial training. It is so simple to understand. The generator creates content that is initially far from perfect. The discriminator evaluates the content. That means it tries to distinguish real from fake. The generator receives feedback from the discriminator and adjusts its content to make it more convincing, and here, it provides better content than the previous. In response to the generator’s improvements, the discriminator improves its ability to detect fake content. In this way, adversarial training continues making the GANs more powerful.
Pix2Pix
The concept of image transformation and manipulation began with traditional image processing techniques. These include image resizing, color correction, and filtering. However, these traditional methods had limitations regarding more complex tasks like image-to-image translation. Machine learning, specifically deep learning, has revolutionized the field of image transformation. CNNs nowadays have become important for automating image processing tasks. However, the development of Generative Adversarial Networks (GANs) marked achievement in image-to-image translation.
Pix2Pix is a deep-learning model used for image translation tasks. The core idea behind Pix2Pix is to take an input image from one domain and generate a corresponding output image in another domain. It translates images from one style to another. This approach is called conditional GANs because Pix2Pix utilizes a conditional setup where the input image conditions the generator. Pix2Pix leverages the GAN architecture in a conditional form called Conditional GAN (cGAN). Based on the condition, the output will be generated.
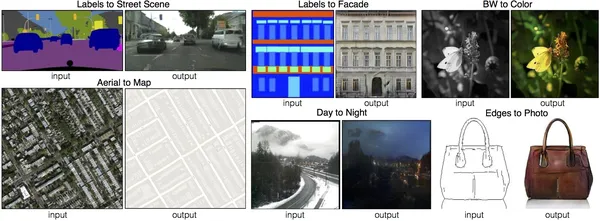
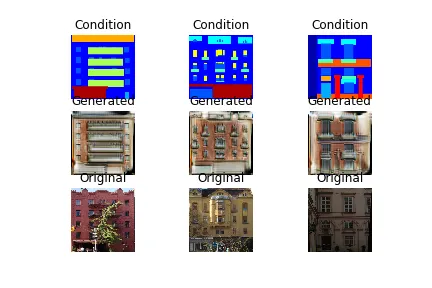
A Conditional Generative Adversarial Network, or CGAN, is an advanced version of the GAN framework that enables precise control over the generated images. It can generate images in a specific category. Pix2Pix GAN is an instance of a CGAN where the process of generating an image depends on the presence of another given image. In the image, we can see the wonders that pix2pix has created. I can create street scenes from the label, facades from the label, black and white to color, aerial views to a real map, Day photographs to night view, and photos based on edges.
Image-to-Image Translation Challenges
Image-to-image translation is a challenging computer vision task, mainly when the goal is to convert an image from one domain into an image in another domain. Here, it has to preserve the underlying content and structure. The challenge in image-to-image translation lies in capturing the complex relationships between the input and output domains. One of the groundbreaking solutions to this problem is Pix2Pix.
Generated images can sometimes have problems, like being blurry or distorted. Pix2pix tries to make the images look better by using two networks: one that creates the images (generator) and another that checks if they look real (discriminator). The discriminator helps the generator to make images that are sharper and more like real pictures, so there are fewer issues with blurriness and distortions.
In tasks like image colorization, the colors in the generated image can spread into neighboring regions, resulting in unrealistic color distribution. Pix2pix uses techniques like conditional GANs to control the colorization process better. This makes the colorization look more natural and less messy.
Pix2Pix Architecture
The architecture of Pix2Pix consists of two main components: the Generator and the Discriminator. A common approach in constructing the generator and discriminator models involves using standard building blocks consisting of layers like Convolution-BatchNormalization-ReLU. Combine these building blocks to form deep convolutional neural networks.
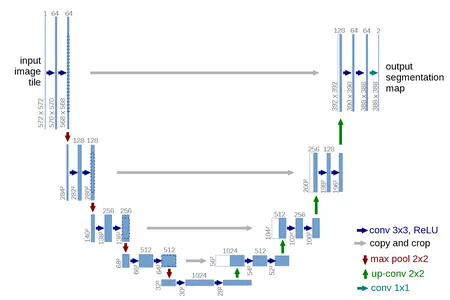
U-NET Generator Model
Here, for the generator, the U-Net model architecture is used. The traditional encoder-decoder model takes an image as input and down-samples it for a few layers. The process continues until a layer in the image is up-sampled for a few layers, and a final image is outputted. The UNet architecture also involves downsampling and upsampling the image again. But the difference here is it has to skip connections between the same size layers in the encoder and decoder. Skip connections enable the model to combine low-level and high-level features, addressing the problem of information loss during the downsampling process.
The top part of the U shape consists of a series of convolutional and pooling layers that progressively reduce the spatial dimensions of the input image while increasing the number of feature channels. This particular part of the network is responsible for capturing contextual information from the input image. U-Net has become a foundational architecture in deep learning for image segmentation tasks. Finally, this generator will generate images indistinguishable from the real images.
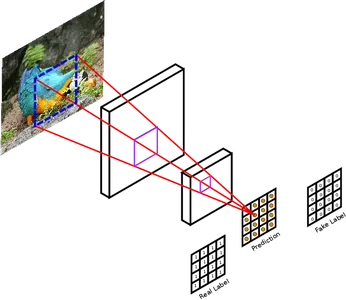
PatchGAN Discriminator Model
Design the discriminator model to take two images as inputs. It takes an image from the source domain and an image from the target domain. The primary task is to evaluate and determine the probability that the image is either real or generated by the generator.
The discriminator model uses a traditional GAN with a deep convolutional neural network to classify images. Pix2Pix discriminator uses PatchGAN instead of traditional GAN. Instead of classifying the full input image as real or fake, design this deep convolutional neural network to identify patches of the image. It divides the real and generated images into smaller non-overlapping patches and evaluates each of them individually. PatchGAN offers fine-grained feedback to the generator and allows it to focus on improving local image details. This makes the generator train better. It is really useful in some tasks where preserving fine details is crucial. These tasks include image super-resolution. It helps generate high-resolution and realistic results.
Applications of Pix2Pix
Now let’s see some of the applications of pix2pix.
- Architectural Design: Pix2Pix can convert rough sketches of building designs into detailed architectural blueprints. This helps architects to design better buildings.
- Style Transfer: It can transfer the style of one image to another. It can take the style of a famous painting and apply it to a photograph.
- Navigation systems: Pix2Pix has its application in navigation systems. We can capture the street view image, and using Pix2Pix, we can convert it into accurate maps. It can be valuable for autonomous navigation systems.
- Medical Imaging: Pix2Pix can enhance and translate medical images in medical imaging. High-resolution images are always helpful in the medical industry for providing better treatment. This Pix2Pix helps turn low-resolution MRI scans into high-resolution ones or generate CT images from X-ray images.
- Art and Creativity: Use Pix2Pix for creative purposes. It generates unique and artistic images or animations based on user input.
Companies Using Pix2Pix
Now let’s see some companies that are using pix2pix.
- Adobe has used Pix2Pix to develop features for its creative cloud products. It includes converting sketches into realistic images and translating images from one style to another. Pix2Pix is also used by Adobe to generate synthetic data for training its machine-learning models.
- Google has used Pix2Pix to develop map and photo product features. It creates realistic street views from satellite imagery and colorises black-and-white photos.
- Nvidia uses pix2pix for its AI platform. It has the ability to generate synthetic datasets for training machine learning models. It also creates new styles for the images.
- Google’s Magenta Studio is a research project that explores machine learning and art. Google’s Magenta Studio has used Pix2Pix to create many art-making tools. Magenta Studio has released many Colab Notebooks that use Pix2Pix to create different types of art, such as image translation, image completion, and image inpainting. Image inpainting includes removing objects from the images or filling the missing parts of the image. Magenta Studio has additionally released numerous Magenta models that employ Pix2Pix to produce various art forms. These models include Pix2PixHD, which generates high-resolution images from low-resolution ones; Disco Diffusion, which creates images inspired by diverse artistic styles, and GANPaint, which produces images that blend realism with imagination.
Implementation
Let’s start by importing all the necessary libraries and modules. If you find any missing modules, import them using the pip command.
import numpy as np
from matplotlib import pylab as plt
import cv2
import tensorflow as tf
import tensorflow.keras.layers as layers
from tensorflow.keras.models import Model
from glob import glob
import time
import os
Dataset
The dataset we used in this project is available in Kaggle, and you can download it from here.
Link: https://www.kaggle.com/datasets/balraj98/facades-dataset
This dataset contains images of building facades and their corresponding segmentation. It was split into train and test subsets. It has 506 building facade images in total.

Preprocessing
Our next step is to load the data and preprocess it according to our problem statement. We will define a function to do all the necessary steps for this. It loads batches of images and their corresponding labels, preprocesses them, and returns them as NumPy arrays ready to be fed into your model. First, we are specifying both the paths where test pictures and test labels are present. It uses the glob function to find all files in two directories. Create two empty lists, img_A and img_2. These empty lists will store the preprocessed images from batches 1 and 2. Once the loop is created, it iterates through pairs of file paths from batch 1 and 2. For each pair, read images using openCV and store them in variables.
Color Channels
We reverse the color channels of the images, a step often necessary to align with deep learning model input specifications. Then, we resize the images to 256×256 pixels, and lastly, we add the preprocessed images to their respective lists. After processing all the images in the batch, the code converts the lists img_A and img_B into NumPy arrays and scales the pixel values to the range [-1, 1]. Finally, it returns the processed images as img_A and img_B.
def load_data(batch_size): path1=sorted(glob('../test_picture/*')) path2=sorted(glob('../test_label/*')) i=np.random.randint(0,27) batch1=path1[i*batch_size:(i+1)*batch_size] batch2=path2[i*batch_size:(i+1)*batch_size] img_A=[] img_B=[] for filename1,filename2 in zip(batch1,batch2): img1=cv2.imread(filename1) img2=cv2.imread(filename2) img1=img1[...,::-1] img2=img2[...,::-1] img1=cv2.resize(img1,(256,256),interpolation=cv2.INTER_AREA) img2=cv2.resize(img2,(256,256),interpolation=cv2.INTER_AREA) img_A.append(img1) img_B.append(img2) img_A=np.array(img_A)/127.5-1 img_B=np.array(img_B)/127.5-1 return img_A,img_B Similarly, we have to create another function to do the same for the train data. Previously, we had done all the preprocessing steps for test data, and finally, we saved all the images in the list, and they do exist till the end. But here, for preprocessing train data, we don’t have to store all of them till the end. So, we make use of the generator function. The yield statement is used to create a generator function. It yields the processed images as img_A and img_B for the current batch, allowing you to iterate through the training data one batch at a time without loading it into memory at once. This is the beauty of generators.
# GeneratorFunction
def load_batch(batch_size): path1=sorted(glob('../train_picture/*')) path2=sorted(glob('../train_label/*')) n_batches=int(len(path1)/batch_size) for i in range(n_batches): batch1=path1[i*batch_size:(i+1)*batch_size] batch2=path2[i*batch_size:(i+1)*batch_size] img_A,img_B=[],[] for filename1,filename2 in zip(batch1,batch2): img1=cv2.imread(filename1) img2=cv2.imread(filename2) img1=img1[...,::-1] img2=img2[...,::-1] img1=cv2.resize(img1,(256,256),interpolation=cv2.INTER_AREA) img2=cv2.resize(img2,(256,256),interpolation=cv2.INTER_AREA) img_A.append(img1) img_B.append(img2) img_A=np.array(img_A)/127.5-1 img_B=np.array(img_B)/127.5-1 yield img_A,img_B
Next, we will define a class called pix2pix where we will be defining all the functions needed inside it. We will be defining a constructor, generator, discriminator, train method, and sample_images to visualize the output. We will learn each of those methods in detail.
class pix2pix(): def __init__(self): pass def build_generator(self): pass def build_discriminator(self): pass def train(self,epochs,batch_size=1): pass def sample_images(self, epoch): pass Constructor Method
First, we will be defining the constructor method. This method initializes the attributes and components of your pix2pix model. It is a unique method that gets automatically invoked when an object of a class is created. We have defined the dimensions of the image and the number of channels. The images are expected to be 256×256 pixels with 3 color channels (RGB). The self.gf and self.df are the attributes that define the number of filters (channels) for the generator and discriminator models, respectively.
Next, we will define an optimizer where we will be using an Adam optimizer with a specific learning rate and beta parameter for the model training. Next, the discriminator model is created. It’s configured with binary cross-entropy loss and the Adam optimizer defined earlier. We also freeze the discriminator’s weights during the training of the combined model. The self.combined attribute represents the combined model, which consists of the generator followed by the discriminator. The generator produces fake images, and the discriminator decides their validity. This combined model trains the generator to produce more realistic images.
def __init__(self): self.img_rows=256 self.img_cols=256 self.channels=3 self.img_shape=(self.img_rows,self.img_cols,self.channels) patch=int(self.img_rows/(2**4)) # 2**4 = 16 self.disc_patch=(patch,patch,1) self.gf=64 self.df=64 optimizer=tf.keras.optimizers.legacy.Adam(learning_rate=0.0002, beta_1=0.5) self.discriminator=self.build_discriminator() #self.discriminator.summary() self.discriminator.compile(loss='binary_crossentropy', optimizer=optimizer) self.generator=self.build_generator() #self.generator.summary() img_A=layers.Input(shape=self.img_shape)#picture--label img_B=layers.Input(shape=self.img_shape)#label--real img=self.generator(img_A) self.discriminator.trainable=False valid=self.discriminator([img,img_A]) self.combined=Model(img_A,valid) self.combined.compile(loss='binary_crossentropy', optimizer=optimizer)Build Generator
Our next step is to build a generator. This method defines the architecture of the generator model in a pix2pix-style GAN. Inside this, we need two different functions. They are conv2d and deconv2d. The conv2d is a helper function that creates a convolutional layer with optional batch normalization. It takes the input tensor, number of channels, kernel size, and the bn, a boolean indicating whether to use batch normalization. It applies a 2D convolution, LeakyReLU activation, and optional batch normalization and returns the resulting tensor.
Like conv2d, this is also a helper function for creating a transposed convolutional layer (also known as a deconvolutional or up-sampling layer) with optional dropout and batch normalization. It takes an input tensor, an input tensor from a previous layer, to concatenate with the number of channels, kernel size, and dropout rate. It applies an up-sampling layer, convolution, activation, dropout (if specified), batch normalization, concatenation with skip_input, and returns the resulting tensor.
The generator model consists of several layers, starting with an input layer. It then goes through a series of convolutional (conv2d) and deconvolutional (deconv2d) layers. Here, d1 to d7 are convolutional layers that progressively reduce the dimensions while increasing the number of channels. Similarly, u1 to u7 are deconvolutional layers that progressively increase the dimensions while decreasing the number of channels. The skip connections help preserve fine details from the input image to the output, making it suitable for tasks like image-to-image translation in the pix2pix framework. The final layer is a convolutional layer with a tanh activation function. This produces the output image. It has the same number of channels as the input image (self.channels) and aims to generate an image that resembles the target domain.
def build_generator(self): def conv2d(layer_input,filters,f_size=(4,4),bn=True): d=layers.Conv2D(filters,kernel_size=f_size,strides=(2,2), padding='same')(layer_input) d=layers.LeakyReLU(0.2)(d) if bn: d=layers.BatchNormalization()(d) return d def deconv2d(layer_input,skip_input,filters,f_size=(4,4),dropout_rate=0): u=layers.UpSampling2D((2,2))(layer_input) u=layers.Conv2D(filters,kernel_size=f_size,strides=(1,1), padding='same',activation='relu')(u) if dropout_rate: u=layers.Dropout(dropout_rate)(u) u=layers.BatchNormalization()(u) u=layers.Concatenate()([u,skip_input]) return u d0=layers.Input(shape=self.img_shape) d1=conv2d(d0,self.gf,bn=False) d2=conv2d(d1,self.gf*2) d3=conv2d(d2,self.gf*4) d4=conv2d(d3,self.gf*8) d5=conv2d(d4,self.gf*8) d6=conv2d(d5,self.gf*8) d7=conv2d(d6,self.gf*8) u1=deconv2d(d7,d6,self.gf*8,dropout_rate=0.5) u2=deconv2d(u1,d5,self.gf*8,dropout_rate=0.5) u3=deconv2d(u2,d4,self.gf*8,dropout_rate=0.5) u4=deconv2d(u3,d3,self.gf*4) u5=deconv2d(u4,d2,self.gf*2) u6=deconv2d(u5,d1,self.gf) u7=layers.UpSampling2D((2,2))(u6) output_img=layers.Conv2D(self.channels,kernel_size=(4,4),strides=(1,1), padding='same',activation='tanh')(u7) return Model(d0,output_img)Build Discriminator
Our next step is to build a discriminator model. This method defines the architecture of the discriminator model in a pix2pix-style GAN. Similar to the conv2d function in the generator, we will define the d_layer function here. This helper function creates a convolutional layer with optional batch normalization. It takes the input tensor, number of channels, kernel size, and the bn, a boolean indicating whether to use batch normalization. It applies a 2D convolution, LeakyReLU activation, and optional batch normalization and returns the resulting tensor. The discriminator model has two input layers, img_A and img_B, each with a shape defined by self.img_shape.
These inputs represent pairs of images: one from the source domain (img_A) and one from the target domain (img_B). The input images img_A and img_B are concatenated along the channel axis (axis=-1) to create combined images. The discriminator architecture consists of convolutional layers, from d1 to d4, with increasing filters. These layers downsample the spatial dimensions of the input image while extracting features. The final layer is a convolutional layer with a sigmoid activation function. It produces a single-channel output representing the probability of whether the input image pair is real or fake. Use this output to classify the input image pair as real or fake.
def build_discriminator(self): def d_layer(layer_input,filters,f_size=(4,4),bn=True): d=layers.Conv2D(filters,kernel_size=f_size,strides=(2,2), padding='same')(layer_input) d=layers.LeakyReLU(0.2)(d) if bn: d=layers.BatchNormalization()(d) return d img_A=layers.Input(shape=self.img_shape) img_B=layers.Input(shape=self.img_shape) combined_imgs=layers.Concatenate(axis=-1)([img_A,img_B]) d1=d_layer(combined_imgs,self.df,bn=False) d2=d_layer(d1,self.df*2) d3=d_layer(d2,self.df*4) d4=d_layer(d3,self.df*8) validity=layers.Conv2D(1,kernel_size=(4,4),strides=(1,1),padding='same', activation='sigmoid')(d4) return Model([img_A,img_B],validity)Training
We need to create the training method that trains the model when it’s invoked. The “valid” array consists of ones in the form of a numpy array, representing real image labels. Similarly, the “fake” array comprises zeros in a numpy array, representing fake (generated) image labels. Subsequently, we initiate a for loop to iterate through the designated number of epochs. In each epoch, we initiate a timer to record the time taken for that specific epoch. A generator is utilized to load the training data in batches within each epoch, which yields pairs of images, img_A (input), and img_B (target).
The generator employs input images to produce images. The discriminator trains to classify real image pairs as real, calculating the loss for real images. Similarly, the discriminator trains to classify generated image pairs as fake, subsequently computing the loss for fake images. The total discriminator loss is determined by averaging the losses for both real and fake images. The generator’s training objective is to generate images that deceive the discriminator into classifying them as real.
def train(self,epochs,batch_size=1): valid=np.ones((batch_size,)+self.disc_patch) fake=np.zeros((batch_size,)+self.disc_patch) for epoch in range(epochs): start=time.time() for batch_i,(img_A,img_B) in enumerate(load_batch(1)): gen_imgs=self.generator.predict(img_A) d_loss_real = self.discriminator.train_on_batch([img_B, img_A], valid) d_loss_fake = self.discriminator.train_on_batch([gen_imgs, img_A], fake) d_loss = 0.5 * np.add(d_loss_real, d_loss_fake) g_loss = self.combined.train_on_batch(img_A,valid) if batch_i % 500 == 0: print ("[Epoch %d] [Batch %d] [D loss: %f] [G loss: %f]" % (epoch,batch_i, d_loss,g_loss)) self.sample_images(epoch) print('Time for epoch {} is {} sec'.format(epoch,time.time()-start))Visualizations
The sample_images method generates and displays sample images to visualize the progress of the generator during training. Here r and c are set to 3, indicating that the grid of displayed images will have 3 rows and 3 columns. Here 3 pairs of input and target images are loaded. The generator is used to generate fake images based on the input images. The images are then concatenated into a single array for display purposes. The pixel values are rescaled from the range [-1, 1] to [0, 1] for proper visualization. The images are displayed on the subplots. The figure is saved as an image file with the epoch number as the filename.
def sample_images(self, epoch): r, c = 3, 3 img_A, img_B =load_data(3) fake_A = self.generator.predict(img_A) gen_imgs = np.concatenate([img_A, fake_A, img_B]) # Rescale images 0 - 1 gen_imgs = 0.5 * gen_imgs + 0.5 titles = ['Input Image', 'Predicted Image', 'Ground Truth'] fig, axs = plt.subplots(r, c) cnt = 0 for i in range(r): for j in range(c): axs[i,j].imshow(gen_imgs[cnt]) axs[i,j].set_title(titles[i]) axs[i,j].axis('off') cnt += 1 fig.savefig("./%d.png" % (epoch)) plt.show()Results
After defining all the required methods, you must call the main method. Create an object called gan of class pip2pix. Then, train the model by specifying the number of epochs and batch size.
After every epoch, the predicted image will be displayed along with the input and ground truth images. As the training continues, you can observe the changes in the picture. As the number of epochs increases, the image will be more precise. Eventually, you will get an indistinguishable image from the ground truth image. That’s the power of GANs.
if __name__ == '__main__': gan = pix2pix() gan.train(epochs=50, batch_size=1)Result of 1st epoch:

After 10 epochs, the result is:
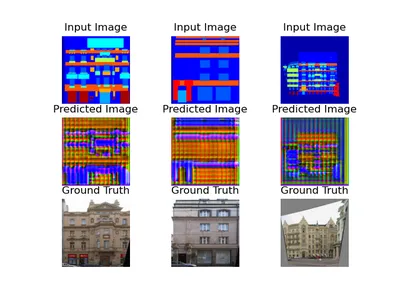
Result after 50 epochs is:
Conclusion
Pix2Pix’s success lies in its capacity to learn from data and generate images that are not only realistic but also artistically expressive. Whether it’s converting day scenes into night scenes or transforming black and white photos into vibrant colors, Pix2Pix has proven its capacity. Pix2Pix has become a creative superpower by allowing artists and designers to transform and manipulate images in innovative and imaginative ways. As technology keeps progressing, Pix2Pix opens up even more amazing opportunities. It’s an exciting field to explore for anyone who’s into combining art and AI.
Key Takeaways
- Pix2Pix is a smart computer friend that helps us make amazing pictures from our ideas. It’s like magic for the digital world!
- Pix2Pix has become a revolutionary technology in computer vision and image processing.
- It offers exciting possibilities but also challenges, such as training stability and the need for substantial datasets.
- Google’s Magenta Studio, a research project exploring machine learning and art, has used Pix2Pix to create different art-making tools.
- In this article, we have seen how the pix2pix actually works and understood its magical power.
- We learned how to use Pix2Pix with building facade data to turn drawings into real-looking building pictures, giving us a practical understanding.
Frequently Asked Questions
A. Pix2Pix is a deep-learning model that you can use for image translation tasks. The core idea behind Pix2Pix is to take an input image from one domain and generate a corresponding output image in another domain. It translates images from one style to another.
A. Pix2Pix combines two neural networks: a generator and a discriminator. The generator creates images while the discriminator evaluates them. They work together in a competitive manner, improving the quality of generated images over time.
A. Pix2Pix has many applications, such as turning maps into satellite images, generating detailed faces from sketches, creating art in different styles, and converting black and white photos into color.
A. Yes, Fine-tuning specific datasets on Pix2Pix models can adapt them to particular tasks or styles, resulting in improved outcomes for those tasks.
A. The generator uses an encoder-decoder architecture. Here, the encoder extracts features from the input image, and the decoder generates the output image based on extracted features.
The media shown in this article is not owned by Analytics Vidhya and is used at the Author’s discretion.
Related
- SEO Powered Content & PR Distribution. Get Amplified Today.
- PlatoData.Network Vertical Generative Ai. Empower Yourself. Access Here.
- PlatoAiStream. Web3 Intelligence. Knowledge Amplified. Access Here.
- PlatoESG. Carbon, CleanTech, Energy, Environment, Solar, Waste Management. Access Here.
- PlatoHealth. Biotech and Clinical Trials Intelligence. Access Here.
- Source: https://www.analyticsvidhya.com/blog/2023/10/pix2pix-unleashed-transforming-images-with-creative-superpower/
- :has
- :is
- :not
- :where
- $UP
- 1
- 10
- 13
- 16
- 1st
- 27
- 2D
- 50
- 500
- 9
- a
- ability
- According
- accurate
- achievement
- Activation
- actually
- Adam
- adapt
- add
- Additionally
- addressing
- adjusting
- Adobe
- advanced
- adversarial
- After
- again
- AI
- AI platform
- aims
- align
- All
- Allowing
- allows
- almost
- along
- also
- always
- amazing
- an
- analytics
- Analytics Vidhya
- and
- animations
- Another
- any
- anyone
- Application
- applications
- applies
- Apply
- approach
- architects
- architectural
- architecture
- ARE
- Array
- Art
- article
- artificial
- artificial intelligence
- artistic
- artistically
- Artists
- AS
- asked
- At
- attributes
- Authentic
- author
- automatically
- automating
- autonomous
- available
- averaging
- Axis
- AXS
- based
- BE
- beautiful
- Beauty
- because
- become
- becomes
- began
- behind
- being
- beta
- Better
- between
- Black
- Blend
- Blocks
- blogathon
- both
- build
- Building
- buildings
- but
- by
- calculating
- call
- called
- CAN
- Capacity
- capture
- Capturing
- Cards
- careful
- Category
- caused
- challenge
- challenges
- challenging
- change
- Changes
- changing
- Channel
- channels
- Checks
- Children
- class
- Classify
- Cloud
- code
- color
- colorful
- Columns
- combine
- combined
- combines
- combining
- come
- Common
- Companies
- competitive
- completion
- complex
- components
- comprises
- computer
- Computer Vision
- computers
- computing
- concept
- condition
- conditional
- conditions
- configured
- Connections
- Consisting
- consists
- constructing
- contains
- content
- contextual
- continues
- control
- convert
- converting
- convincing
- convolutional neural network
- Core
- Corresponding
- create
- created
- creates
- Creating
- Creative
- creativity
- crucial
- Current
- data
- datasets
- day
- deck
- decreasing
- deep
- deep learning
- define
- defined
- Defines
- defining
- depends
- Design
- designated
- designers
- designs
- detail
- detailed
- details
- detect
- Determine
- determined
- develop
- Development
- difference
- different
- Diffusion
- digital
- dimensions
- directories
- discretion
- Display
- displayed
- displays
- distinguish
- distribution
- diverse
- divides
- do
- does
- domain
- domains
- done
- Dont
- download
- draw
- Drawings
- during
- each
- Earlier
- edges
- either
- employs
- empty
- enable
- enables
- end
- enhance
- epoch
- epochs
- Ether (ETH)
- evaluate
- Even
- eventually
- Every
- Examines
- example
- exciting
- exist
- expected
- explore
- explores
- Exploring
- expressive
- Extracts
- faces
- fake
- famous
- far
- Feature
- Features
- Fed
- feedback
- few
- fewer
- field
- Fig
- Figure
- File
- Files
- filling
- filtering
- filters
- final
- Finally
- Find
- fine
- First
- Focus
- followed
- For
- form
- forms
- Framework
- Freeze
- friend
- from
- full
- function
- functions
- GANs
- generate
- generated
- generates
- generating
- generation
- generative
- generative adversarial networks
- generator
- generators
- get
- given
- Giving
- goal
- Goes
- Google’s
- Grid
- Ground
- groundbreaking
- had
- Have
- having
- help
- helpful
- helps
- here
- High
- high-level
- high-resolution
- How
- How To
- However
- HTTPS
- i
- idea
- ideas
- identify
- if
- image
- image generation
- image segmentation
- images
- imagination
- Imaging
- implementation
- import
- important
- importing
- improved
- improvements
- improves
- improving
- in
- include
- includes
- Including
- Increase
- Increases
- increasing
- indicating
- Individually
- industry
- information
- initially
- initiate
- innovative
- input
- inputs
- inside
- inspired
- instance
- instead
- Intelligence
- into
- inventions
- invoked
- involves
- issues
- IT
- ITS
- keras
- kids
- Know
- known
- Label
- Labels
- lastly
- layer
- layers
- LEARN
- learned
- learning
- Legacy
- less
- Lets
- leverages
- libraries
- lies
- Life
- like
- limitations
- List
- Lists
- load
- loading
- loads
- local
- Look
- loss
- losses
- machine
- machine learning
- magic
- Main
- mainly
- make
- MAKES
- Making
- Manipulation
- manner
- many
- map
- Maps
- marked
- matplotlib
- max-width
- meaningful
- means
- Media
- medical
- medical imaging
- Memory
- method
- methods
- missing
- model
- models
- Modules
- more
- most
- MRI
- Music
- must
- Natural
- Navigation
- necessary
- Need
- needed
- neighboring
- Neptune
- network
- networks
- Neural
- neural network
- neural networks
- New
- next
- night
- Noise
- notebooks
- number
- numerous
- numpy
- object
- objective
- objects
- observe
- of
- off
- Offers
- often
- on
- once
- ONE
- ones
- only
- OpenCV
- opens
- opportunities
- or
- OS
- Other
- our
- out
- outcomes
- output
- over
- owned
- painting
- pair
- pairs
- parameter
- part
- particular
- parts
- pass
- Patch
- Patches
- perfect
- photo
- photographs
- Photos
- picture
- Pictures
- Pixel
- platform
- plato
- Plato Data Intelligence
- PlatoData
- possibilities
- power
- powerful
- Practical
- Practical Applications
- precise
- predicted
- presence
- present
- preserving
- previous
- previously
- primary
- probability
- Problem
- problems
- process
- processed
- processing
- produce
- produces
- Product
- Products
- Program
- Progress
- progressing
- progressively
- project
- proper
- proven
- provides
- providing
- published
- purposes
- quality
- R
- random
- range
- Rate
- Read
- ready
- real
- real world
- realistic
- really
- receives
- recent
- record
- reduce
- regarding
- regions
- Relationships
- released
- removing
- represent
- representing
- represents
- required
- research
- resembles
- respective
- response
- responsible
- result
- resulting
- Results
- return
- returns
- reverse
- revolutionary
- revolutionized
- RGB
- Role
- same
- satellite
- satellite imagery
- saved
- scales
- scans
- scenes
- Science
- scratch
- SEC
- see
- seen
- segmentation
- SELF
- Series
- set
- setup
- several
- Shape
- shown
- significant
- similar
- Similarly
- Simple
- single
- Size
- smaller
- smart
- So
- Solutions
- Solves
- some
- something
- sometimes
- Source
- Spatial
- special
- specific
- specifically
- specifications
- specified
- split
- spread
- Stability
- standard
- start
- Starting
- starts
- Statement
- Step
- Steps
- store
- street
- structure
- studio
- style
- Subsequently
- substantial
- success
- such
- suitable
- superpower
- synthetic
- synthetic data
- Systems
- Take
- taken
- takes
- Target
- Task
- tasks
- techniques
- Technology
- tensorflow
- test
- text
- than
- that
- The
- The Source
- their
- Them
- then
- There.
- These
- they
- things
- this
- those
- Through
- till
- time
- titles
- to
- together
- tools
- top
- Total
- traditional
- Train
- Training
- trains
- transfer
- Transform
- Transformation
- transforming
- translate
- Translation
- treatment
- tricks
- truth
- TURN
- Turning
- two
- types
- underlying
- understand
- understanding
- understood
- unique
- unleashed
- until
- us
- use
- used
- useful
- User
- uses
- using
- utilized
- utilizes
- valid
- validity
- Valuable
- Values
- variables
- various
- version
- vibrant
- View
- views
- vision
- visualization
- visualize
- was
- Way..
- ways
- we
- webp
- What
- What is
- when
- whether
- which
- while
- white
- whole
- will
- with
- within
- without
- Work
- work together
- working
- works
- X
- x-ray
- yes
- Yield
- yields
- you
- Your
- zephyrnet

![What is SUBSTRING Function in SQL? [ Explained with Examples]](https://platoaistream.net/wp-content/uploads/2023/07/what-is-substring-function-in-sql-explained-with-examples-360x189.webp)