A fun side-project that I worked on during my co-op term here at StarFish Medical was a custom-built reflow oven to solder surface mount components onto printed circuit boards.
Why Build a Reflow Oven?
Most of the time, our PCBs are assembled at contract manufacturers, but there are some cases where it is more appropriate to assemble small prototype boards in-house to save time. In the past, we’ve used a board preheater and a hot air station to assemble them, but this has some drawbacks, such as potentially pushing components past their temperature limits or producing low-quality solder joints due to the lack of a proper reflow profile. A reflow solution that properly implements a reflow profile is needed if we want to address these issues. Cheap reflow ovens that implement reflow profiles are available online, but such devices often require modifications to work well, so we decided to build a custom one. Plus, it sounded like a fun project!
Creating a Custom Solution

I built the reflow oven around the StarFish DAQ, one of our internal development platforms. The StarFish DAQ (Data Acquisition System) is an ideal choice for a project like this because it allows you to quickly implement PID control loops with preset trajectories. This eliminates the development time that would normally be spent on implementing PID control, ADC input, and PWM output on a microcontroller and a graph UI on a computer. It also provides enough capability to improve on a project without requiring a platform change. Its high current outputs can run a fan motor for convection cooling or a servo to open the oven door at the end of the cycle.
For the oven itself, I used the cheapest toaster oven I could find: a Hamilton-Beach unit on sale for $27. A cheap toaster oven was preferred because in addition to keeping project costs low, toaster ovens generally have a very simple electromechanical thermal control system. A bimetallic strip thermostat turns the heating elements on if the temperature is below the setpoint of the thermostat and off if the temperature is above the setpoint. The thermostat can be bypassed by setting its limit to a temperature beyond the maximum temperature of the reflow cycle and controlling the heaters with an external relay connected to the oven’s power inlet.
For the relay, I initially used an off-the-shelf device containing a mechanical relay that I could control with the StarFish DAQ connected in between the toaster oven and the wall outlet. That relay was very slow and had a relatively low number of maximum switching events, meaning that I couldn’t really push the PWM frequency past about 1 Hz. A higher PWM frequency is preferred to reduce its effect on the temperature response of the oven, as lower frequencies can produce artifacts in the temperature. A solid-state relay can be driven at a higher PWM frequency than a mechanical relay.
After proving the concept with the off-the-shelf relay, I designed a 3D-printed enclosure for a solid-state relay that also held the StarFish DAQ. The enclosure was an interesting design challenge because I had to consider electrical safety surrounding the AC mains wiring and thermal safety, as the relay could get too hot and melt the case. I included an isolation barrier between the high and low voltage sides of the enclosure that only the relay could pass, and an earth-grounded heatsink to passively cool the relay.
For temperature feedback, I used a type K thermocouple and an Adafruit breakout board. This thermocouple is connected to the PCB being reflowed. The oven heats its contents using infrared radiation, so the air inside the oven (relatively transparent to IR) can be several degrees cooler than the PCB itself (opaque to IR). Many cheap reflow ovens don’t have the thermocouple contacting the PCB and instead measure the temperature of the air inside the oven. This can lead to the PCB temperature deviating from the reflow profile if the discrepancy is not properly accounted for.
Evaluating Performance

The temperature response of the oven was able to follow the programmed reflow profile accurately, with only some damped ringing along the rising temperature in the soak period and a bit of overshoot during the reflow period. These shortcomings could be improved through better PID tuning, but they are small enough that the reflow process works quite well.

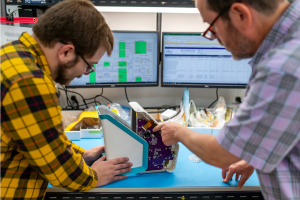
I tested the device on expansion boards that we had made for another project. These were relatively simple boards used to implement a modification to another board that is in the prototype stage. Their small production volume made them unsuitable for professional assembly. I hand-populated the components on the board and reflowed it using the reflow oven.
After some cleaning, the boards had excellent-looking solder joints. At first glance, you might think that they came from a professional assembly service, rather than being assembled by hand and reflowed with a custom-made reflow oven! I was able to test the reflow oven on other boards and it was able to produce good quality solder joints every time. One board that was particularly impressive was a board optimized for heat transfer, which is generally more difficult to solder by hand.
Learning From This Project
This seemed to be a relatively simple project initially, but I found a lot of areas to dive deep on to improve the system as much as possible. I got practice with several skills through this project, such as how to safely wire a high-power 120VAC circuit, how to apply and tune a PID control to a thermal system, and how to design a 3D printed enclosure to meet electrical safety and thermal requirements.
I’m grateful that I was able to work on interesting projects like this during my co-op at StarFish and learn from the excellent team here! StarFish Medical accepts work placements throughout the year for exceptional students. Check out their Co-op Placements page for more information.
Callum O’Riley is an Electrical Engineering student at UBC. His last co-op term was a 4 month term working on testing shape memory alloy actuators. He is part of UBC Rocket, an engineering student design team, leading a team to design the electronics for a supersonic rocket.
- SEO Powered Content & PR Distribution. Get Amplified Today.
- PlatoData.Network Vertical Generative Ai. Empower Yourself. Access Here.
- PlatoAiStream. Web3 Intelligence. Knowledge Amplified. Access Here.
- PlatoESG. Automotive / EVs, Carbon, CleanTech, Energy, Environment, Solar, Waste Management. Access Here.
- PlatoHealth. Biotech and Clinical Trials Intelligence. Access Here.
- ChartPrime. Elevate your Trading Game with ChartPrime. Access Here.
- BlockOffsets. Modernizing Environmental Offset Ownership. Access Here.
- Source: https://starfishmedical.com/blog/starfish-medical-co-op-custom-built-reflow-oven/
- :has
- :is
- :not
- :where
- 1
- 179
- 237
- 300
- 3d
- 8
- a
- Able
- About
- above
- AC
- Accepts
- accounted
- accurately
- acquisition
- addition
- address
- AIR
- allows
- Alloy
- along
- also
- an
- and
- Another
- Apply
- appropriate
- ARE
- areas
- around
- AS
- assembled
- Assembly
- At
- available
- barrier
- BE
- because
- being
- below
- Better
- between
- Beyond
- Bit
- board
- breakout
- build
- built
- but
- by
- came
- CAN
- capability
- case
- cases
- challenge
- change
- cheap
- cheapest
- check
- choice
- Cleaning
- COM
- components
- computer
- concept
- connected
- Consider
- contents
- contract
- control
- controlling
- Cool
- Costs
- could
- Creating
- Current
- custom
- Custom-built
- cycle
- data
- decided
- deep
- Design
- designed
- Development
- device
- Devices
- difficult
- discrepancy
- Display
- dive
- Dont
- Door
- drawbacks
- driven
- due
- during
- effect
- Electronics
- elements
- eliminates
- end
- Engineering
- enough
- Ether (ETH)
- events
- Every
- excellent
- exceptional
- expansion
- external
- fan
- feedback
- Find
- First
- follow
- For
- found
- Frequency
- from
- fun
- generally
- get
- Glance
- good
- graph
- grateful
- had
- hand
- Have
- he
- Held
- here
- Hidden
- High
- higher
- his
- HOT
- How
- How To
- HTTPS
- i
- ideal
- if
- implement
- implementing
- implements
- impressive
- improve
- improved
- in
- included
- information
- initially
- input
- inside
- instead
- interesting
- internal
- isolation
- issues
- IT
- ITS
- itself
- jpg
- keeping
- Lack
- Last
- lead
- leading
- LEARN
- like
- LIMIT
- limits
- Lot
- Low
- lower
- made
- Manufacturers
- many
- max-width
- maximum
- meaning
- measure
- mechanical
- medical
- Meet
- Memory
- might
- Modifications
- Month
- more
- Motor
- MOUNT
- much
- my
- needed
- normally
- number
- of
- off
- often
- on
- ONE
- online
- only
- onto
- opaque
- open
- optimized
- or
- Other
- our
- out
- outlet
- output
- part
- particularly
- pass
- past
- PCBs
- period
- placements
- platform
- Platforms
- plato
- Plato Data Intelligence
- PlatoData
- player
- plus
- possible
- potentially
- power
- practice
- preferred
- process
- produce
- producing
- Production
- professional
- Profile
- Profiles
- programmed
- project
- projects
- proper
- properly
- prototype
- provides
- Push
- Pushing
- quality
- quickly
- Radiation
- rather
- really
- reduce
- relatively
- require
- Requirements
- response
- rising
- rocket
- Run
- safely
- Safety
- sale
- Save
- seemed
- service
- setting
- several
- Shape
- Share
- shortcomings
- Sides
- Simple
- skills
- slow
- small
- So
- solution
- some
- sounded
- spent
- Stage
- Starfish
- station
- Strip
- Student
- Students
- such
- supersonic
- Surface
- Surrounding
- system
- team
- term
- test
- tested
- Testing
- than
- that
- The
- their
- Them
- There.
- thermal
- thermostat
- These
- they
- Think
- this
- Through
- throughout
- time
- to
- too
- transfer
- transparent
- turns
- type
- ui
- unit
- used
- using
- very
- Video
- Voltage
- volume
- Wall
- want
- was
- we
- WELL
- were
- which
- Wire
- with
- without
- Work
- worked
- working
- works
- would
- year
- you
- youtube
- zephyrnet