Recommendations to Avoid Non-Functional Cartridges
The popular Netflix series “The Walking Dead” is all about “Zombies” – people that look normal but lack the ability to function as normal. In microfluidics, there are cartridges that seem perfectly normal and functional but are not due to internal defects.
They are “the walking dead“ or “Zombie cartridges” destined to fail.
Designers and engineers try a variety of designs and techniques to increase functional success and production yield. During initial design and fabrication, microfluidic devices are produced manually, and a high failure rate is expected.
In general, the initial production will be very expensive with lots of failures and will be very unreliable. However, as maturity increases and volumes ramp-up, the functional cartridge yield will improve using automated systems. In this blog, we will explore early indicators that determine whether a cartridge will function as designed or fail during the assay protocol run.
Fabrication Methodologies
Microfluidic devices are fabricated using a variety of methodologies. For a simple design, a micro milling machine can be used. A photolithography technique is employed for a more complex design. For rapid prototyping, 3D printing is often used, while embossing and micromachining offer more stable production output at a small scale.
However, for mass production, manufacturing methods such as roll-to-roll, injection molding or printed microfluidics are the preferred route. These manufacturing methods require huge investments and production volume commitment.
If your microfluidic design has not yet been prototyped at small volume and tested using real samples, jumping to mass manufacturing is fundamentally not a good idea.
Many successful microfluidic designs and prototypes have been produced at a commercial scale and several vendors offer off-the-shelf microfluidic cartridges on the go. Service providers are available in Europe, Asia, and North America.
It is imperative to have a reliable and repeatable cartridge for use in analytical or pre-clinical testing requiring several hundred or thousands of units. With pricey reagents and samples, it is absolutely necessary to ensure the cartridge is functional and can run the assay protocol from start to finish.
7 “ZOMBIE” Microfluidic Cartridge Early Indicators
- Missing critical parts or features
A number of companies that built or were in the process of scaling-up their cartridge came to us because their current build was not reliable. Often, only 1 out of 5 cartridges will work and when the cartridge works, it works fine. But in most cases, it fails in the middle of a test run. We have noticed that several critical features needed for the assay protocol are overlooked.
As part of our standard procedure, we identify and list all critical parameters with sufficient detail. We start with a high-level assay workflow diagram with steps and processes mapped out. This might include input samples, output products and all the steps in between.
It is important to get advice from the assay development team and users with a list of critical features and parameters they believe will affect results. Some of this information may not be documented in detail or treated as common practice; however, it will surely affect the performance of the assay in microfluidic format.
Several cartridge components are highly dependent on the type of assay being used. These components include channel dimensions, reagent and mixing reservoirs, metering, incubation, actuation mechanism, off-the-shelf components integration, and interfaces.
The critical component features required by the assay will dictate parts, material selection, production, assembly and testing procedure.
Recommendation: To avoid missing critical component features, (a) have a clear assay workflow with important requirements listed, (b) create a detailed list of reagents including material compatibility, storage requirements, and fluidic characteristics, (c) list all the parts including dimensions, of off-the shelf components, (d) detailed step-by-step procedure, lastly (4) document notes and comments from the lab engineers or scientists that perform the assay protocol.
- Too Complex design
Over the years we have seen hundreds of microfluidic cartridge designs. During the initial fabrication build, approximately 75% of the designs end up in the garbage bin or become a zombie cartridge. Typically, the design is too complex and that leads to high failure rates.
It would be great to be able to accommodate all the assay workflow requirements and features. However, not everything can be integrated into a microfluidic cartridge due to the limited footprint. There is a sweet spot between which important processes should be implemented in the cartridge and which should be left out. Features that do not fit can be integrated into the instrument or done manually by the user.
As a rule, cartridge design simplicity is directly proportional to the build success rate.
Complex design introduces lots of features, however, each feature will add a potential failure mode. They also increase prototyping time, raw materials, and complexity during assembly. Design complexity impacts cartridge performance (reliability), manufacturability (repeatability of build, yield) and the cost per unit cartridge.
Recommendation: Identify and rank the importance of each assay step. Decide what is to be included in the cartridge and make necessary adjustments to the protocol. Consider focusing on assay requirements that are critical to the assay protocol and end-product. Successful cartridge designs often have only 2-3 important features, a mixing mechanism, fluid metering and interrogation zones for analytes detection.
- Use of wrong materials
Material mismatches will always create a zombie cartridge. Is the material selected compatible with the assay? Does the reagent require a hydrophobic or hydrophilic surface? Is the material optically transparent for the analyte’s detection?
These are some of the questions that need to be answered to ensure a healthy cartridge. For example, we selected PMMA as our material for a cartridge build. PMMA is optically transparent and can be milled or micromachined. However, it is less hydrophobic than other options. The PMMA material caused fluid to become trapped in the channels and reservoirs impacting the concentration and silently ruining the assay.
For years, microfluidic engineers have used Polydimethylsiloxane (PDMS) – a hydrophobic silicon-based organic polymer. This material is very popular for its inherent characteristics. It has good optical transparency suitable for imaging and microscopy, it is easy to fabricate and less costly than alternatives. It can also be fabricated with high resolution and fine features, and is gas permeable, which is excellent for cell culture.
However, in terms of scaling production this material is not a good choice. There are other plastic polymers that can be used such as Poly (methyl methacrylate) PMMA, polycarbonate and polystyrene. Depending on the assay, materials such as Poly (ethylene glycol), diacrylate (PEGDA), Cyclic Olefin Copolymer (COP), and Cyclic Olefin Polymer (COP) are good candidates.
Recommendation: To avoid zombies in your inventory, (a) check your stock material for the reagent you will use in the assay (chemical and biocompatibility); (b) review optical properties for analytes detection, (c) fabrication method to use (micro-machining, embossing, injection molding, etc.), (d) bonding properties and adhesives to use and lastly, (e) assembly workflow.
- Too many off-the-shelf (OTS) components
In an effort to speed the development of a cartridge, there is often a tendency to cut short the design and development processes. One common approach is to use and integrate off-the-shelf (OTS) components. Surely, using OTS components will save time and effort by not redesigning parts which are commercially available. The use of OTS components has its merits, however, using too many is a problem.
Why? In each OTS part, there is a need to design a coupling mechanism to the cartridge. This interface is a potential source of failure. Furthermore, if the OTS part footprint is large, this part will now dictate the overall dimensions of the cartridge, and the arrangement of other components. Specifically, OTS parts include valves, connectors, plugs, filters, tubes adaptors, pumps, reagents pack, inserts and more. The more OTS components integrated in the cartridge, the higher the chance of developing zombies.
Furthermore, in scaling up, such integration may cause issues in manufacturing. It will create additional steps and human intervention during assembly, reducing throughput as well as production yield. And ultimately, it will create an undesirable increase in the build cost of the cartridge. The OTS saving becomes a very expensive zombie cartridge.
Recommendation: As much as possible, limit the number of OTS components to a minimum. If the function of components can be embedded into the cartridge design, go for it. If OTS components cannot be avoided (i.e., valves), ensure that the interface to the cartridge is properly designed. It is a good design practice to contain OTS to essentials and explore creative ways to replace OTS functions that can be designed within the cartridge.
- Tolerancing
In many prototyping shops, it’s not unusual to see a garbage bin full of defective builds. This is the result of a failure to consider stack-up tolerance in the design. Depending on the fabrication method used, tolerances when stacking-up on layers of the cartridge during assembly may close or clog the channels and vias. This situation is difficult to notice because the cartridge will pass pressure decay and airflow tests but will produce erroneous outputs during the actual assay run. This is an indicator of a zombie build.
Considering that the channel dimension can be designed as small as 5um, proper calibration and maintenance for your fabrication machine is of prime importance to maintain a precise channel build. Vibration, temperature and build up materials can contribute to the accuracy of channel cuts. For a channel width of around 50-100um, adding extra tolerance on target dimensions could be employed to facilitate assembly.
When using laser cutter or precision micromachining, cutting performance can easily be set during calibration. For other methods, such as photolithography, embossing or injection molded, care should be implemented with the dimensions including tolerance. Most often, using reference designs generated from years of experience is very helpful.
Recommendation: For new fabrication technologies, conduct a detailed calibration and series of test runs to determine the various parameters crucial for optimum build. Obtain the CAD drawing and specifications for the channel, reservoirs, mixers, and OTS components (if any). Make a trial design layout and position the cartridge layers and other components using a guide pin. Decide on the fabrication method to use and adjust the tolerances accordingly. It is also important to maintain the overall dimensions of the cartridge relative to the instrument reader interface.
- Fabrication and assembly failure
If the cartridge is too difficult to fabricate and assemble, it will end up in the garbage bin or you have made a zombie cartridge. This is the result of a combination of previous factors mentioned and assembly processes. Any prototype cartridge that is too difficult to fabricate or assemble indicates potential assembly failure.
During the assembly it is crucial to have jigs and fixtures, particularly if the design involves a multilayer alignment and integration of OTS parts. In complex cartridges, there is a need for a computer controlled adhesive dispenser and alignment tools using a microscope camera for indexing and quality control monitoring.
An example of a critical assembly is multilayer bonding that requires alignment of through hole vias with tight tolerance. One misaligned via will make the cartridge non-functional. Furthermore, to maintain such alignment in all cartridges built, an optical aligner or pins are used to increase repeatability and manufacturing yield.
Recommendation: Initially create mock-up parts using rapid prototyping (laser cut or 3D printed parts) and create an assembly workflow using such parts. This will identify critical issues during the parts assembly and improve the process. Expect there will be design and process adjustments before the actual build.
- Unclear quality control process
The final step to avoid a zombie cartridge is having strong quality control test criteria. To set inspection criterion requires a microfluidic testing plan as the basis. In this plan, parameters to be tested must be identified and the acceptance threshold set.
In the cartridge prototyping process, usually the first 10 to 100 units built and assembled are treated as an initial trial build which is done manually. This means that all the parts and components should be checked and allowable deviation per lot is taken into consideration.
Recommendation: Clear and strict criteria will ensure functionality and repeatability of the build cartridge. The basic test procedures to be employed include pressure decay, fluid flow test, airflow test and detailed ocular inspections. These tests are non-destructive and can be run without the use of actual reagents. During the assembly of the initial unit, there should be a unit operational test with a quality control check point for each assembly process before proceeding to the next step. This will save a lot of effort and prevent wastage.
Conclusion
During the design process, it is very important to fully understand the assay workflow. Working with the assay developer or with laboratory engineers that routinely implement the assay procedure is necessary to have first-hand information about performing the assay protocol.
Microfluidic device prototyping is a process. It involves many elements and subsystems. The goal is to produce a working prototype that is repeatable, verifiable, and high yield. The 7 failure modes described above could create a zombie cartridge, but are not an exhaustive list. Many other possible zombie modes were not discussed. Translating an assay protocol to microfluidic format is not easy. It requires several considerations.
Following the rules, guidelines and recommended practices in this blog will improve the likelihood of creating a successful (living) microfluidic cartridge.
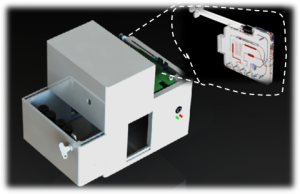
Image: StarFish Medical
Lorenzo Gutierrez is the StarFish Medical Microfluidics Manager. Lorenzo has extensive experience translating point of care assays to microfluidic cartridges. His microfluidics portfolio includes developing a polyvalence instrument for early infant diagnostics at Chipcare.
- SEO Powered Content & PR Distribution. Get Amplified Today.
- EVM Finance. Unified Interface for Decentralized Finance. Access Here.
- Quantum Media Group. IR/PR Amplified. Access Here.
- PlatoAiStream. Web3 Data Intelligence. Knowledge Amplified. Access Here.
- Source: https://starfishmedical.com/blog/indicators-of-non-functional-microfluidic-cartridges/
- :has
- :is
- :not
- $UP
- 1
- 10
- 100
- 300
- 3d
- 3D Printing
- 7
- 8
- a
- ability
- Able
- About
- above
- absolutely
- acceptance
- accommodate
- accordingly
- accuracy
- actual
- add
- adding
- Additional
- Adhesives
- adjustments
- advice
- affect
- All
- also
- alternatives
- always
- america
- an
- Analytical
- and
- any
- approach
- approximately
- ARE
- around
- arrangement
- AS
- asia
- assembled
- Assembly
- At
- Automated
- available
- avoid
- avoided
- basic
- basis
- BE
- because
- become
- becomes
- been
- before
- being
- believe
- between
- BIN
- Blog
- build
- builds
- built
- but
- by
- CAD
- came
- camera
- CAN
- candidates
- cannot
- care
- cases
- Cause
- caused
- cell
- Chance
- Channel
- channels
- characteristics
- check
- checked
- chemical
- choice
- clear
- Close
- COM
- combination
- comments
- commercial
- commercially
- commitment
- Common
- Companies
- compatibility
- compatible
- complex
- complexity
- component
- components
- computer
- concentration
- Conduct
- Consider
- consideration
- considerations
- contribute
- control
- controlled
- Cost
- costly
- could
- create
- Creating
- Creative
- criteria
- critical
- crucial
- Culture
- Current
- Cut
- cuts
- cutting
- decide
- dependent
- Depending
- described
- Design
- design process
- designed
- designs
- detail
- detailed
- Detection
- Determine
- Developer
- developing
- Development
- deviation
- device
- Devices
- difficult
- Dimension
- dimensions
- directly
- discussed
- Display
- do
- document
- documented
- does
- done
- drawing
- due
- during
- e
- each
- Early
- easily
- easy
- effort
- elements
- embedded
- employed
- end
- Engineers
- ensure
- essentials
- etc
- Ether (ETH)
- Europe
- everything
- example
- excellent
- expect
- expected
- expensive
- experience
- explore
- extensive
- Extensive Experience
- extra
- facilitate
- factors
- FAIL
- fails
- Failure
- Feature
- Features
- filters
- final
- fine
- finish
- First
- fit
- flow
- fluid
- focusing
- Footprint
- For
- format
- from
- full
- fully
- function
- functional
- functionality
- functions
- fundamentally
- Furthermore
- GAS
- General
- generated
- get
- Go
- goal
- good
- great
- guide
- guidelines
- Have
- having
- healthy
- helpful
- Hidden
- High
- High Yield
- high-level
- higher
- highly
- his
- Hole
- However
- HTTPS
- huge
- human
- hundred
- Hundreds
- i
- idea
- identified
- identify
- if
- Imaging
- impacting
- Impacts
- imperative
- implement
- implemented
- importance
- important
- improve
- in
- include
- included
- includes
- Including
- Increase
- Increases
- INCUBATION
- indicates
- Indicator
- Indicators
- information
- inherent
- initial
- initially
- input
- Inserts
- instrument
- integrate
- integrated
- integration
- Interface
- interfaces
- internal
- intervention
- into
- Introduces
- inventory
- Investments
- involves
- issues
- IT
- ITS
- lab
- laboratory
- Lack
- large
- laser
- layers
- Layout
- Leads
- left
- less
- LIMIT
- Limited
- List
- Listed
- living
- Look
- Lot
- machine
- made
- maintain
- maintenance
- make
- manager
- manually
- manufacturing
- many
- Mass
- material
- materials
- maturity
- max-width
- May..
- means
- mechanism
- mentioned
- method
- methodologies
- methods
- micro
- Microscope
- Microscopy
- Middle
- might
- minimum
- missing
- MIXERS
- Mixing
- Mode
- modes
- monitoring
- more
- most
- much
- must
- necessary
- Need
- needed
- Netflix
- New
- next
- normal
- North
- north america
- Notes
- Notice..
- now
- number
- obtain
- of
- offer
- often
- on
- ONE
- only
- operational
- optical
- optimum
- Options
- or
- organic
- Other
- our
- out
- output
- overall
- Pack
- parameters
- part
- particularly
- parts
- pass
- People
- perform
- performance
- performing
- PIN
- pins
- plan
- plastic
- plato
- Plato Data Intelligence
- PlatoData
- player
- Point
- polymer
- Polymers
- Popular
- portfolio
- position
- possible
- potential
- practice
- practices
- precise
- Precision
- preferred
- pressure
- prevent
- previous
- Prime
- printing
- Problem
- procedures
- process
- processes
- produce
- Produced
- Production
- Products
- proper
- properly
- properties
- protocol
- prototype
- prototypes
- prototyping
- providers
- pumps
- quality
- Questions
- rapid
- Rate
- Rates
- Raw
- Reader
- real
- recommended
- redesigning
- reducing
- relative
- reliability
- reliable
- repeatable
- replace
- require
- required
- Requirements
- requires
- Resolution
- result
- Results
- review
- Route
- routinely
- Rule
- rules
- Run
- runs
- Save
- saving
- Scale
- scaling
- scientists
- see
- seem
- seen
- selected
- selection
- Series
- service
- service providers
- set
- several
- Share
- Shelf
- shops
- Short
- should
- Simple
- simplicity
- situation
- small
- some
- Source
- specifically
- specifications
- speed
- Spot
- stable
- standard
- Starfish
- start
- Step
- Steps
- stock
- storage
- strict
- strong
- success
- successful
- such
- sufficient
- suitable
- surely
- Surface
- sweet
- Systems
- taken
- Target
- team
- techniques
- Technologies
- terms
- test
- Test run
- tested
- Testing
- tests
- than
- that
- The
- their
- There.
- These
- they
- this
- thousands
- threshold
- Through
- throughput
- time
- to
- tolerance
- too
- tools
- Transparency
- transparent
- treated
- trial
- try
- type
- typically
- Ultimately
- understand
- unit
- units
- unusual
- us
- use
- used
- User
- users
- using
- usually
- valves
- variety
- various
- vendors
- verifiable
- very
- via
- Video
- volume
- volumes
- walking
- was
- ways
- we
- WELL
- were
- What
- What is
- when
- whether
- which
- while
- Wikipedia
- will
- with
- within
- without
- Work
- workflow
- working
- works
- would
- Wrong
- years
- yet
- Yield
- you
- Your
- youtube
- zephyrnet
- zones