Judging has been completed and we now have the sixteen finalists for the “Freestyle” themed TeamLiquid Map Contest #19!
Before we present the maps, we’d like to thank Monster Energy for being the presenting sponsor of TLMC for the second straight contest. It’s been a trying year for the StarCraft II scene, and we really appreciate the amount of support Monster has put into it. Competitive StarCraft II wouldn’t feel complete without regular map rotations, and it’s a tradition that TL and Monster are proud to keep going.
Normally we would hold the TLMC test tournament shortly after announcing the finalists, but unexpected changes in the SC2 tournament calendar have forced us to shift our initial dates. The WardiTV TLMC test tournament will be held during December 20-23, with public voting starting afterward.
Here are some final notes as we announce the finalists.
- Maps are accompanied by comments from the map-maker.
- The maps are listed in random order (grouped by mapmaker), and do not reflect their score in judge voting.
- ESL will consider maps outside the sixteen finalists for inclusion in the competitive map pool.
All-Freestyle Contest
Maps in this category explore new ideas for how StarCraft II can be played. This category is intended for creative, unorthodox, and outside-the-box maps.
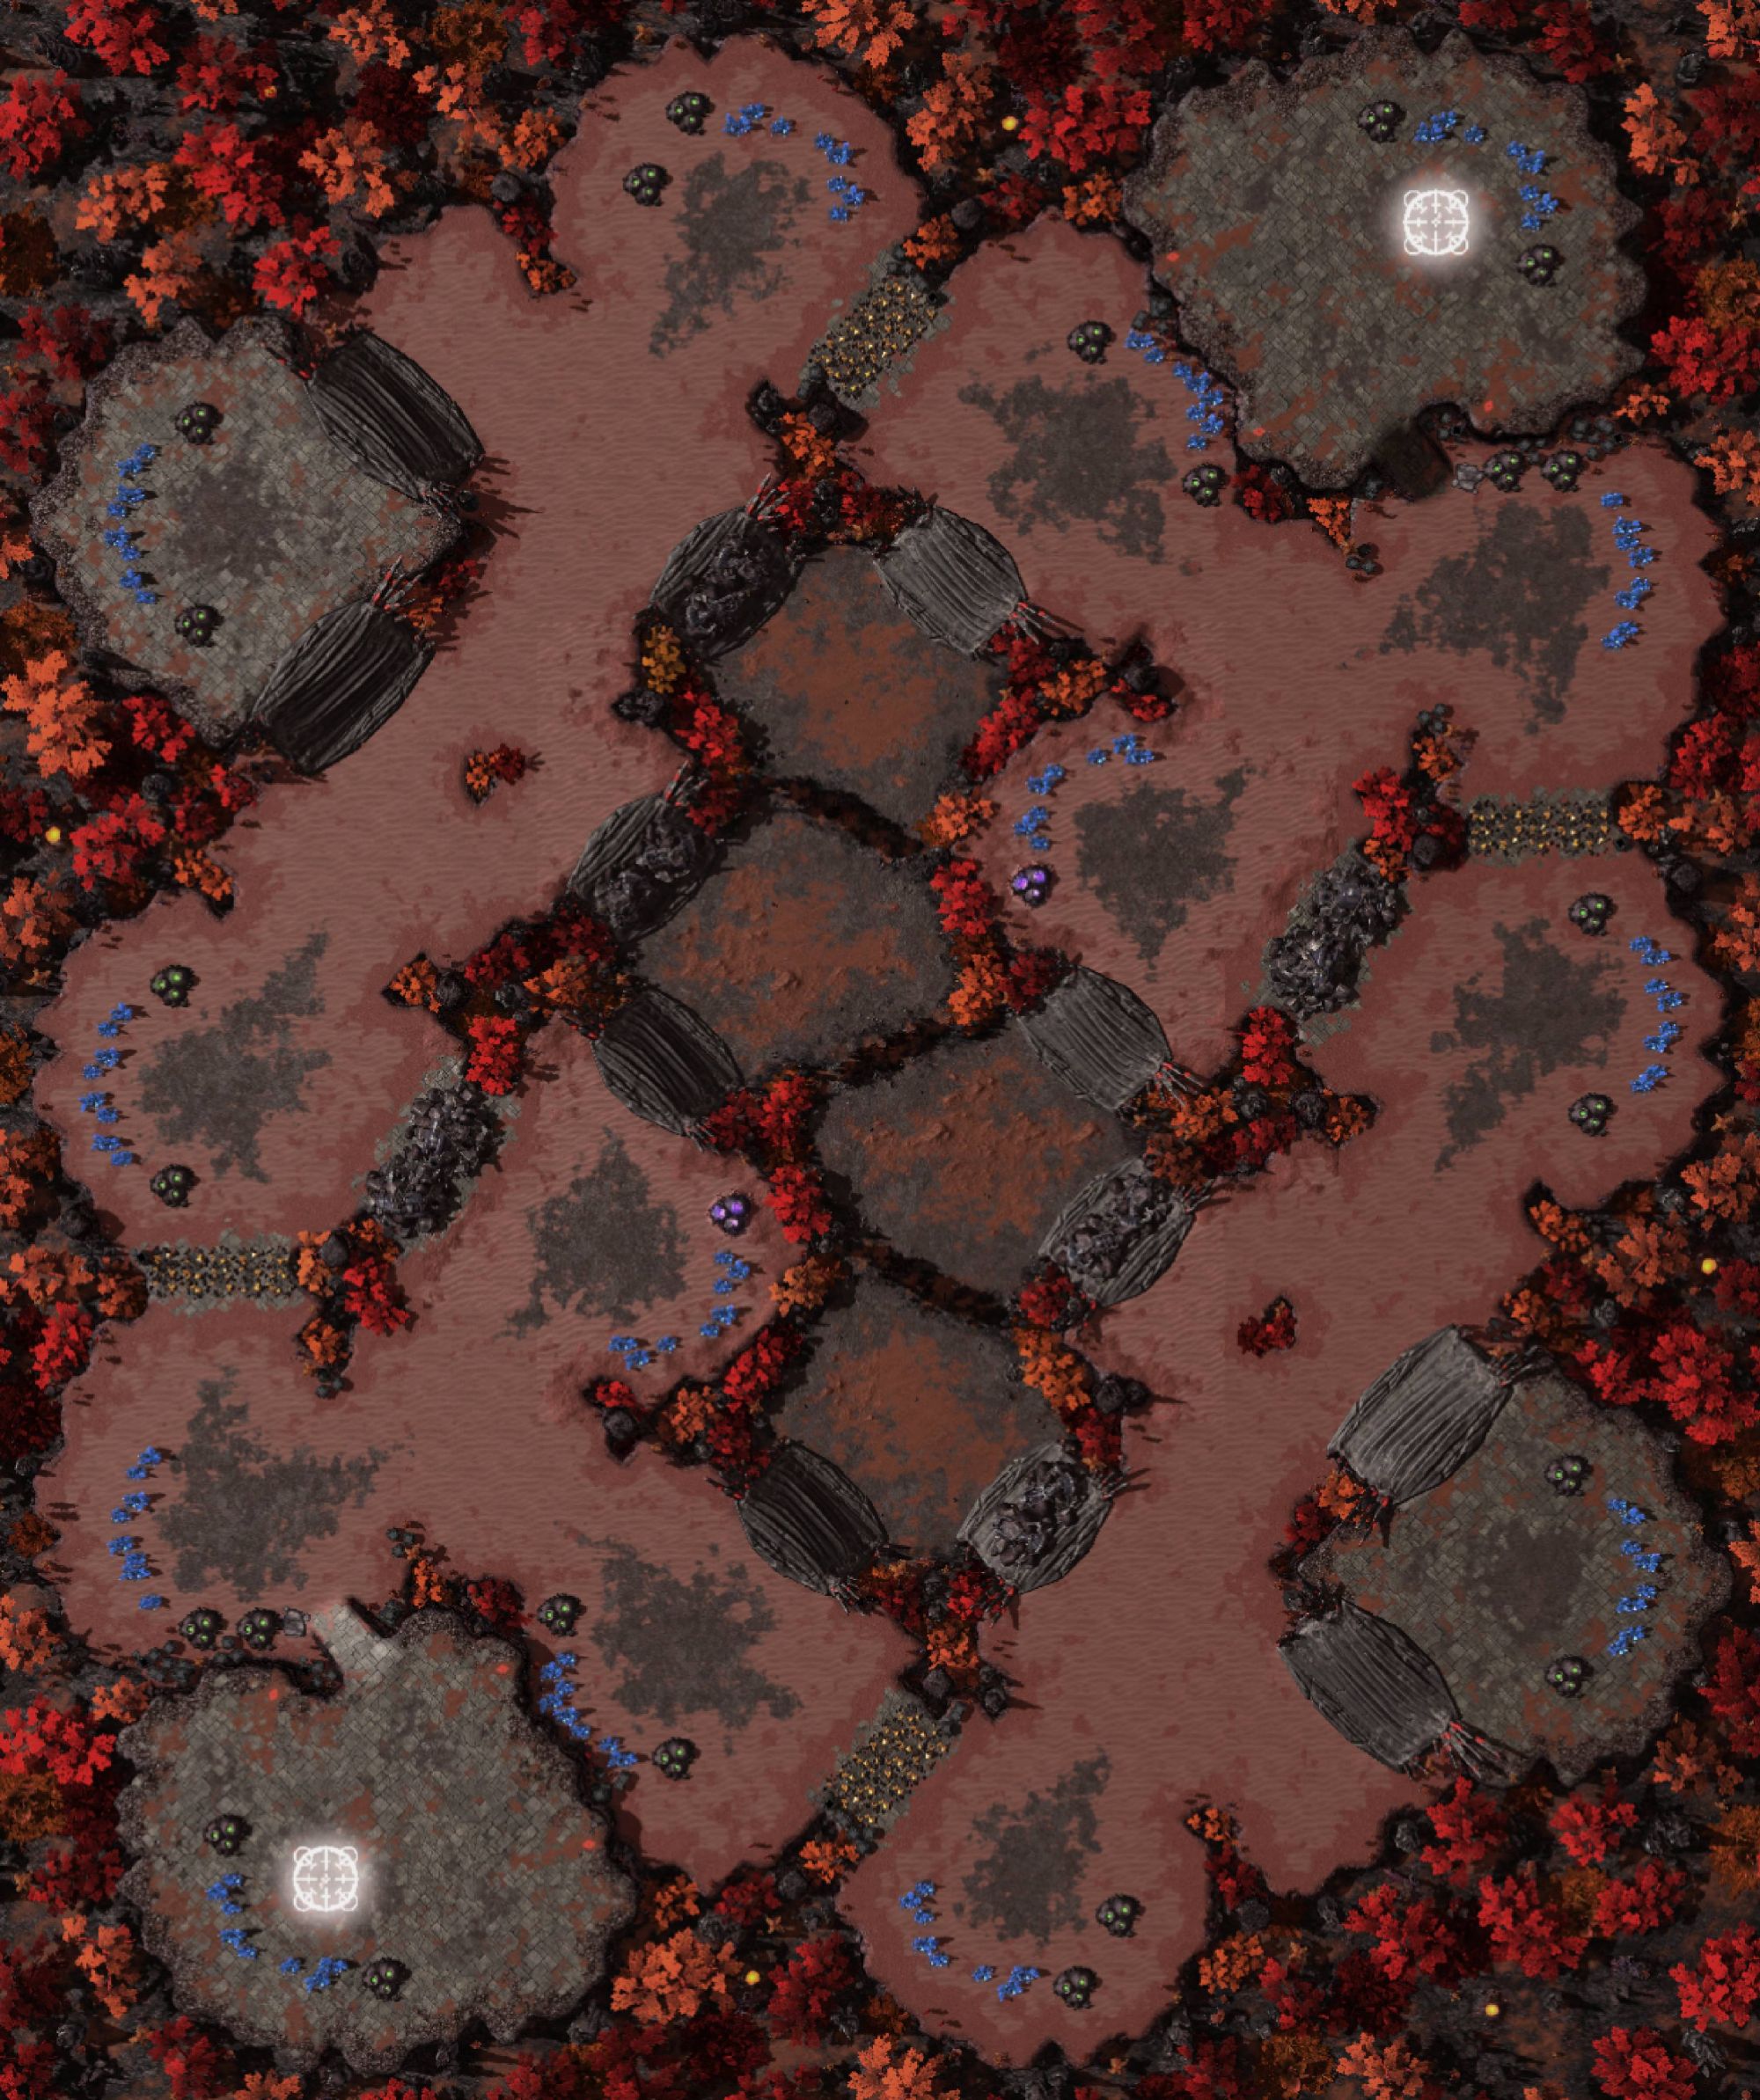
Dynasty
By: Agaton
 Dynasty is a smaller map featuring a backdoor gold expansion that is exposed but separated from the shortest attack path. The expansion is equipped with Vespene geysers on both sides, allowing players to choose between expanding early and taking on additional risks or to delay the expansion and take it from the other side.
At the start of the game, a small bridge is all that connects the center, but destroying the rocks next to it will gradually open up the map for much easier maneuvering.
Notable elements:
- Innovative backdoor gold expansion (6 nodes, 1 geyser, 1 rich geyser) which can be taken from either side.
- Destructible rocks that guide armies toward the sides until taken down.
- Reduced minerals at the pocket ramp for those who want to wall off. It also acts as a reaper wall as the reaper cliff is placed behind the triangular third, leading into the pocket expansion. Wall-off at pocket is also possible.
- And some really nice deco.
Insomniac Doze
By: depressed1
 Insomniac Doze is a freestyle category map with 5 fully utilized levels.The idea of the map is to change the dynamics of late game. After the fourth base you only have hybrid mineral + one rich Vespene geyser bases. Those bases provide you the same mineral and gas income, but with less workers needed (minus 7 workers and one gas). But at the same time they run out very quickly. So from one side you have free supply and a bigger army. But from the other side you can’t build an expensive late game army composition because of significantly less resources. Because of all that the map has additional bases and greater density. Which they are not so easy to hold, but they’re not as painful to lose either. And it is all mixed together with 5 levels.
Another feature of the map is the full frontal base behind the mineral line (10 minerals per patch). The idea of such a base is that you can’t build the base until you dig out the mineral line. So from one side you need to open an additional narrow path which can be problematic but from the other side you have a decent option for income without expanding to the sides. It is expected that such a base will end sooner than other bases.
Sulfur
By: depressed1
 Sulfur is a 4-level freestyle category map. Map offers you to play a game with a brand new natural base with double parallel ramps. Instead of choosing to merely exist and play standard third base, the map urges you to experience the parallel bases (including a golden base, semi-island base and follow up highground base!).
Initially the parallel ramp and corridor that leads to the golden base is closed. But you can open it by destroying rocks in the mineral line thereby connecting the map in one piece.
The map was designed to make sides of the map more active and aggressive. While the center of the map was pushed on low ground. Because of the layout specifics, corners were slightly deemphasized to not cause defensive and staid gameplay.
The slow zone should work as a defensive advantage with an option to quickly move to the center.
Another but not the last feature is a watchtower behind the golden base. The purpose of such a watchtower – simply to avoid injustice with the uncontrollable space behind parallel bases.
Destroying the watchtower will open a narrow path to the semi-island base.
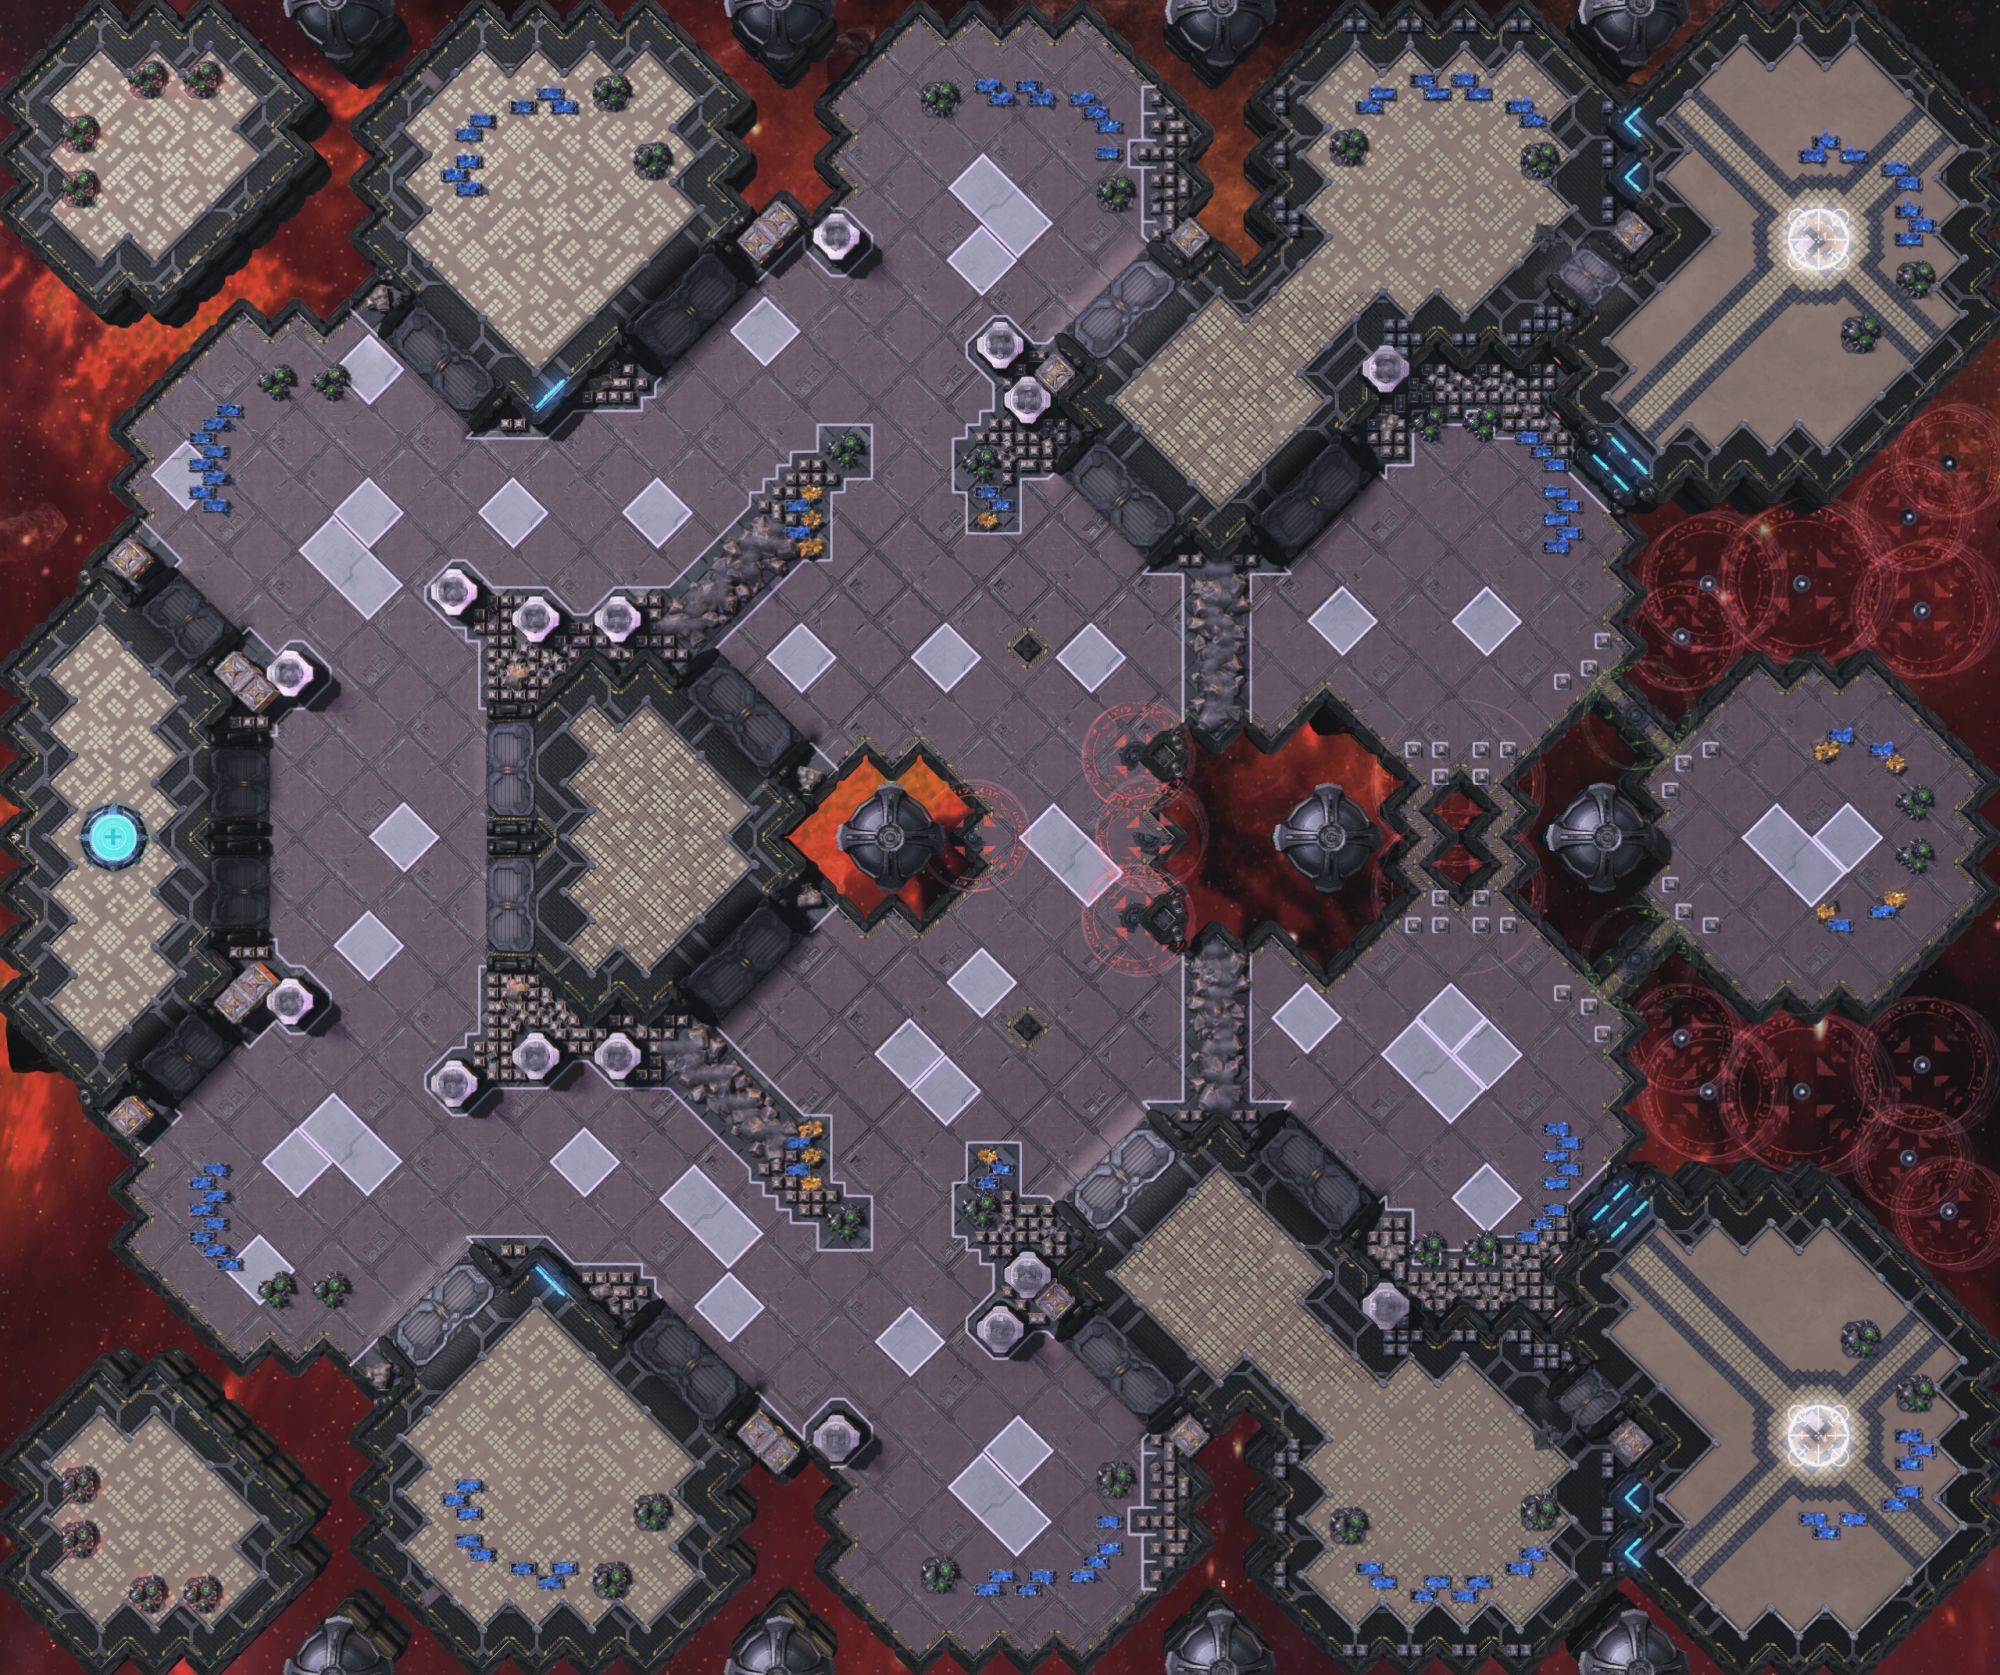
El Dorado
By: Eclipse
 Similar to Golden Wall, the bottom part of the map is sealed off by mineral walls, but rewards you by offering easy to take bases and a watch tower. The gold bases on each side with only one geyser are part of this wall and the mineral line is exposed at the back.
The middle wall has mineral patches of only 5 value, so it’s easy to open but can also be sealed off again by destructible rock towers. There are additional rock towers at the bottom gold base which can be used to block the ramps for some additional defenders advantage and give more incentive to be taken during the game.
- 13 blue, 2 gold near each main with only one geyser and a gold at the bottom center. (16 total)
- Golds near main act also as mineral walls, mineral lines are exposed at the back. These golds are also blocked from expanding by two 10 value mineral patches that first have to be mined out before taking the base.
- Ramp on the natural plateau leading down to the sealed off bottom area is blocked by 2 lines of 10 value mineral walls.
- Mineral wall in the center with only value of 5 each but can be sealed off again by destructible rocks
- Rock towers covering ramps at the bottom gold base
- Watch tower in the center covers both main rush paths through the center, can see if the gold bases on the left and right are taken and see if the rock towers at the bottom gold are being damaged.
Silverflame
By: KillerSmile
 Mining out the triangular 3rd base and destroying a rock leads into a safe halfbase behind your spawn position. Your natural has an opening blocked by 2 decaying spawning pools. The middle features small bridges, rocks, a watchtower, and a healing shrine behind a rich gas base.
Notable elements: Backdoor to halfbase in the back blocked by big rock and minerals of the triangle base. Backdoor to the front natural blocked by double row of neutral spawning pools. Spawning pools can only be attacked by 1 melee unit at a time and expire after 4 minutes in the game, at which point you can use the path to better access your 3rd base and more easily expand towards the bottom left of the map, where a healing shrine hides behind a rich gas base. Short rush distance rewards an aggressive playstyle, while the halfbase in the back is a good fallback option. In case of a contain you can destroy the big rock and mine the triangle base from the back.
sugomA
By: HyperONE
 sugomA is a modern interpretation of Ulrena.
Notable elements:
- Narrow bridges between triangle 3rds with IZGs permit scouting and early rushes, but cripple larger armies. Open areas on both sides buffer against siege pushes. Additional narrow bridges with AZGs lead to the almost-island base. The entrances into both sets of narrow bridges are lined with 1-hex crates to make walloffs more difficult.
- IZGs slow air travel between mains.
- Blackburn-style IZG choke in the middle lane. High-ground region to the left checks the power of the low-ground rich base.
- Reduced-value geyser-only island bases (4 geysers, 1000 gas/geyser).
- Xel’Naga Healing Shrine encourages use of the leftmost lane, and breaks the lategame split map in lieu of a base.
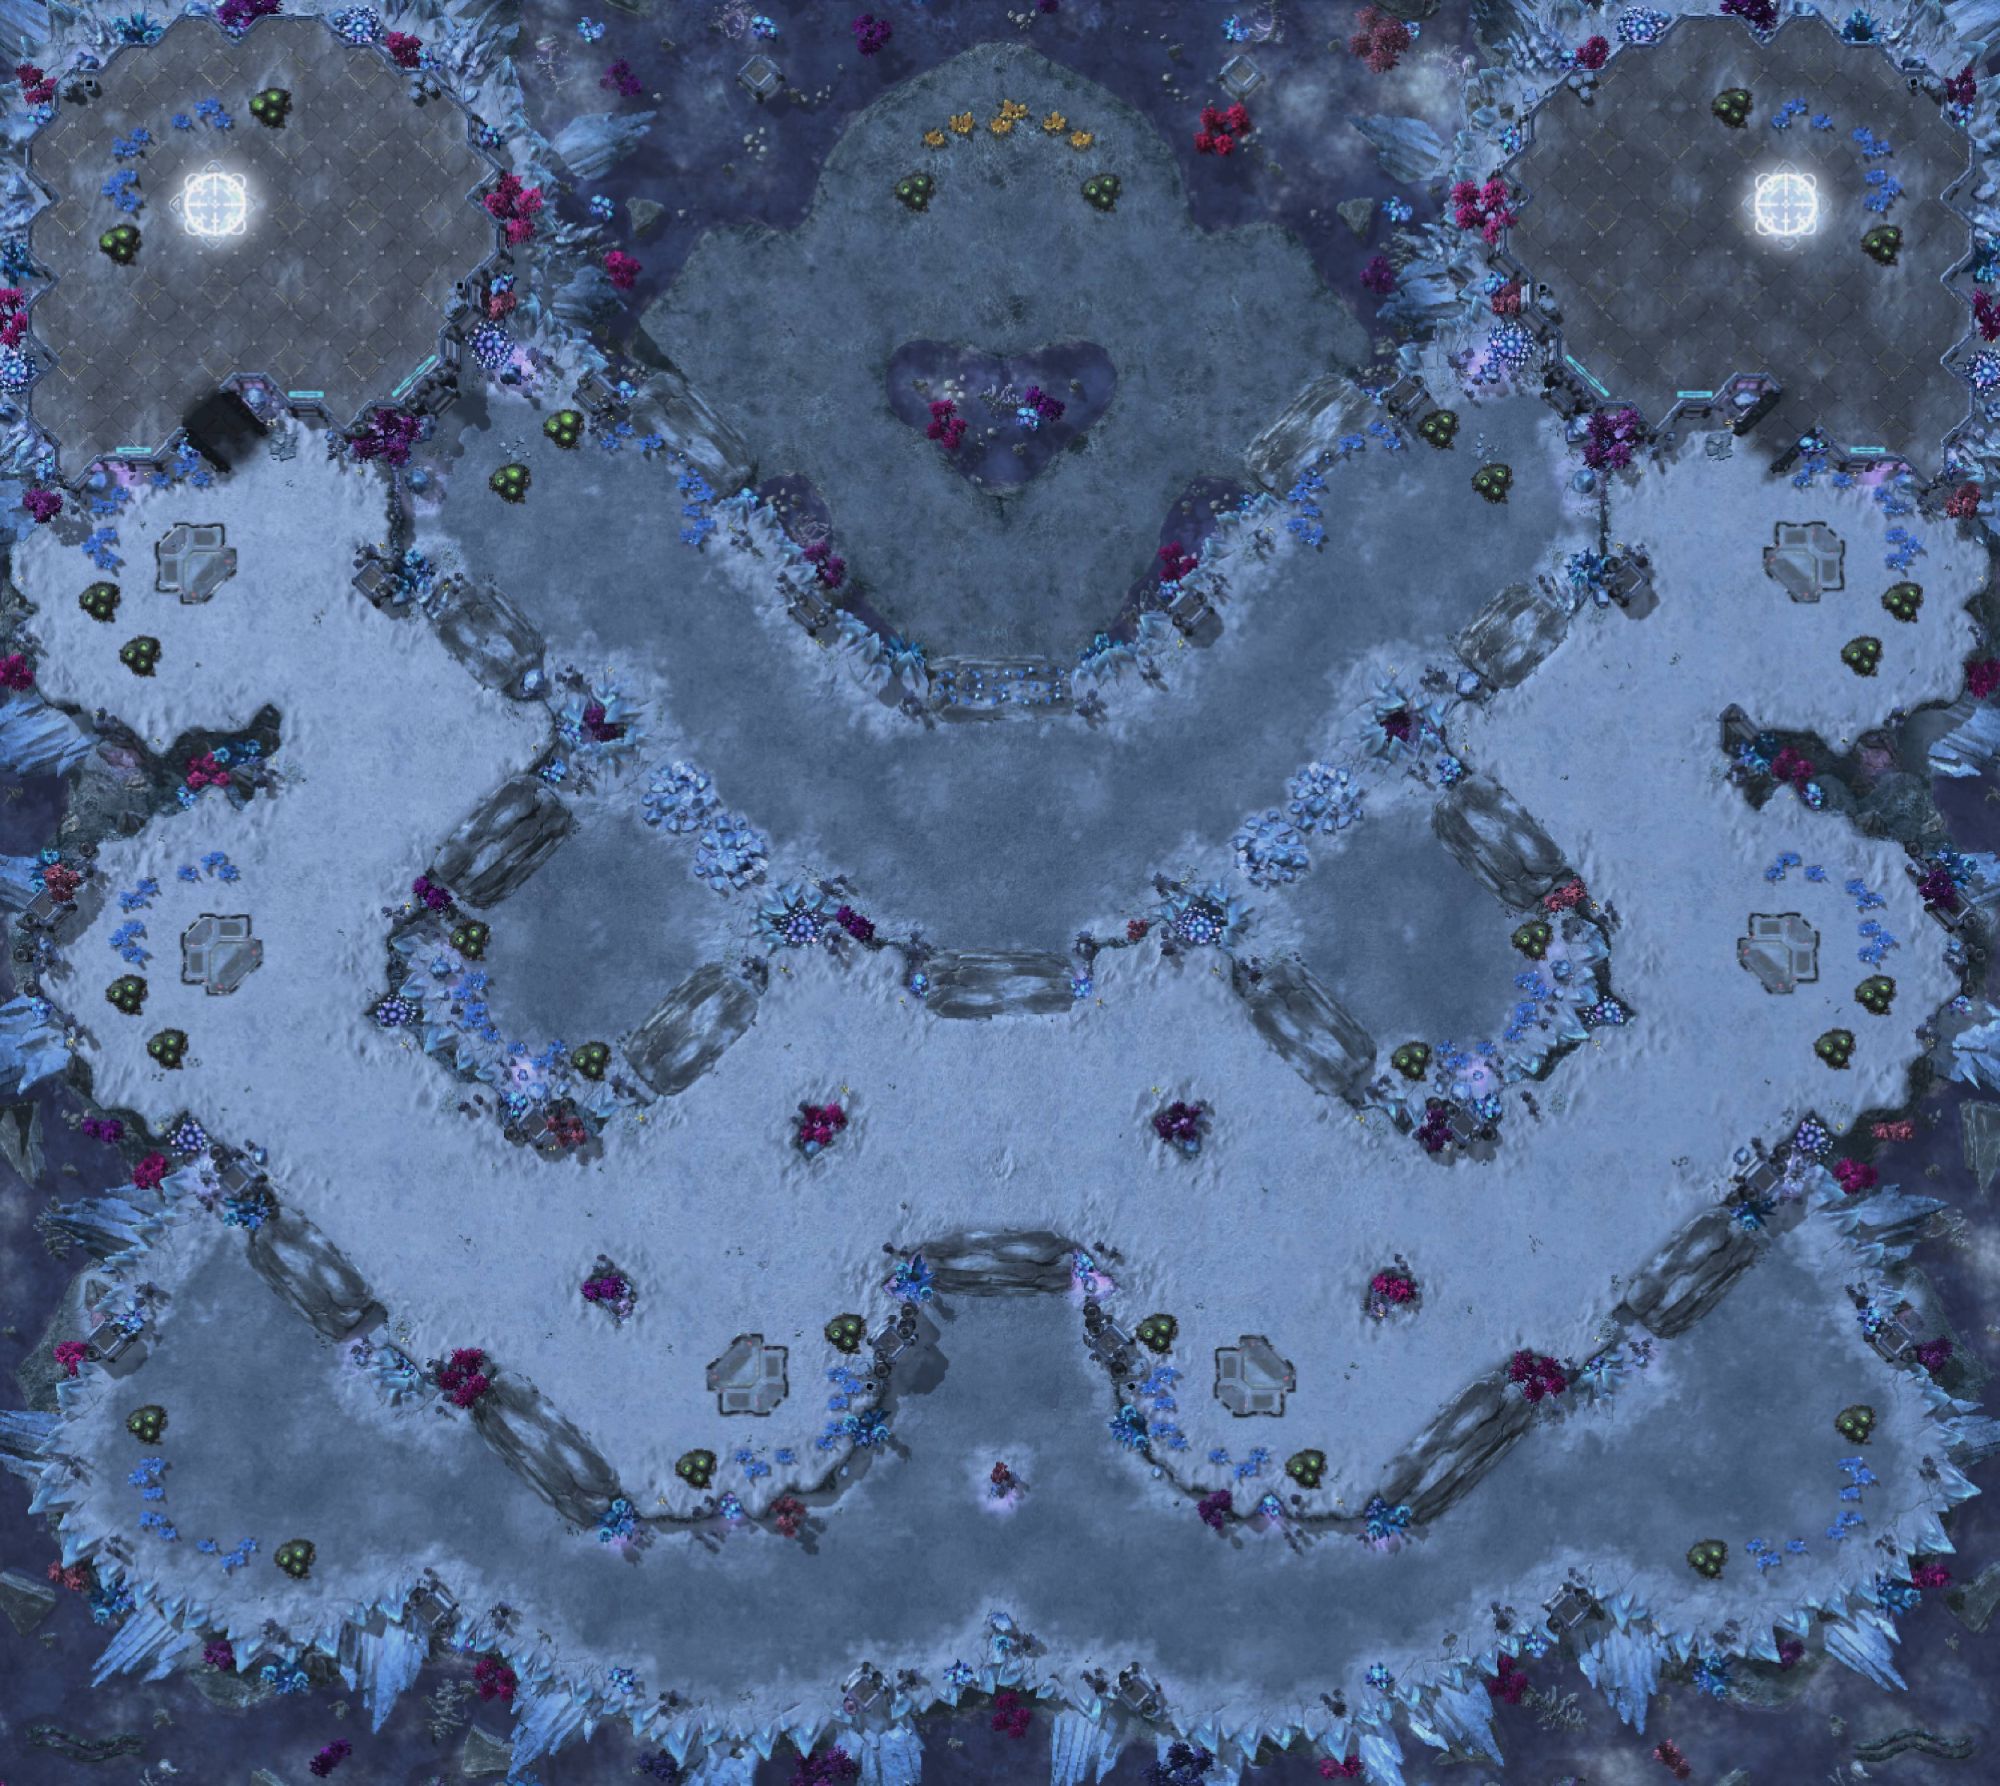
Ghost River
By Marras
 Ghost River is a rush map with 6 bases per player and only one third base option. The uppermost path between the players is blocked with six mineral patches with the value of 10 each, plus a destructible rock. There is also no overlord pillar at the natural, plenty of airspace, lots of rocks and some line of sight blockers on paths. The map also uses four cliff levels. To add some extra spice there is a healing shrine at the bottom middle area of the map.
Amphion
By: MayOnFire
 Natural expansions on this map have a backdoor with reduced minerals that leads to a safe pocket base. As tempting as it might seem, mining them out opens a direct path towards your opponent. Right side of the map has a restricting pathing that helps players secure bases by expanding into the middle.
Notable elements:
- 2 hybrid bases with gold minerals
- 2 Natural expansions have mineable backdoors with 2 rows of 5 minerals
- 2 Forward 4th/5th base has a mineral wall next to it – a single row of 5 minerals
- 2 Significantly faster distance by air than ground
- 2 Dynamic expansion pattern
Crimson King
By: MayOnFire
 This map introduces an alternative pattern of expansions to a standard triangular setup with slightly higher base density and a watch tower that can be used by both attacker and the defender.
Notable elements:
- Triangle base is replaced by a bridge and Xel’naga tower, but players still have an option to take a forward expansion situated in front of their natural
- Main base has a long cliff that is unblinkable and hard to siege
- Reapers and blink stalkers can access the base from the narrow back path (that is unavailable for tanks)
- The base situated on the low ground next to a Xel’naga tower has 10 mineral patches and 2 gas geysers to compensate for the distance, however it’ll most likely be only taken in the later stages if the game
- The gold expansion is meant to be taken in the middle to late game and is an important part of the expansion pattern, however due to distance and openness it’s hard to use it for early rushes
Gold Dust
By: MayOnFire
 This rush map features a simple four base setup that opens up once the rocks are destroyed. It allows fast army rotations for the attacker while providing interesting drop angles around an unusually positioned main base and a healing shrine pad that can be used to heal harassment units.
Notable elements:
- Unusually positioned main base inspired by Disco Bloodbath and Data-C
- Healing shrines next to the corners of the map that allow harassment units to heal
- Rush path goes through the middle
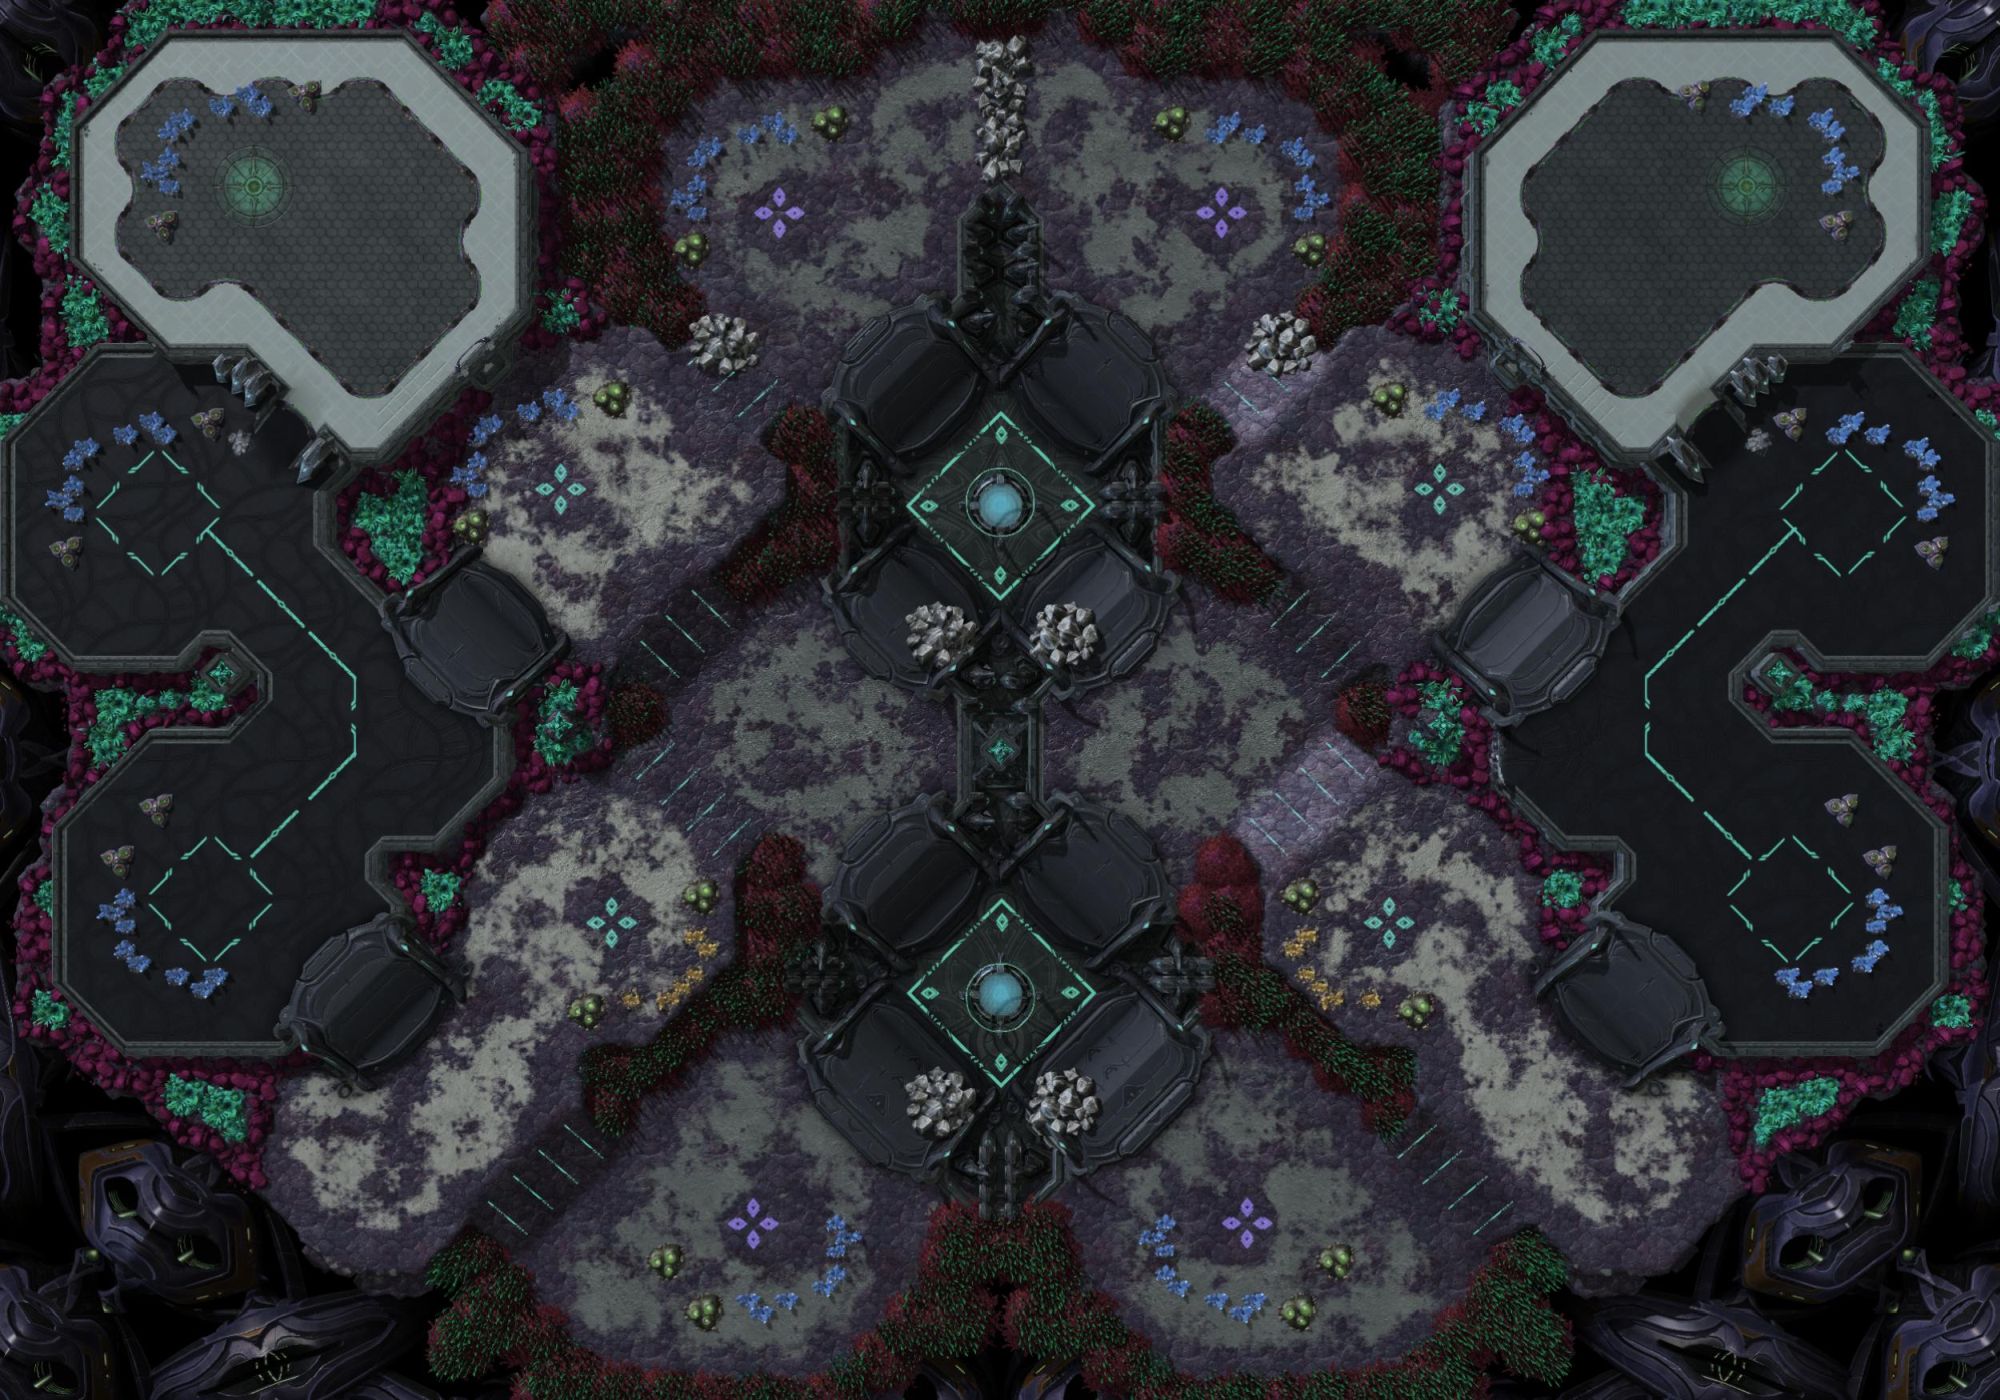
Crimson Court
By: monitor
 Crimson Court features a semi-island configuration where the sides of the map are blocked off by stacked destructible rocks and mineral walls. Players can choose to mine out the minerals or break the stacked rocks to expand.
Notable elements:
- Two gold mineral walls featuring 5 minerals per node: one at the natural and one at the third.
- Six sets of stacked destructible rocks leading to the “islands” – rocks are stacked in groups of 3 and use separate rock models for visual clarity in-game (rocks + debris). Rocks by the high yield base are 6×6 and rocks on ramps are 4×4, which both contain the same health and armor.
- Two high yield gas bases in the center of the map
- No minerals or CC/hatch/nexus can be hit by siege tanks from behind rocks or mineral walls. Careful placement of resources prevents cannon and tank spots.
Moonwater
By: monitor
 Moonwater features a semi-island area at the top of the map containing a gold base. To access the island, players must mine the central mineral wall or mine out their base below the natural. Each of these bases contains two extra mineral patches with 10 minerals per node for quick access to the island.
Notable elements:
- Semi-island area at the top of the map with a 6m2g gold expansion
- Central ramp mineral wall containing 3 rows of 5 min per node
- The expansions that form mineral walls to the semi-island (below each player’s natural) have two extra nodes with 10 minerals per patch. Mining these nodes can be done with four worker trips, allowing any size unit to quickly access the island.
Twilight Imperium
By: nyarla
 Rather defensive map where all attack paths go highground. Healing shrines at the center could compensate for disadvantages and help in attacking central bases, triangle third or golden base. (Air space blocker over healing shrine to prevent air units from using it.)
Anomaly Found
By: OmniSkeptic
 This map sets out to give the player maximum choice of base expansion patterns. In order to force players out of turtling positions, up to 8 bases have -33% reduced mineral/ gas count, especially the bases clustered around the center of the map (new to TLMC19). The rocks at the natural base have had their HP reduced upon game start to make it easier to break that set of ramps in the mid-lategame (new to TLMC19). Healing shrines reside in very conservative positions in the corners of the map, equipped with air blockers to prevent certain builds being overpowered (new to TLMC19).
Destroying rocks in the center of the map allow for more opportunities to flank fortified positions. Some expansions feature exposed mineral lines to provide the enemy with extra opportunities to break strong defensive setups. Bases with reduced resource counts have red warning lights on the geysers and the aesthetics of the mineral fields differ. Special thanks to Acheron and the Bing Bong Exports GMs.
Notable elements (PER SIDE):
- 3 gateway wall at natural
- Variety of expansion patterns
- 1 half base
- 2 -33% reduced (900-patch-only) resource bases
- 1 -33% reduced (900-patch-only) single rich gas base
- 1 Healing Shrine
- 1 Acceleration Zone
- 12 Identified [REDACTED]
Atlantis
By: Patches
 Destroying the destructible rocks or mining out the mineral wall in the main base leads to an additional backdoor expansion, which can serve as your natural. The 6×6 rocks in front of this base make it easier to defend early on.
The triangle rich base is designed to provide a quick boost of income, but quickly mines out due to having only 4 rich nodes (900 each) and two regular nodes. Taking the triangular base will also help defend the backdoor base.
The healing shrines on this map make use of a single air blocker to prevent air units from using it, this healing shrine will heal your units, but is also dangerous thanks to the slow zone added with the dead end.
Sacred Isle
By: Patches
 Inspired by Zen, features many diverse expansion paths. Each expansion path on Sacred Isle has various pros and cons, from their strategic location, resources, and safety. The pocket base leaves the main base vulnerable to drops, so taking the pocket may help defend against drops while being an overall safe option. Taking the rich gas base provides further protection against drops but puts you closer to your opponent.
The mineral walls contain rich mineral nodes that each take 2 trips to mine out, while opening up these paths makes your natural more vulnerable, they allow you to move your army more freely and expand in various directions.
The tight chokes have been combined with LOS blockers and acceleration zones to shorten some rotation distances, while also creating an interesting dynamic when it comes to engaging your opponent’s army.
Voting
Voting will begin in late December, following the TLMC Test Tournament.
Public voting via TL.net determines the final rankings in TLMC #19. All sixteen finalists, as selected by the judges, receive $200 per winning entry. The top five entrants, as determined by public vote, will be awarded additional winnings as follows:
First – $200
Second – $125
Third – $100
Fourth – $75
Fifth – $50
Maps that place high in TLMC #19 are not guaranteed to be added to the competitive ladder. ESL will reference the finalists, as well as other highly rated runner-up maps, and choose which maps to add at its own discretion.
Prize money has been provided by Monster Energy, and we thank them for their support of the map making community and competitive StarCraft II.
- SEO Powered Content & PR Distribution. Get Amplified Today.
- PlatoData.Network Vertical Generative Ai. Empower Yourself. Access Here.
- PlatoAiStream. Web3 Intelligence. Knowledge Amplified. Access Here.
- PlatoESG. Carbon, CleanTech, Energy, Environment, Solar, Waste Management. Access Here.
- PlatoHealth. Biotech and Clinical Trials Intelligence. Access Here.
- Source: https://tl.net/forum/starcraft-2/618794-team-liquid-map-contest-19-finalists
- :has
- :is
- :not
- :where
- $UP
- 1
- 10
- 11
- 13
- 16
- 17
- 20
- 26
- 3rd
- 7
- 8
- 9
- 900
- a
- acceleration
- access
- accompanied
- Act
- active
- acts
- add
- added
- Additional
- ADvantage
- After
- again
- against
- aggressive
- AIR
- air travel
- airspace
- All
- allow
- Allowing
- allows
- also
- alternative
- amount
- an
- and
- Announce
- Announcing
- any
- appreciate
- ARE
- AREA
- areas
- Army
- around
- AS
- At
- attack
- Attacking
- avoid
- awarded
- back
- backdoor
- Backdoors
- base
- BE
- because
- been
- before
- begin
- behind
- being
- below
- Better
- between
- Big
- bigger
- Bing
- Blink
- Block
- blocked
- Blue
- boost
- both
- Both Sides
- Bottom
- brand
- Brand New
- Break
- breaks
- BRIDGE
- bridges
- buffer
- build
- builds
- but
- by
- Calendar
- CAN
- careful
- case
- Category
- Cause
- Center
- central
- certain
- change
- Changes
- Checks
- choice
- Choose
- choosing
- clarity
- closed
- closer
- combined
- comes
- comments
- community
- competitive
- complete
- Completed
- composition
- Configuration
- Connecting
- connects
- Cons
- conservative
- Consider
- contain
- contains
- contest
- corners
- corridor
- could
- Court
- covering
- covers
- Creating
- Creative
- Dangerous
- Dates
- dead
- December
- Defenders
- defensive
- delay
- density
- designed
- destroy
- destroyed
- determined
- determines
- differ
- difficult
- DIG
- direct
- discretion
- distance
- diverse
- do
- done
- double
- down
- Drop
- Drops
- due
- during
- dynamic
- dynamics
- each
- Early
- easier
- easily
- easy
- either
- elements
- encourages
- end
- energy
- engaging
- entrants
- entry
- equipped
- ESL
- especially
- exist
- Expand
- expanding
- expansion
- expected
- expensive
- experience
- explore
- exports
- exposed
- extra
- FAST
- faster
- Feature
- Features
- Featuring
- feel
- Fields
- final
- finalists
- First
- five
- follow
- following
- follows
- For
- Force
- forced
- form
- Forward
- four
- Fourth
- Free
- freely
- from
- front
- full
- fully
- further
- game
- gameplay
- GAS
- gateway
- Geyser
- Give
- GMS
- Go
- Goes
- going
- Gold
- Golden
- good
- gradually
- greater
- Ground
- Group’s
- guide
- had
- Half
- harassment
- Hard
- Have
- having
- healing
- Health
- Held
- help
- helps
- High
- High Yield
- higher
- highly
- Hit
- hold
- How
- However
- HP
- HTTPS
- Hybrid
- idea
- ideas
- identified
- if
- ii
- important
- in
- in-game
- Incentive
- Including
- inclusion
- Income
- initial
- injustice
- inspired
- instead
- intended
- interesting
- interpretation
- into
- Introduces
- island
- IT
- ITS
- jpg
- judge
- judges
- Keep
- ladder
- Lane
- larger
- Last
- Late
- later
- Layout
- lead
- leading
- Leads
- left
- less
- levels
- lights
- like
- likely
- Line
- lined
- lines
- Liquid
- Listed
- ll
- location
- Long
- los
- lose
- lots
- Low
- Main
- make
- MAKES
- Making
- many
- map
- Maps
- maximum
- May..
- meant
- merely
- Middle
- might
- min
- mine
- mined
- mineral
- minerals
- mines
- Mining
- minutes
- mixed
- models
- Modern
- money
- more
- most
- move
- much
- must
- narrow
- Natural
- Near
- Need
- needed
- net
- Neutral
- New
- next
- nice
- no
- node
- nodes
- Notes
- now
- of
- off
- offering
- Offers
- on
- once
- ONE
- only
- open
- opening
- Openness
- opens
- opportunities
- Option
- or
- order
- Other
- our
- out
- outside
- over
- overall
- own
- pad
- painful
- Parallel
- part
- Patch
- Patches
- path
- paths
- Pattern
- patterns
- per
- piece
- Pillar
- Place
- placed
- placement
- plato
- Plato Data Intelligence
- PlatoData
- Play
- played
- player
- players
- Plenty
- plus
- Point
- pool
- Pools
- position
- positioned
- positions
- possible
- power
- present
- prevent
- prevents
- PROS
- protection
- proud
- provide
- provided
- provides
- providing
- public
- public vote
- purpose
- pushed
- pushes
- put
- Puts
- Quick
- quickly
- Ramp
- Ramps
- random
- rated
- RE
- really
- receive
- Red
- Reduced
- reference
- reflect
- region
- regular
- replaced
- resource
- Resources
- restricting
- Rewards
- Rich
- right
- risks
- River
- Rock
- ROW
- Run
- rush
- s
- safe
- Safety
- same
- scene
- score
- Second
- secure
- see
- seem
- selected
- separate
- serve
- set
- Sets
- setup
- shift
- Short
- Shortly
- should
- side
- Sides
- Sight
- significantly
- Simple
- simply
- single
- situated
- SIX
- Size
- slow
- small
- smaller
- So
- some
- Space
- Spawn
- special
- specifics
- spice
- split
- sponsor
- spots
- stacked
- stages
- standard
- Starcraft
- start
- Starting
- Still
- straight
- Strategic
- strong
- such
- supply
- support
- T
- Take
- taken
- taking
- tank
- Tanks
- team
- Team Liquid
- test
- than
- thank
- thanks
- that
- The
- their
- Them
- Themed
- There.
- thereby
- These
- they
- Third
- this
- those
- Through
- time
- TL.net
- to
- together
- top
- Total
- tournament
- toward
- towards
- Tower
- tradition
- travel
- trying
- two
- uncontrollable
- Unexpected
- unit
- units
- until
- upon
- urges
- us
- use
- used
- uses
- using
- utilized
- value
- various
- very
- via
- visual
- Vote
- Voting
- Vulnerable
- Wall
- want
- warning
- was
- Watch
- we
- WELL
- were
- when
- which
- while
- WHO
- will
- winning
- winnings
- with
- without
- Work
- worker
- workers
- would
- wouldn
- year
- Yield
- you
- Your
- Zen
- zephyrnet
- zones